
Restore From BDRSuite Client GUI
Your files and folders can now be restored easily through BDRSuite Client for Files & Applications and do not require any help from administrators. More than one file can be restored at a time from the BDRSuite Client for File Servers simultaneously.
From the Restore tab, click the Restore option that is available alongside the backup you want to restore. The plugin type will also be displayed near the backup name. Begin your restore process.
Step 1: Choose Restore Point
- A tree listing various backup time-stamps with the full backup as its parent node will be displayed. This list generated is based on incremental and retention configured. If Additional Full backup is configured, then there will be more than one parent node list based on the configuration.
- Select the time-stamp from which you want to restore data and proceed to select files/folders. The IP address of the backup server and the name of the backup you are restoring will be available just in case you have selected another backup for restore. The Restore version will be in the following format: Day/Date/Month/Year/Hours/Minutes/Seconds. Click Next to select the Files/Folders for restore.
Step 2: Select Files/Folders
Your backed up files and folders will be available in a Tree format based on the chosen time-stamp. Select the required files/folders and click Next to proceed with the restore process.
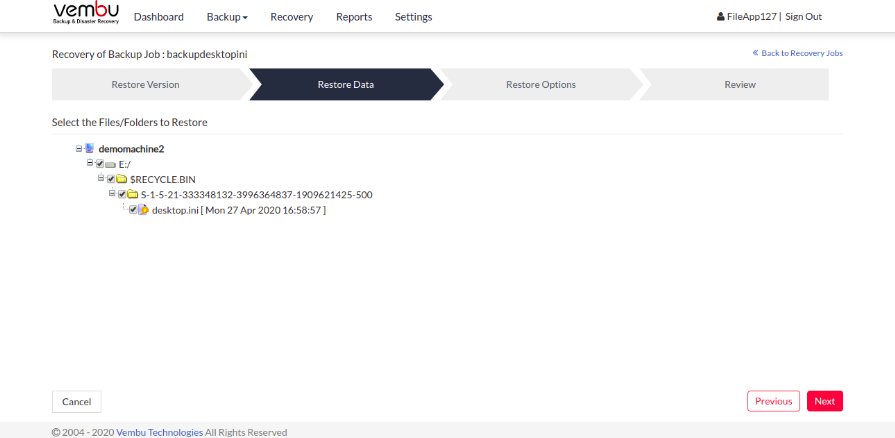 You can select files/folders in 3 ways. You can either:
- Select the root folder to proceed with restoring the entire backed-up data for the chosen time-stamp.
- Select specific files and folders alone based on requirement and proceed with the restore.
Step 3: Restore Options
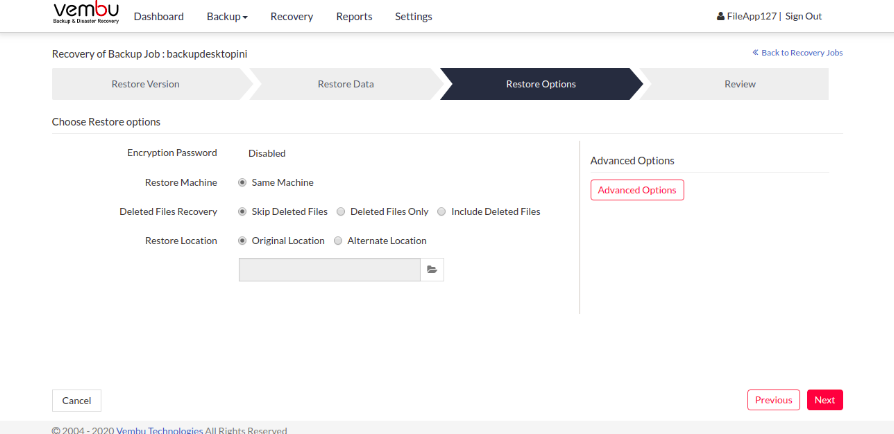 Password Protected
– This option will display whether the backup is password protected. If encrypted, provide the respective password.
Password Protected
– This option will display whether the backup is password protected. If encrypted, provide the respective password.
Restore Machine – This option will display the machine to which the restore is happening. In this case, the client machine is the restore machine.
Restore deleted files – You have 3 options to configure from:
- Skip deleted files (Restore backup data skipping deleted files) – Choosing this option will not restore the deleted files and skip them instead.
- Deleted files only (Restore deleted files alone) – This option will restore the files that are deleted alone and omit the other backed up data from the restore process.
- Include deleted files (Restore backup data along with deleted files) – This option will restore the backup data along with the deleted files.
Restore to(This gives two optional locations to choose from):
- Original location- This option is available only if the backup is restored to the same machine, where the backup data is restored to its original folder location.
- Alternate location- This option allows you to restore the backup to a different location, where backup data is restored in its original folder structure.
Note: If the source file is already present in the restore location, then the restored file will be saved with an extension ‘*.sg’. ( This can be changed using “Advanced Options”).
Advanced Options
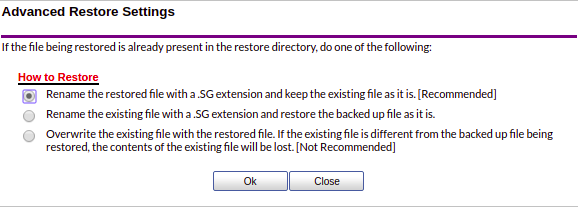 When backup data is restored, it is possible that source files are already present in the restore location. In this case, BDRSuite Client for File Servers will retain the source file by default and restore files by renaming with a *.sg extension.
‘Advanced Settings’ allow alternate options to change this, they are:
- Rename the restored file with *.SG extension and keep existing files (This is the default option selected).
- Rename the existing file with *.SG extension and restore the backup file as it is.
- Overwrite the existing file with the restored file. (If the existing file is different from the backed-up file restored, the contents of the source files will be lost. Choose this option if you are sure that the current file can be overwritten).
Step 4: Review Configurations
 You have reached the final step of the restore process wherein you have to review the configuration you have provided and click Restore Now option. This will trigger the restore process. Review restore progress and make sure it gets completed successfully.
You can abort your restore if not required from the Abort (-) option available in that window. You will get a pop-up as shown below. Click OK to Abort your restore.
Note: To enhance your restore performance, close the progress window and open it only occasionally to check the restore progress.
You can suspend your restore if not required from the Suspend option available in that window. You will get a pop-up as shown below. Click OK to Suspend your restore.