
Read on:
Beginners’ Guide for Microsoft Hyper-V: Overview of Hyper-V – Part 1
Beginners’ Guide for Microsoft Hyper-V: How to Install Microsoft Hyper-V Using Server Manager – Part 2
Beginners’ Guide for Microsoft Hyper-V: How to Install Microsoft Hyper-V with PowerShell – Part 3
Read More
Introduction
Undoubtedly on your Hyper-V journey, you will want to learn about running Windows Kubernetes using Hyper-V as the backing virtualization technology for spinning up your container hosts. We have previously learned about running Microk8s as a Windows Kubernetes platform. One of the crucial aspects of running a Kubernetes cluster is providing ingress to internal Kubernetes cluster services. An ingress controller usually handles this task. Let’s see how we can spin up an ingress controller in Microk8s to create ingress connections to our services.
Cluster IP vs. NodePort vs. LoadBalancer
Kubernetes is the standard container management platform allowing organizations to run containers with high availability and automated resource scheduling. However, compared to traditional infrastructure, some complexities get introduced with Kubernetes and serving out applications from Kubernetes clusters.
With Kubernetes, the services exist “inside” the cluster and are not exposed to the outside world by default. However, there are a few ways to handle ingress traffic into the cluster. These include the following:
- ClusterIP – ClusterIPs are generally configured by default once a service has been provisioned in the cluster. The ClusterIP address is only accessible from within the Kubernetes cluster, including from other containers
- NodePort – With NodePort configuration, a port is opened on every node in the Kubernetes cluster. When traffic is received on the specific configured port on a host, it is then forwarded to the destination ClusterIP. There is a specific range available for NodePort, ports 30,000 to 32,767
- LoadBalancer – The LoadBalancer is the preferred method for Kubernetes installations as they exist in the cloud. A cloud controller will automatically provision and reclaim the IPs configured. On-premises self-hosted Kubernetes clusters need to have a LoadBalancer configured to provision IP addresses for services. A popular solution for this is MetalLB
Using the above connection mechanisms, we can allow outside traffic to enter the Kubernetes cluster and access internal cluster services. However, there is another way to access internal services that is much more efficient compared to the above mentioned service access mechanisms. It is the ingress controller.

What is a Kubernetes ingress controller
An ingress resource is a special resource deployed in the Kubernetes cluster that proxies service requests coming into the cluster for specific applications. It internally routes traffic based on rules configured to allow routing requests to internal services. The ingress controller is a special resource configured like any other service, as it must have a NodePort or LoadBalancer to expose itself to the external network.
The typical way of routing services with ingress is taking a DNS name and mapping the DNS name to a Kubernetes service hosted internally. Once the request is received for that specific DNS name, the ingress controller routes the request to the appropriate internal service.
Ingress controllers can be used to configure services with the following:
- External URLs
- Load balance traffic
- Terminate SSL
- Name-based virtual hosts
As a note, you can deploy multiple ingress controllers in a Kubernetes cluster if needed. In addition, many free and open-source ingress controllers are available for use, including NGINX, HAProxy, and Traefik. Let’s look at setting up ingress in our Windows Kubernetes cluster running in Microk8s.
Setting up a LoadBalancer for the ingress controller
Since we are self-hosting our Windows Kubernetes cluster with Microk8s, let’s enable MetalLB to automatically assign an IP address to the ingress controller we will configure. To enable MetalLB in our Microk8s installation, we run the following command:
- sudo microk8s enable metallb:10.1.149.119-10.1.149.121
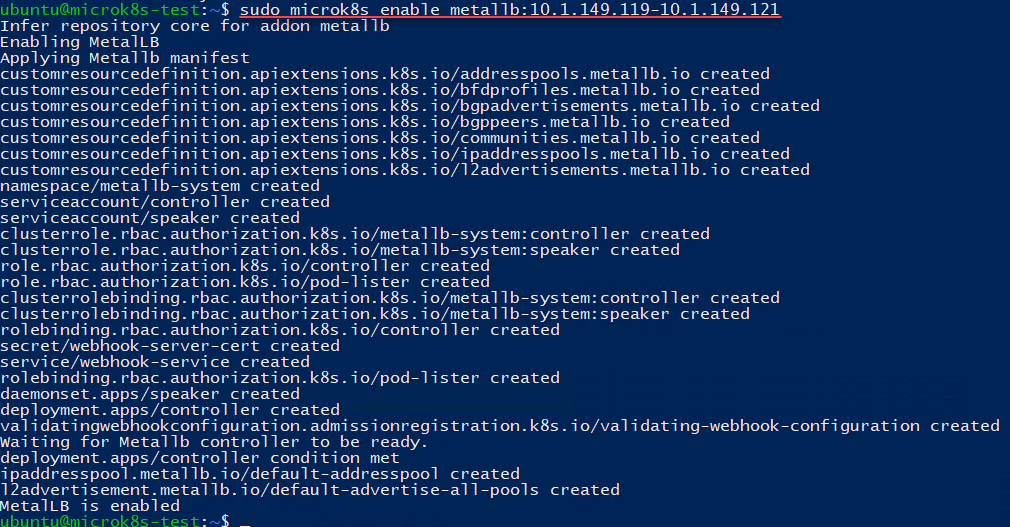
Once we have MetalLB installed and configured in Microk8s with an IP range for handing out IP addresses, we can now install our ingress controller. The ingress controller will pull an external IP address from the IP range configured from the MetalLB installation. This IP will be the external IP address we can use for routing ingress traffic to internal Kubernetes services with the ingress routing rules.
Installing Traefik
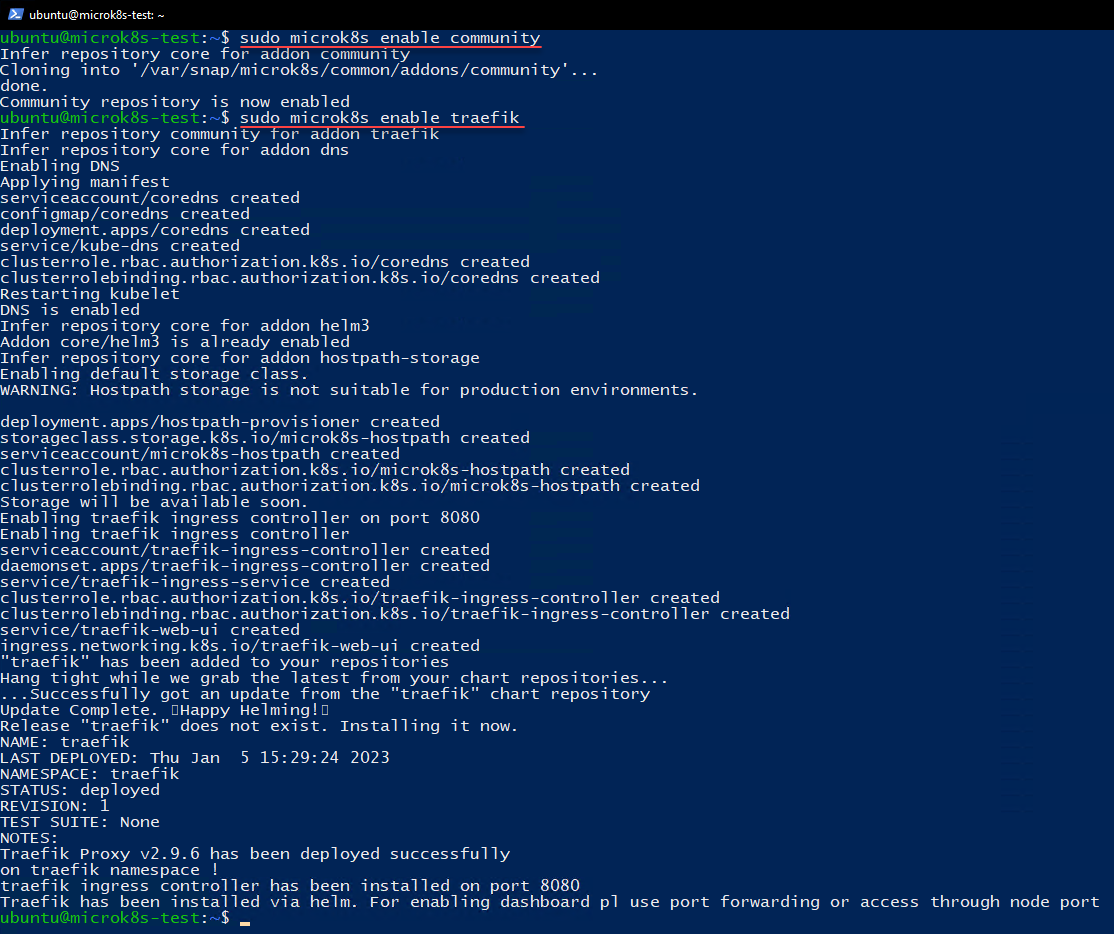
One of the popular free and open-source ingress controllers available is Traefik. It provides many powerful features and a GUI that can be enabled for monitoring and visualizing ingress routes. In Microk8s, the process to enable a Windows Kubernetes ingress controller is the simple command:
- sudo microk8s enable community
- sudo microk8s enable traefik
Now, we can check the Traefik ingress controller to see if it has pulled an IP address from the MetalLB load balancer.
- sudo microk8s kubectl get all -A
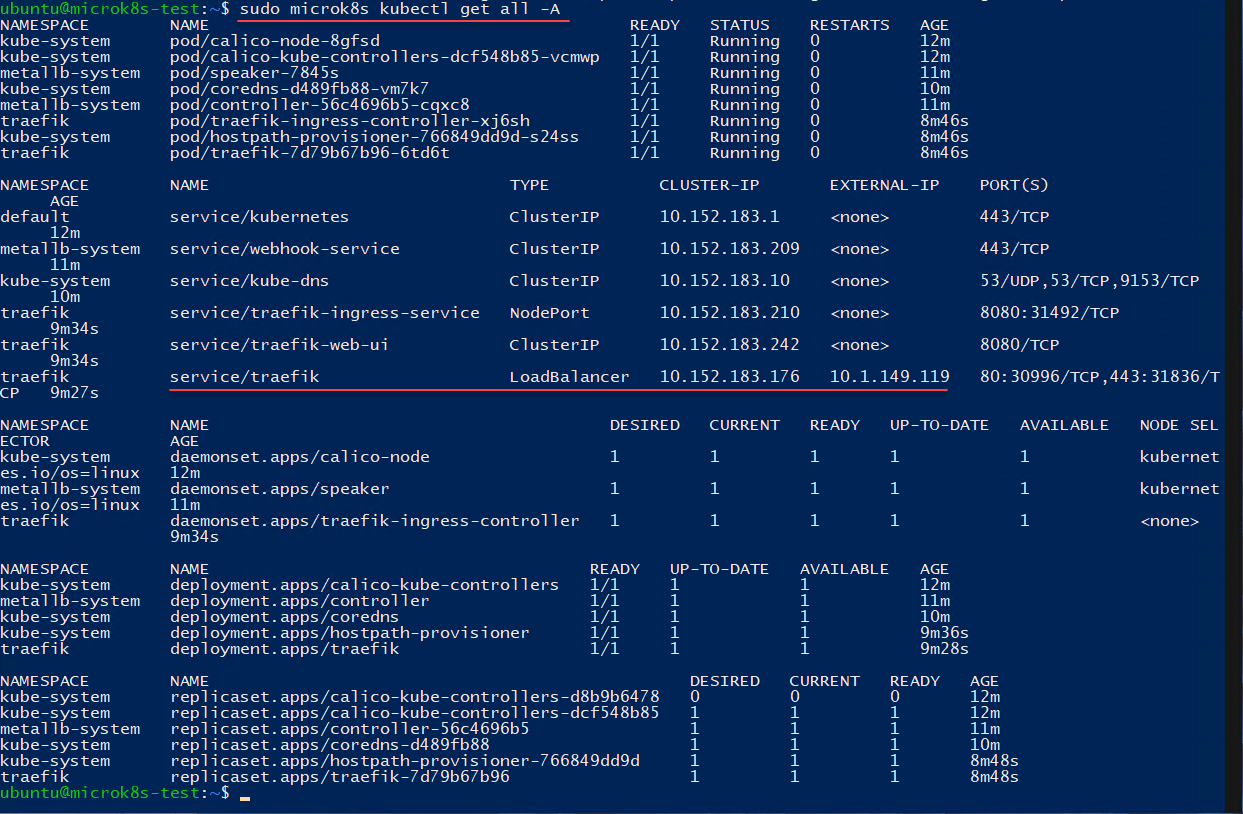
The Traefik service has pulled one of the IP addresses from the configured range of IP addresses from the MetalLB load balancer. Now, we can begin setting up ingress configuration for our Kubernetes services inside the Microk8s cluster.
Windows Kubernetes ingress controller FAQs
What are the ways you can get traffic into a Kubernetes cluster?
With Kubernetes, services can be configured with type ClusterIP, NodePort, and LoadBalancer. Each of these configurations has pros and cons. ClusterIP is configured by default. However, it is only accessible inside the Kubernetes cluster by other containers. NodePort allows creating a high port 30000-32767 on the host and passing this into the ClusterIP for the service. LoadBalancer allows assigning an external IP address to each internal service. However, by default, there is no built-in LoadBalancer in Kubernetes. You have to supply your own with MetalLB, etc.
Why is ingress desirable for production environments?
First, Ingress and ingress controllers help to get traffic into your Kubernetes cluster. You can then allow traffic to your ingress controller using NodePort or LoadBalancer, and then use the ingress controller to route traffic to the desired internal connection.
Why do we need a load balancer in bare metal environments?
Kubernetes does not have a built-in LoadBalancer. Since Kubernetes was written for cloud-native environments, it expects a cloud controller to supply the LoadBalancer IP, such as you would find with cloud provider environments. However, in an on-premises self-hosted environment, this is not available, so you have to supply your own load balancer.
Wrapping Up
Hopefully, this look at ingress and Windows Kubernetes ingress controllers helps explain the concepts involved with getting traffic into a Kubernetes cluster to services that exist inside the cluster. Next, we will take a look at configuring an ingress route to an internal service.
Beginners Guide for Microsoft Hyper-V: How to Install Microsoft Hyper-V in Windows Server Core – Part 4
Beginners Guide for Microsoft Hyper-V: Remote Management of Hyper-V – Part 5
Beginners Guide for Microsoft Hyper-V: How to Install Hyper-V Server – Part 6
Beginner’s Guide for Microsoft Hyper-V: What is Azure Stack HCI – Part 7
Beginner’s Guide for Microsoft Hyper-V: Windows Admin Center Hyper-V Management – Part 8
Beginner’s Guide for Microsoft Hyper-V: Configuration of Hyper-V Networking Best Practices – Part 9
Beginner’s Guide for Microsoft Hyper-V: Hyper-V Storage Best Practices and Configuration – Part 10
Beginner’s Guide for Microsoft Hyper-V: How to build a Virtual Lab with Hyper-V – Part 11
Beginner’s Guide for Microsoft Hyper-V: Top 10 PowerShell Commands for Hyper-V – Part 12
Beginner’s Guide for Microsoft Hyper-V: How to Create a Hyper-V Virtual Machine – Part 13
Beginner’s Guide for Microsoft Hyper-V: Hyper-V Shared Storage for Beginners – Part 14
Beginner’s Guide for Microsoft Hyper-V: How to Create Hyper-V Cluster – Part 15
Beginner’s Guide for Microsoft Hyper-V: What is Non-Uniform Memory Access (NUMA) – Part 16
Beginner’s Guide for Microsoft Hyper-V: Hyper-V Dynamic Memory – Part 17
Beginner’s Guide for Microsoft Hyper-V: Cluster Aware Updating (CAU) – Part 18
Beginner’s Guide for Microsoft Hyper-V: Hyper-V Containers – Part 19
Beginner’s Guide for Microsoft Hyper-V: Managing Windows Server Containers with Windows Admin Center – Part 20
Beginner’s Guide for Microsoft Hyper-V: What are Hyper-V Checkpoints – Part 21
Beginners Guide for Microsoft Hyper-V: How to Create Cluster Shared Volumes (CSVs) – Part 22
Beginners’ Guide for Microsoft Hyper-V: VHD vs VHDX Vs AVHD/AVHDX: Overview of Virtual Disk Formats – Part 23
Beginners’ Guide for Microsoft Hyper-V: Hyper-V Live Migration – Part 24
Beginners’ Guide for Microsoft Hyper-V: Hyper-V High Availability – Part 25
Beginners’ Guide for Microsoft Hyper-V: How to Export and Import Hyper-V VM’s – Part 26
Beginners’ Guide for Microsoft Hyper-V: How To Install Docker Container on Windows Server – Part 27
Beginners’ Guide for Microsoft Hyper-V: How to Run Linux Containers on Hyper-V – Part 28
Beginners’ Guide for Microsoft Hyper-V: Containers vs Virtual Machines – Part 29
Beginners’ Guide for Microsoft Hyper-V: What is Azure Arc VM Management – Part 30
Beginners’ Guide for Microsoft Hyper-V: Azure Features in Windows Admin Center – Part 31
Beginners’ Guide for Microsoft Hyper-V: What is Microsoft Azure Arc – Part 32
Beginners Guide for Microsoft Hyper-V: How to Create a Virtual Switch in Hyper-V using Windows Admin Center – Part 33
Beginners Guide for Microsoft Hyper-V: Managing Hyper-V Server with Azure Arc – Part 34
Beginners Guide for Microsoft Hyper-V: Learn How to Install MicroK8s on Windows Kubernetes – Part 35
Beginners Guide for Microsoft Hyper-V: Top 8 Basic Docker Commands You Should Know – Part 36
Beginners’ Guide for Microsoft Hyper-V: Windows Docker Container Networking in Hyper-V – Part 37
Beginners’ Guide for Microsoft Hyper-V: How to run IIS in Docker Container – Part 38
Beginners’ Guide for Microsoft Hyper-V: How to install and run Linux on Windows with WSL – Part 39
Beginners’ Guide for Microsoft Hyper-V: How to use Multipass on Windows Hyper-V – Part 40
Follow our Twitter and Facebook feeds for new releases, updates, insightful posts and more.