
Read on:
Beginners’ Guide for Microsoft Hyper-V: Overview of Hyper-V Part 1
Beginners’ Guide for Microsoft Hyper-V: How to Install Microsoft Hyper-V Using Server Manager – Part 2
Beginners’ Guide for Microsoft Hyper-V: How to Install Microsoft Hyper-V with PowerShell – Part 3
Beginners Guide for Microsoft Hyper-V: How to Install Microsoft Hyper-V in Windows Server Core – Part 4
Beginners Guide for Microsoft Hyper-V: Remote Management of Hyper-V – Part 5
Beginners Guide for Microsoft Hyper-V: How to Install Hyper-V Server – Part 6
Beginner’s Guide for Microsoft Hyper-V: What is Azure Stack HCI – Part 7
Beginner’s Guide for Microsoft Hyper-V: Windows Admin Center Hyper-V Management – Part 8
Beginner’s Guide for Microsoft Hyper-V: Configuration of Hyper-V Networking Best Practices – Part 9
Beginner’s Guide for Microsoft Hyper-V: Hyper-V Storage Best Practices and Configuration – Part 10
Beginner’s Guide for Microsoft Hyper-V: How to build a Virtual Lab with Hyper-V – Part 11
Beginner’s Guide for Microsoft Hyper-V: Top 10 PowerShell Commands for Hyper-V – Part 12
Beginner’s Guide for Microsoft Hyper-V: How to Create a Hyper-V Virtual Machine – Part 13
So far, we have talked about working with local storage for virtual machines running in Hyper-V. However, as we start to consider building out a highly available solution for running virtual machines on top of Hyper-V, we need to have shared storage attached to the Hyper-V host. Why is this? How do we set up shared storage on a Hyper-V host? First, let us look at Hyper-V shared storage for beginners and see how we can introduce this configuration.
Why do you need shared storage?
To truly unlock the power of today’s modern virtualization platforms like Hyper-V, shared storage is a requirement. Why? When running virtual machines on local storage, if the host goes down, there is no way to have another hypervisor host assume the responsibility of running the VM. It is now inaccessible to any other host.
When you run virtual machine resources on local storage, the VM’s availability is only as good as the host it is running on. Therefore, even if you are running a cluster of Hyper-V hosts, if the virtual machine resides on the local storage of one of the Hyper-V cluster hosts, it will still be unavailable to the other Hyper-V hosts in the cluster.
Shared storage between Hyper-V hosts allows all hosts in the Hyper-V cluster access to the storage location where the virtual machines reside. With a shared storage configuration, all Hyper-V hosts can run any virtual machines on the shared storage. If a Hyper-V host fails, another host can be used to run the virtual machines that were running on the failed host.

As we begin to see, shared storage unlocks a Hyper-V cluster configuration’s potential to ensure workloads are highly available. It also provides a quick and easy way for resources across a cluster to be balanced using Hyper-V Live Migration. During a Live Migration using shared storage, the virtual machine storage is not moving, only the memory and processing footprint.
With the capability of Live Migration, admins can perform maintenance operations on each Hyper-V host without disrupting the workloads running in the Hyper-V cluster. Additionally, they can migrate VMs off a specific host so the host can go down for maintenance, updates, and other lifecycle operations.
Types of shared storage
What types of shared storage are available for use with Microsoft Hyper-V? Admins can configure traditional and software-defined storage technologies as shared storage in Hyper-V. Traditional technologies generally enter the format of SAN devices or disk shelves that attach to the Hyper-V hosts, either directly or using the network. These include:
- iSCSI
- Fiber Channel
- Direct Attached SCSI
- NVMe over Fabric
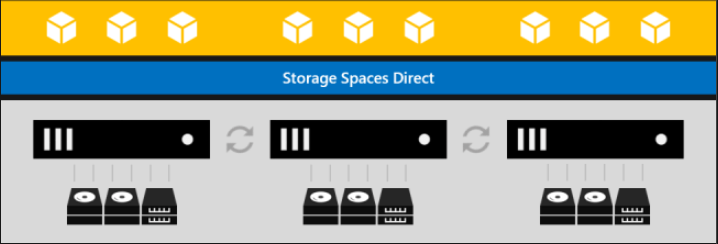
Microsoft’s software-defined storage technology for provisioning shared storage includes Microsoft’s Storage Spaces Direct (S2D) technology. Like technologies from other vendors, like VMware vSAN, Storage Spaces Direct pools locally attached storage into a logical storage pool of useable, high-performance storage for running virtual machines and other resources.
It may appear counterintuitive that local storage attached to each Hyper-V host could be shared, especially since we have differentiated between local and shared storage. However, using the software-defined storage layer of Storage Spaces Direct, S2D can create the logical storage volume from locally attached storage and present this to each host as a single storage volume.
You can learn more about Storage Spaces Direct (S2D) here: Storage Spaces Direct overview – Azure Stack HCI | Microsoft Learn
Attaching shared storage to a Hyper-V host
Let’s now see how to attach shared storage using a simple example of connecting an iSCSI LUN to a Hyper-V host. The iSCSI storage protocol has long been a standard in the enterprise and allows encapsulating storage traffic in Ethernet packets. It enables taking advantage of existing network infrastructure to allow virtualization hosts and other types of servers to share storage between them.
Here, we have a Windows Server 2022 host in the lab environment we want to connect to a shared iSCSI LUN. A LUN is a logical storage unit presented using the iSCSI protocol. An iSCSI LUN is comprised of several underlying disks configured in a RAID array. However, servers attached to a storage LUN do not see the underlying disks, only the logical storage presented.
To add an iSCSI LUN in Windows Server 2022, let’s type the command iscsicpl.exe. You will see the below message presented, noting the Microsoft iSCSI service is not running. It will ask if you want to start the service and set it to automatic.
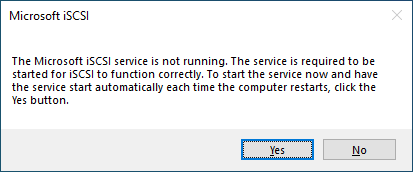
As noted by the message, we want to automatically start the service because the storage attached using iSCSI will only be visible if the service is started.
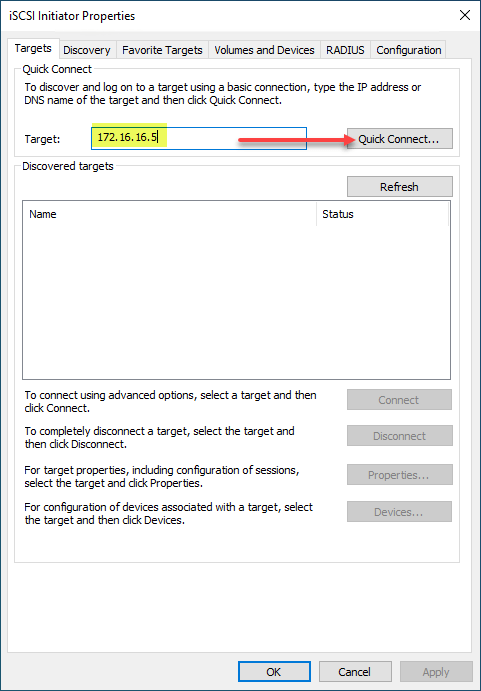
On the iSCSI Initiator Properties screen, we will type in the IP or FQDN of the iSCSI portal target (the server hosting the ISCSI LUN).
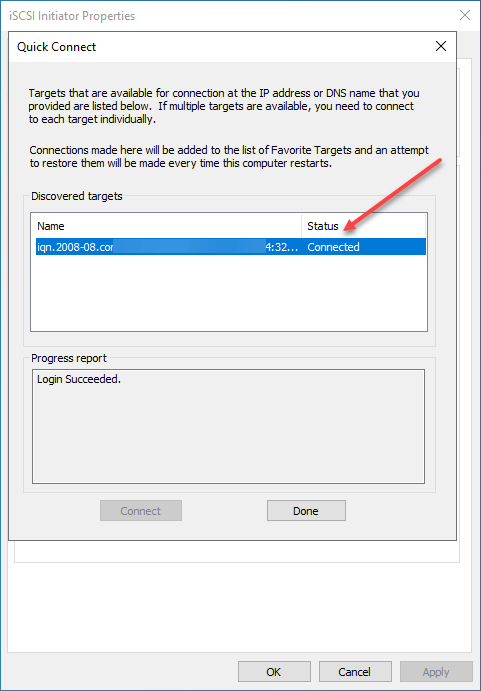
Once you click the Quick Connect button, you should see the connected message under the Status column.
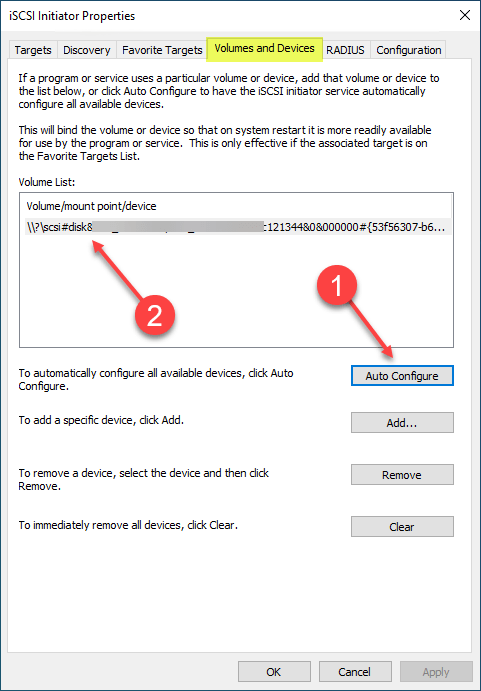
After successfully connecting to the iSCSI target, navigate to the Volumes and Devices tab and click the Auto Configure button. You should see the configured storage target appear as a volume mount point. Click OK.
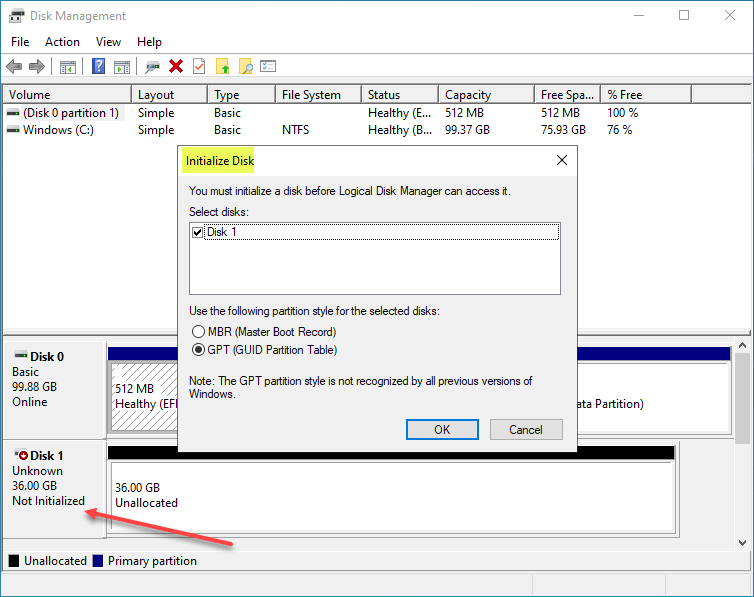
Now, we can open Disk Management and begin the typical configuration process to initialize the new disk and create storage. First, select your Disk and partition style for the initialization process. Then click OK.
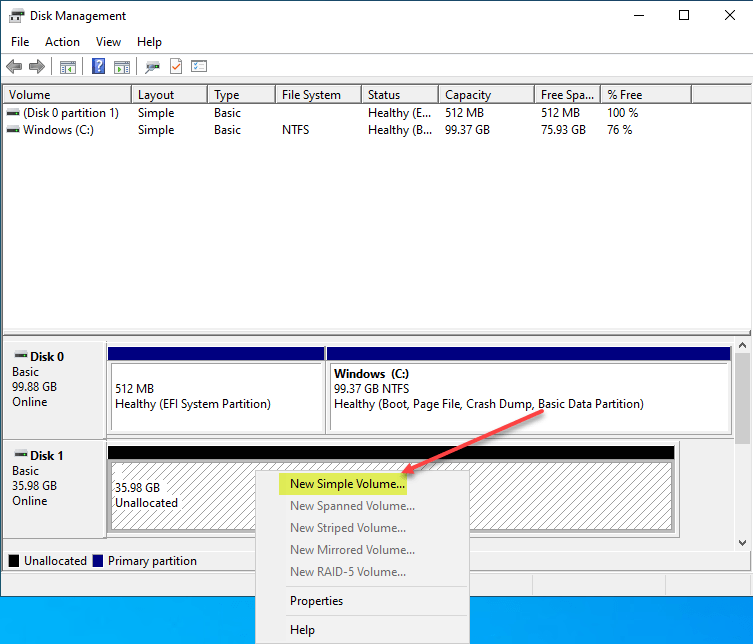
Next, right-click on the Unallocated space and click New Simple Volume.
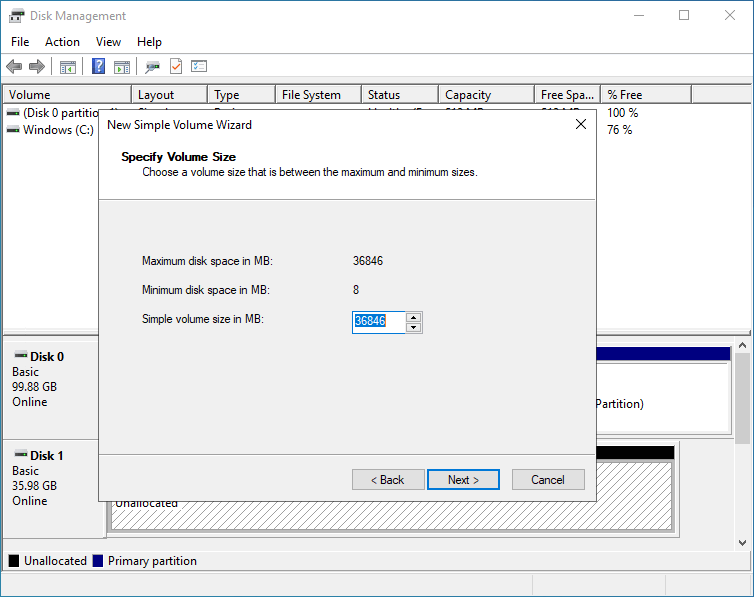
Choose the size for the simple volume.
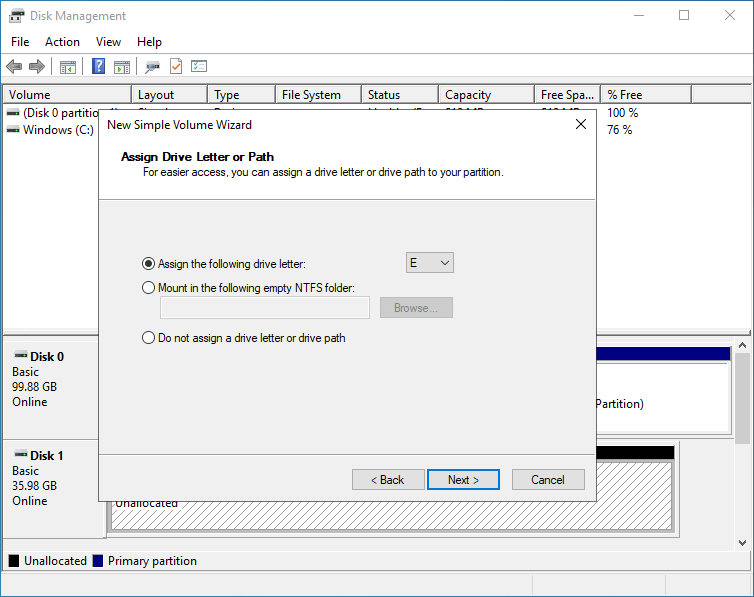
Next, assign a drive letter for the new storage volume.
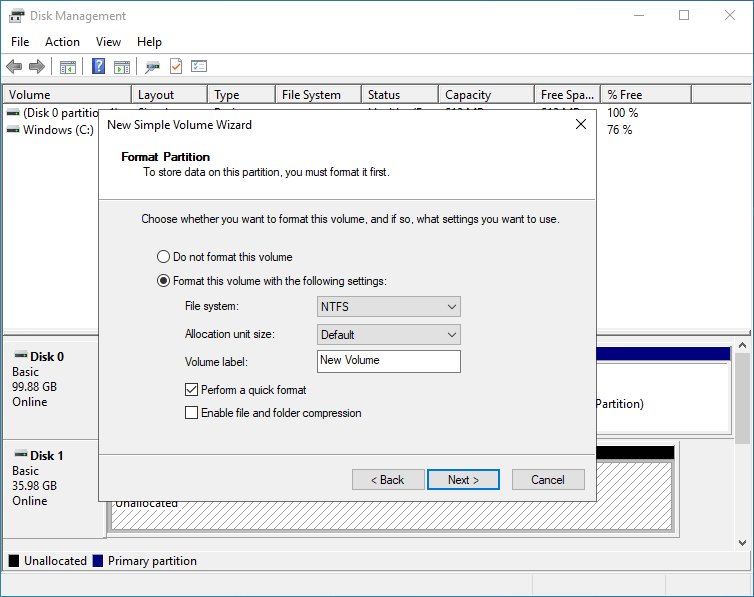
Choose the drive formatting options.
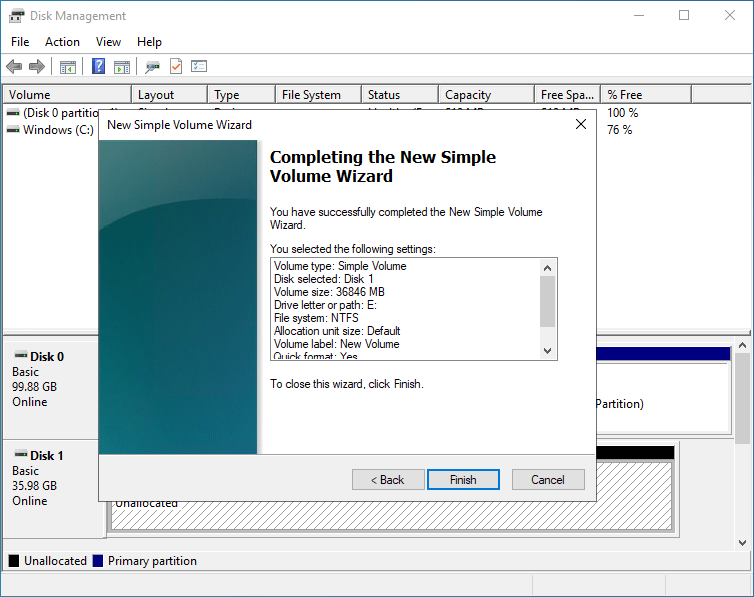
Complete the new simple volume wizard by clicking Finish.
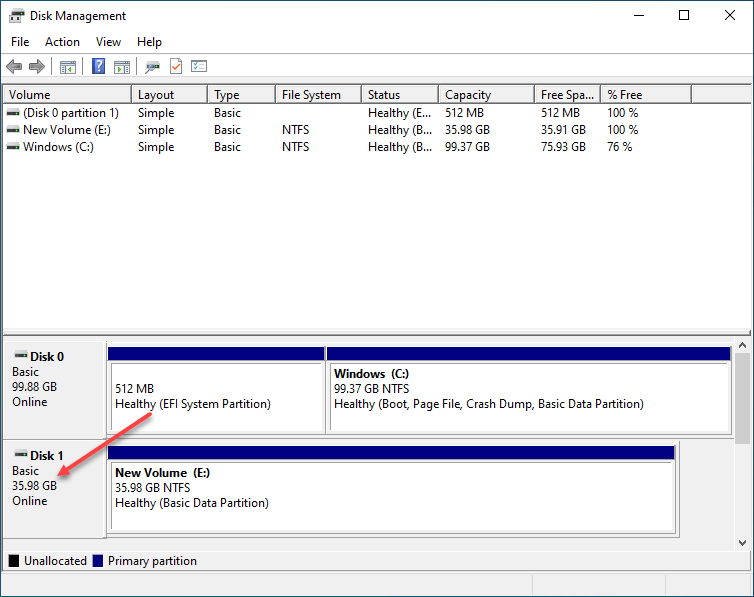
After completing the wizard, you will see the new storage added and Online.
We have now successfully added shared storage to our Hyper-V host. You would repeat this process for each Hyper-V host in the cluster so each host would have a connection to the shared iSCSI LUN.
Wrapping Up
Shared storage is one of the core building blocks of a Hyper-V cluster providing high availability to virtual workloads. It allows multiple hosts to run the virtual machines in the environment, providing the benefits of virtualization, including Live Migration, resource redistribution, and the ability to perform maintenance on each host without disrupting the virtual machine workloads.
Follow our Twitter and Facebook feeds for new releases, updates, insightful posts and more.