
Read On:
VMware for Beginners – Overview of vSphere: Part 1
IaaS, PaaS, SaaS and Pizza!
In previous articles, I have explained the terms IaaS, PaaS, and SaaS, but I think it is essential to repeat this briefly. The difference between Legacy (on-premise), IaaS, PaaS, and SaaS mainly concerns the extent to which you purchase the service and to what extent you are still responsible. With a Legacy service, you are entirely responsible and in control. With IaaS, you are still in control, but you no longer have to worry about the physical hardware you use; the service provider takes care of that! IT departments and network architects mainly use IaaS. PaaS services, which software developers often use, are only responsible for the data and the application settings, whereas, with SaaS (often used by end users), you are entirely unburdened. All cloud providers offer IaaS, PaaS and SaaS services.
Example of On-Premise, IaaS, PaaS and SaaS:
A fantastic example that makes it immediately apparent is the picture created by Albert Barron in 2014 :

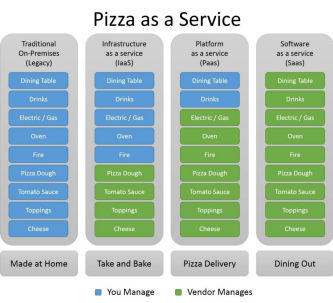
You can see the difference between the different services and what this means in practice. For example, with “Legacy pizza” you have to take care of all the ingredients yourself, prepare the pizza, set the table, and do the dishes.
Depending on which part you want to outsource, there is always an appropriate service (with a matching price and service arrangements).
People who encounter Azure for the first time often start with IaaS services. Often they still have a legacy environment on-premise and want to migrate it entirely or partially to the Cloud.
In these articles, I use the IaaS, PaaS, and SaaS services as a handle to guide you through the possibilities of Azure. Let’s start with IaaS!
As already described in Part 1, there are multiple ways to manage Azure. At the beginning of this series, we will mainly use the Portal. In later articles, we will look at Infrastructure as Code, Powershell and Azure CLI.
My first virtual Machine on Azure
Open your favorite browser, and browse to https://Portal.azure.com, and log in with the appropriate credentials. Next, press the three horizontal bars at the top left and choose virtual machines. We are now going to create a virtual machine on Azure.
Choose Create | Azure virtual machine with preset configuration
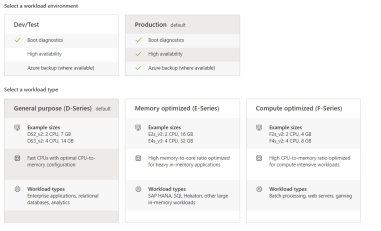
The following data must then be entered :
– Subscription & resource group (resource group can be created) – VM name | Region | Availability set no
Here you can specify the name and whether it should be highly available.
– Image (Windows Server 2022 Datacenter)
As you can see, many images are available from the marketplace, but you can also upload your custom images.
– Size See all sizes Standard_D2s_v3
Depending on your system requirements, there is always a suitable VM available. But, beware, the costs can be high!
– Username & Password
– Allow selected ports 3389
For testing, we will open port 3389. Again, remember to use a strong and long password!
– Disks Leave default
Here you can specify how many disks and sizes you want to use.
– Network Leave default
– Management Leave default
Using this pane, you can choose several identity options, auto shutdown, site recovery, and Guest OS updates
– Monitoring Leave default
– Advanced Leave default
– Tags Leave default
– Review + create
– The virtual machine is now created!
If all goes well, you will get a confirmation after a short time that your VM has been created :

We now go to the menu again and choose Virtual machines. You should now see that the virtual machine has been created. If you then click on the VM, a new window will automatically open where you can view all the VM’s settings and modify them. We won’t go through all the settings now, but a quick glance shows that the options are divided into General, Settings, Operations, Monitoring and Automation sections.
Congratulations! The virtual machine has been created. Let’s check it out!
At the top of the screen, you’ll see the Connect option. Choose Connect | RDP to download the rdp file. Then you can open it and use the credentials you entered while creating the VM to log in.
We have just created a VM with several options. To get a clear overview of exactly what we have created in detail, we open the resource group we just used or created.
To do this, choose resource groups from the menu and select the name of your resource group.
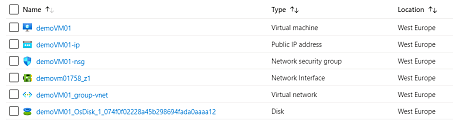
Apart from the VM, you will see that a public IP address has been created (to connect using RDP), an NSG (a rule base that defines which connections are allowed and which are not), a network card associated with the VM and a virtual network that has also been created.
For example, if you open the virtual network, you will see (again divided into categories) all the possibilities to manage and configure your network. In this example, you can see that you are fully in control. You can configure everything and Microsoft takes care of the underlying hardware.
A brief summary of exactly what we’ve seen
We briefly discussed the differences between legacy, IaaS, PaaS, and SaaS services. Then we immediately rolled out our 1st IaaS service, which is a virtual machine. We saw that we have a huge number of options that we can specify while deploying a VM and how we can customize it after deployment. We have also seen that when creating an IaaS resource, various dependent resources are deployed “underwater,” such as a virtual network and network adapter. These resources can also be configured entirely and customized. While creating, we used the Azure Portal and know our way around there.
The following blog post is going to be about governance, among other things, and why this is incredibly important when using Cloud services.
Follow our Twitter and Facebook feeds for new releases, updates, insightful posts and more.

Leave A Comment