
KVM Backup and Recovery Solution
Agentless Backup & Recovery of KVM VMs through seamless KVM Hypervisor Integration
- Agentless backup for KVM virtual machines
- Changed block tracking for incremental backups
- Scheduled and automated backups
- Store backup data on local disk, NAS, SAN, Tape, S3, Azure Blob, Google Cloud, Wasabi, etc.
- End-to-End encryption & compression
- Retain VM backup data as long as you need
- Centralized monitoring & reporting capabilities
- Flexible recovery options include instant boot VM, file recovery & more

What is KVM Backup
Using third-party Backup solutions for KVM like BDRSuite offer comprehensive data protection with features such as agentless backup, incremental backups, compression, encryption, and compatibility with various storage systems.
Benefits of KVM VM Backup Solutions
Data Protection
Safeguard critical data by creating secure backups, mitigating the risk of data loss and corruption.
Disaster Recovery
Enable swift recovery from hardware failures or disasters, minimizing downtime and ensuring uninterrupted business operations.
Flexibility
Tailor backup strategies to specific needs, with options for full VM backups or selective backup of individual files and folders.
Resource Optimization
Implement efficient backup processes, including features like incremental backups, optimizing resource utilization.
Deliver Profitable Backup as a Service (BaaS) & Managed Backup Service
- Files & Folders Backup
- Disk Image Backup
- SaaS Backup
- Agentless VM Backup
- Cloud VM Backup
- Database/App Backup
How KVM Backup Works
Step 1 – Agentless KVM Backup: BDRSuite introduces an agentless backup solution tailored for KVM, leveraging native capabilities to simplify the backup process without the need for individual VM agents.
Step 2 – Snapshot Creation: BDRSuite initiates the snapshot process, capturing the complete state of the KVM VM, including OS, disks, files, etc. This ensures a consistent point-in-time backup.
Step 3 – Secure Data Transfer: The captured backup data is securely transferred to the designated backup repository – local storage (NAS, SAN, etc) or Cloud (S3, Azure Blob, Google, etc) as configured. Encryption is employed for a secure data transfer process, ensuring data integrity.
Step 4 – Incremental Backups: After the initial full backup, BDRSuite optimizes backup efficiency by employing incremental backups. This captures only the changes made since the last backup, reducing backup time and minimizing storage requirements.
Step 5 – Data Retention and Management: BDRSuite offers flexible options to manage retention policies, allowing organizations to define how long they want to retain KVM VM backup data.
Step 6 – KVM Recovery In the face of data loss, VM failure, or disasters, BDRSuite supports reliable and instant recovery for KVM VMs. This includes restoring entire VMs, individual files or folders, and even granular application-level recovery, providing comprehensive data restoration options.
KVM Backup Solutions – A Comparison
Feature |
BDRSuite |
Veeam |
Acronis |
|---|---|---|---|
| Backup Approach | |||
| Platform Compatibility | Supports KVM Hosts on:
Supported Versions:
|
||
| Incremental Backups | |||
| Recovery Options | |||
| Centralized Management | |||
| Ease of Use | |||
| Cost-Effectiveness |
How to Backup KVM Virtual Machines
- Download BDRSuite: Download and Install BDRSuite Backup Server in your environment.
- Add KVM Host: Add KVM host as Data Sources on BDRSuite, from which you want to backup VMs.
- Configure backup storage: You can store the backup data on NAS, SAN, S3, Azure Blob, Google Cloud, S3 Compatible storage – Wasabi, MinIO, Backblaze, etc.
- Configure KVM backup:
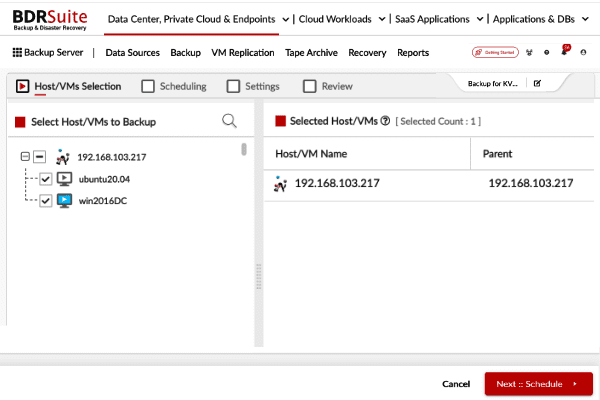
- Select VMs for backup
- Automate backups at specific intervals
- Configure Retention & Encryption settings
- Save & Run the Backup Job: Backup will start to run as per the schedule.
How to Restore KVM VMs from Backup
- Instant Boot VM: Instantly restore your entire KVM VM from backup in under 15 minutes, supporting various hypervisors like KVM, Hyper-V, and VMware to ensure seamless business continuity.
- Full VM Recovery: Restore the entire VM from KVM backup to the source or different KVM host in your environment
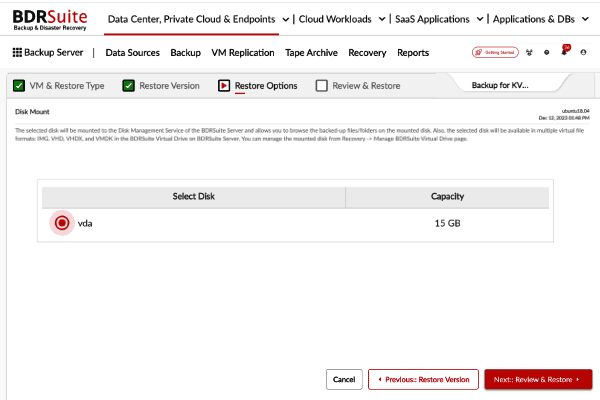
- Disk Mount: BDRSuite allows you to mount the backup disk and promptly recover specific files or folders, providing flexible and efficient file recovery.
- Download VMs & Disks: BDRSuite facilitates the download of backed-up VMs/Disks in multiple virtual formats, including RAW, VHD, VHDX, VMDK, and Flat-VMDK. These formats can be employed for comprehensive VM recovery or streamlined VM migration.
Free KVM Backup Software
Key Features of KVM Backup Solution
VM Backup for KVM Hypervisor
Seamless Integration with KVM
BDRSuite seamlessly integrates with the KVM hypervisor, leveraging its native capabilities for efficient backup and restore operations.
Agentless VM Backup
BDRSuite offers agentless image backup for KVM virtual machines. BDRSuite interacts directly with the KVM hypervisor, eliminating the need for additional agents.
CBT based Incremental Backups
BDRSuite performs incremental backups, capturing only the changes made since the last backup (Changed Block Tracking). This significantly reduces backup times and storage requirements.
Flexible Storage Options
BDRSuite supports wide range of storage options, allowing you to store your backed up data in local disk, NAS, SAN, S3, Azure Blob, Google Cloud, Wasabi, etc.
Automated Backups
You can schedule regular backups with BDRSuite to ensure that your VMs are consistently protected. BDRSuite offers flexible scheduling options, including every 15 mins, hourly, daily, weekly, & more.
Recovery of KVM VMs
Instant Boot VM
You can instantly restore the entire KVM VM from backup in less than 15 mins on any hypervisor – KVM, Hyper-V, VMware and ensure business continuity.
File Recovery
BDRSuite provides the option to mount the backup disk and instantly recover individual files or folders using the Disk Mount option.
Download VMs & Disks
BDRSuite supports downloading the backed up VMs/Disks into different virtual formats such as RAW, VHD, VHDX, VMDK, & Flat-VMDK which can be used for full VM recovery or VM migration.
Management of KVM VM Backups
Secure Data Protection
BDRSuite offers encryption options for backup data, ensuring data encryption during transit and storage.
Data Retention
Store backups in storage targets as long as you need with flexible retention policies, complying with regulatory requirements.
Centralized Management
BDRSuite offers centralized management console that allows you to easily configure backups, monitor backup status, and manage recovery across multiple KVM hypervisors.
Reporting and Notifications
BDRSuite provides comprehensive reporting and email notifications to keep you informed about the status of your backup and recovery tasks.
KVM Backup & Restore – FAQ
Utilize Incremental Backups: To optimize storage space and reduce backup times, leverage incremental backups. Incremental backups capture only the changes made since the last backup.
KVM backup software helps create regular snapshots of your VMs, capturing all their essential data and settings. If anything goes wrong, you can easily restore your VMs from these backups, getting your operations back up and running in no time.
There are many KVM backup solutions available, both free and paid. Consider factors like features (incremental backups, encryption), ease of use, and scalability when making your choice.
By implementing a KVM backup solution for your organization, you’re safeguarding your virtual environment and ensuring business continuity. Don’t let your VMs become vulnerable – explore BDRSuite, your comprehensive and cost-effective KVM backup software today!
Here are some key aspects of KVM Disaster Recovery:
Reduced Downtime (RTO) and Data Loss (RPO): KVM Disaster Recovery solutions, like BDRSuite, aim to minimize RTO and RPO by ensuring that VMs are restored quickly with minimal data loss in case of failure.
Cross-Cloud and Multi-Platform Support: With an option to replicate VMs across different cloud platforms and hypervisors, KVM disaster recovery should provide flexibility and redundancy in disaster recovery planning.
Think of it as a safety net woven with backups. Don’t settle for just one copy – aim for three. This includes the original VMs and two separate backups. BDRSuite lets you store these backups in diverse locations:
Locally: Keep one backup on your KVM host’s internal storage for quick access.
Remotely: Secure another copy on a separate physical server or network storage within your datacenter.
Off-site: Send the final copy to the cloud, creating an air-gapped haven against local disasters.
Step 2: Double Down on Diversity: Utilize Two Media Types:
Don’t put all your eggs in one basket! Spread your backups across two different media types. This minimizes the risk of a single media failure jeopardizing your entire backup strategy. BDRSuite offers flexibility:
Disk/Block Storage: Utilize local disks, network attached storage (NAS), or storage area networks (SANs) for readily accessible local and remote backups.
Cloud Object Storage: Leverage the scalability and resilience of cloud storage platforms like AWS S3 or S3 compatible storage like MiniIO, Wasabi, Azure blob, Google Cloud Storage for your off-site copy.
Step 3: Embrace Off-site Replication:
Disaster knows no boundaries. Ensure at least one copy resides outside your physical location.
BDRSuite’s disaster recovery (DR) replication feature comes to the rescue:
Replicate to Another BDRSuite Server: Set up a secondary DR server in a geographically distant location and replicate your backups automatically. This helps you perform a seamless recovery, if any disaster strikes your primary site.
Cloud DR as a Backup: Utilize cloud-based DR solution offered by BDRSuite to replicate your backups directly to the cloud, providing an ultimate off-site refuge.
By following these 3-2-1 principles and leveraging BDRSuite’s capabilities, you’ll build a robust KVM backup strategy that can withstand any storm. Remember, prevention is better than recovery, so invest in your disaster recovery plan today!
Option 1: File-level Backup:
- Identify VM files:
- Disk images (e.g., qcow2)
- Configuration files (e.g., xml)
- Copy files to a backup location:
- Use commands like cp, rsync, or file managers.
- Store backups securely:
- Use external drives, network storage, or cloud storage.
Option 2: KVM virsh Commands:
1. Export VM configuration:
virsh dumpxml vm_name > /etc/libvirt/qemu/vm_name_backup.xml
2. Copy virtual hard disk:
virsh domblklist vm_name # Check disk location
cp /path/to/original/disk.qcow2 /path/to/backup/disk.qcow2
3. Modify configuration file:
vim /etc/libvirt/qemu/vm_name_backup.xml
- Change vm_name to vm_name_backup
- Modify UUID to make it unique
- Update virtual disk label to new path
- Change VNC port to a unique one
Option 3: Built-in Guest Tools:
Steps:
- Access guest OS:
- Use SSH or a virtual console.
- Utilize guest OS backup tools:
- Commands like dd for disk imaging
- Backup utilities within the guest OS
Option 4: Backup Software:
Steps:
- Install backup software:
- Choose a compatible software (e.g., BDRSuite for KVM).
- Configure backup settings:
- Specify VMs, backup frequency, retention policies.
- Initiate backups:
- Create a backup job and run backups as per your requirements
- Open a terminal window.
- Type the following command, replacing virtual_machine_name with the actual name of your virtual machine:
- virsh snapshot-create virtual_machine_name
- To view a list of snapshots for a virtual machine, use:
- virsh snapshot-list virtual_machine_name
Option 2: Using the Cockpit web interface:
- Access the Cockpit web interface.
- Go to Virtual Machines.
- Select the virtual machine you want to snapshot.
- Pause the virtual machine (optional, but recommended).
- Scroll down to the Snapshots section.
- Click Create snapshot.
- Enter a name and description for the snapshot (optional).
- Click Create.
- Resume the virtual machine (if you paused it).
1. Export VM configuration:
virsh dumpxml vm_name > /etc/libvirt/qemu/vm_name_backup.xml
2. Copy virtual hard disk:
virsh domblklist vm_name # Check disk location
cp /path/to/original/disk.qcow2 /path/to/backup/disk.qcow2
3. Modify configuration file:
vim /etc/libvirt/qemu/vm_name_backup.xml
- Change vm_name to vm_name_backup
- Modify UUID to make it unique
- Update virtual disk label to new path
- Change VNC port to a unique one
virsh list –all
2. Automatic clone:
virt-clone –original old_vm1 –auto-clone
3. Manual clone:
virt-clone –connect qemu:///system –original old_vm1 –name new_vm1 –file /var/lib/libvirt/images/new_vm1.img –file /var/lib/libvirt/images/new_vm1_data.img
(Adjust disk image paths as needed.)
4. Start the cloned VM:
virsh start new_vm1
Agentless backup: No need to install additional software on your VMs, simplifying deployment and minimizing overhead.
Fast, incremental backups: Capture only changed data, significantly reducing backup times and storage requirements.
Flexible scheduling: Automate backups to run at times that best suit your needs, minimizing service disruption.
Wide range of storage options: Store backups on local storage, NAS, SAN, or even cloud platforms for secure and reliable disaster recovery.
Instant recoveries: Get your VMs backup and running quickly in case of disaster with BDRSuite’s efficient restore capabilities.
Don’t settle for slow, inconvenient backup solutions. Upgrade your KVM protection with BDRSuite and experience the power of simple, reliable VM backup and recovery.
