
Read on:
VMware for Beginners – Overview of vSphere: Part 1
VMware for Beginners – vSphere Installation Requirements: Part 2
VMware for Beginners – How to Install vSphere: Part 3
VMware for Beginners – vSphere Networking: Part 4
VMware for Beginners – vSphere Datastores – Part 5
VMware for Beginners – vSphere Virtual Machines – Part 6
VMware for Beginners – How to Install vCenter: Part 7
VMware for Beginners – Datacenter and Clusters – Part 8
VMware for Beginners – How to Create and Configure iSCSI Datastores: Part 9(a)
VMware for Beginners – How to Create and Configure iSCSI Datastores : Part 9(b)
In the last VMware for Beginners – How to create NFS Datastores – Part 10(a) we discussed about NFS and the type of NFS Network configuration that we can apply in our ESXi host environment. In this second part for now, we will learn:
- How to create an NFS VMkernel network
- How to add NFS Datastores to your ESXi host
- Troubleshooting NFS issues
Let us now create a VMkernel NFS Storage for our NFS Datastores.
As I stated above, we will use the configuration shown in Figure 1.
How to create NFS VMkernel
Different from the iSCSI network, creating the NFS networking in ESXi host is much easier and requires fewer steps.

For the NFS VMkernel, we need to create one NFS VMkernel in the same subnet that has the NFS Storage network, and that is it.
We will need two VMkernel(or more) if we use a multi-target network configuration. One for each subnet or VLAN.
The process is similar to that we already discuss for iSCSI VMkernel.
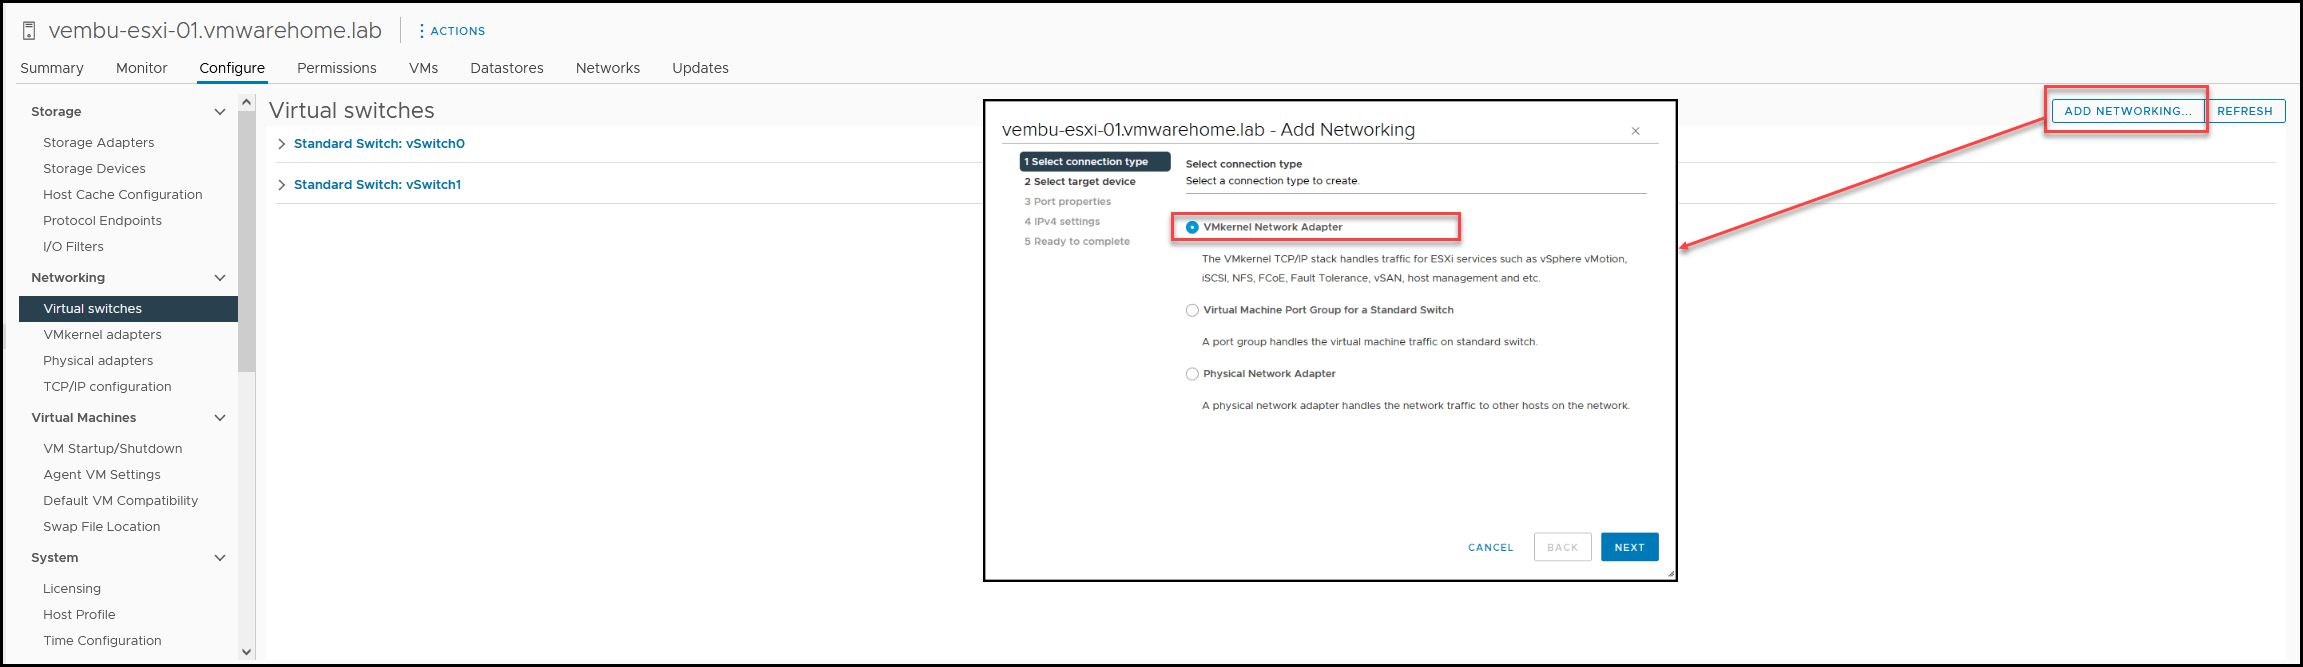
Select the ESXi host to create the VMkernel on the Virtual Switches option, and click Add Networking. Next select VMkernel Network Adapter.
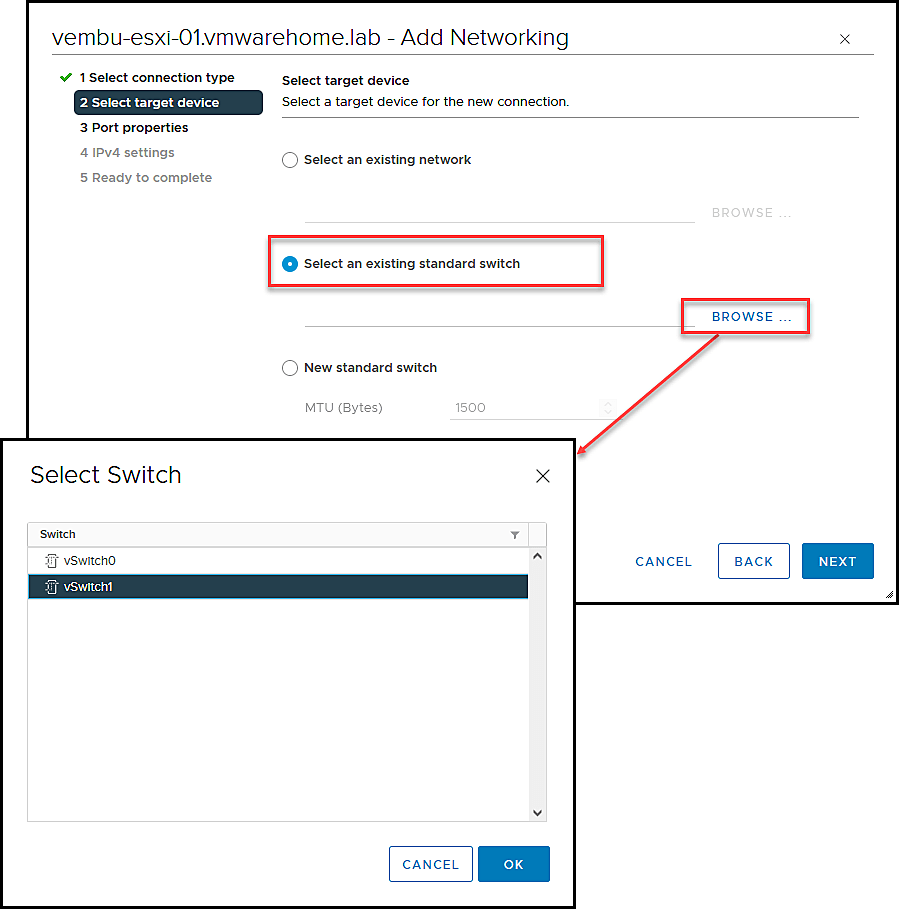
Next, in the iSCSI, we select to create a new Standard Switch, but since we already created one for iSCSI, we will use the same Virtual Switch(vSwitch1) to create our NFS VMkernel.
Note: If you only have NFS, and it is the first VMkernel you are creating, follow the steps to create a new Standard Switch(shown in the previous article about iSCSI).
After selecting, Select an Existing Standard Switch, select Browse, and choose the vSwitch you will use. In our case it is the vSwitch1.
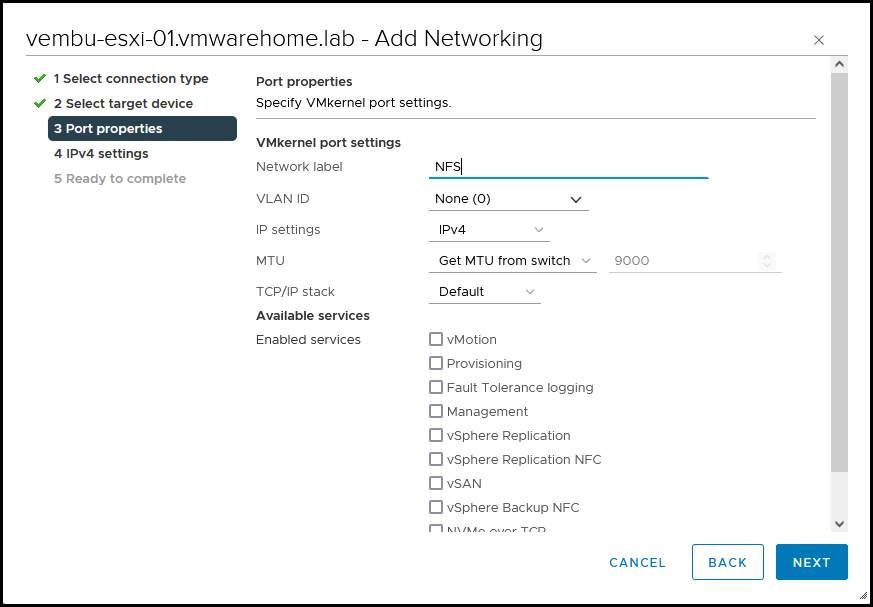
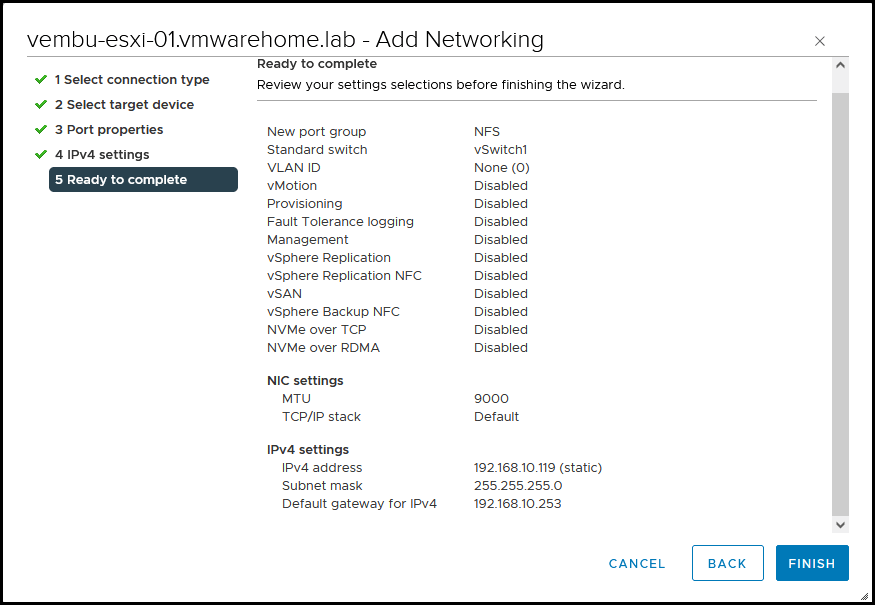
Next, add all the information needed to create the VMkernel, Name, VLAN(if using), and set the MTU 9000 (is using on a new vSwitch, if using an existing vSwitch, it will use the MTU already set in the vSwitch).
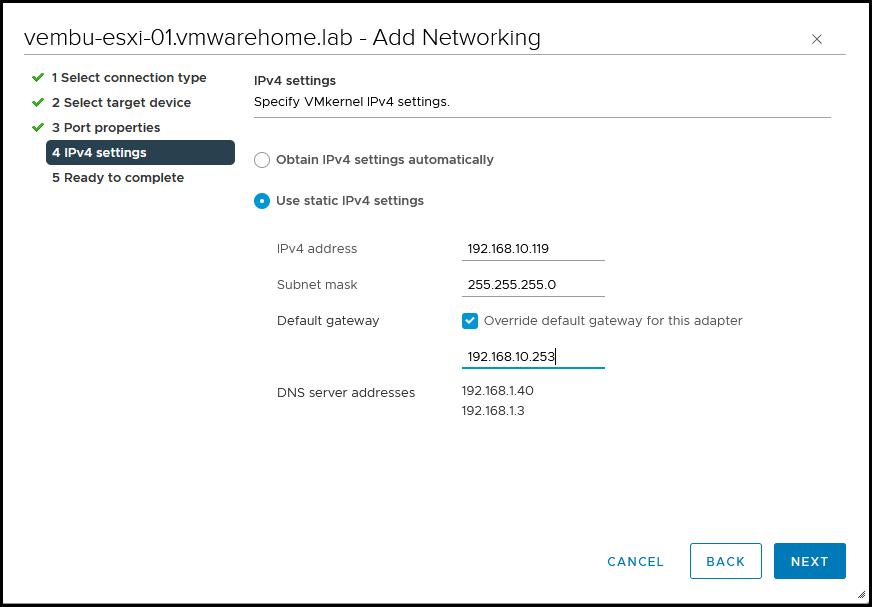
The next step is adding our IP, Subnet Mask, etc.
Note: Unless you have special routing, there is no need to change the gateway. As I did in the iSCSI VMkernel configuration, I have a special gateway for Storage. But do not change the default if you don’t have any special routing.
Double-check the information and finish creating the NFS VMkernel.
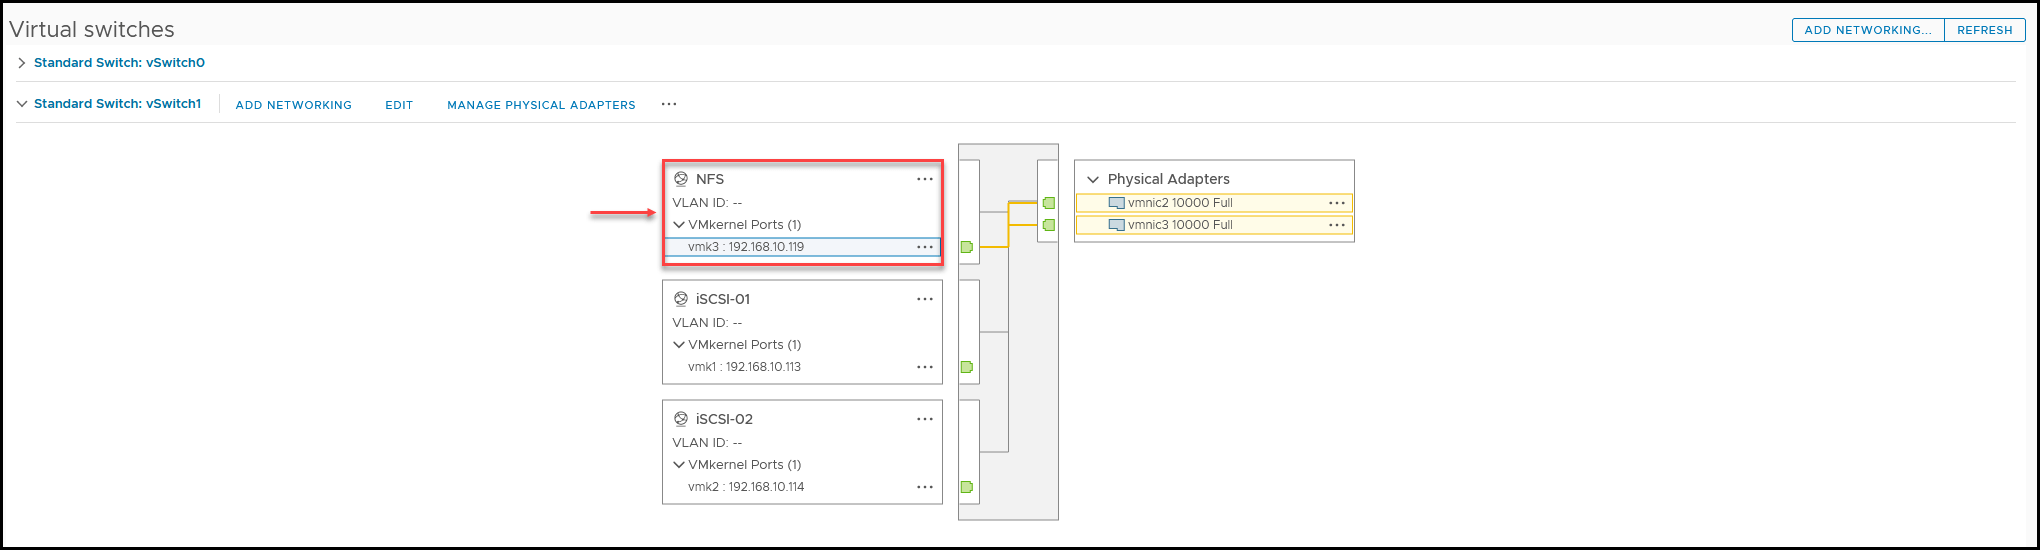
As we can see, now we have a new NFS VMkernel in our vSwitch1. We can also see that both vmnics are connected to the VMkernel.
Differently from iSCSI, we can use both vmnics to connect to our NFS NAS, using a single target.
So now we have an NFS VMkernel network, and it is possible to connect our ESXi host to our NFS NAS and mount a shared folder to create a Datastore.
Do not forget to use the NFS Datastores in all the ESXi hosts, you need to do this in each ESXi host.
Final note: If you are using NFS and iSCSI in your environment connected to the same SAN/NAS, as best practices, iSCSI and NFS should be running in different subnets or VLANs.
In this case, we are using the same subnet because it’s a test environment, but in a production environment, you should follow the Best Practices and separate the traffic from iSCSI and NFS.
Note: Sometimes, we may have issues using IP Hash when not using LACP(you may notice some drop packages). In that case, you should change the Load Balancing to Use explicit failover order.
How to create a NFS Datastore
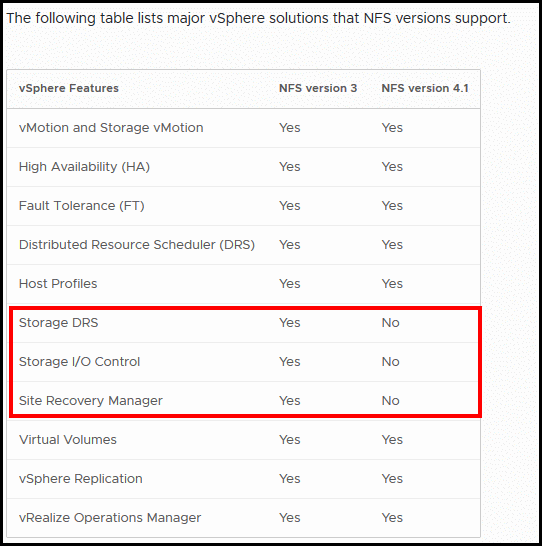
Before we go through how to create an NFS Datastore, a quick overview of NFS v3 and NFS v4.1
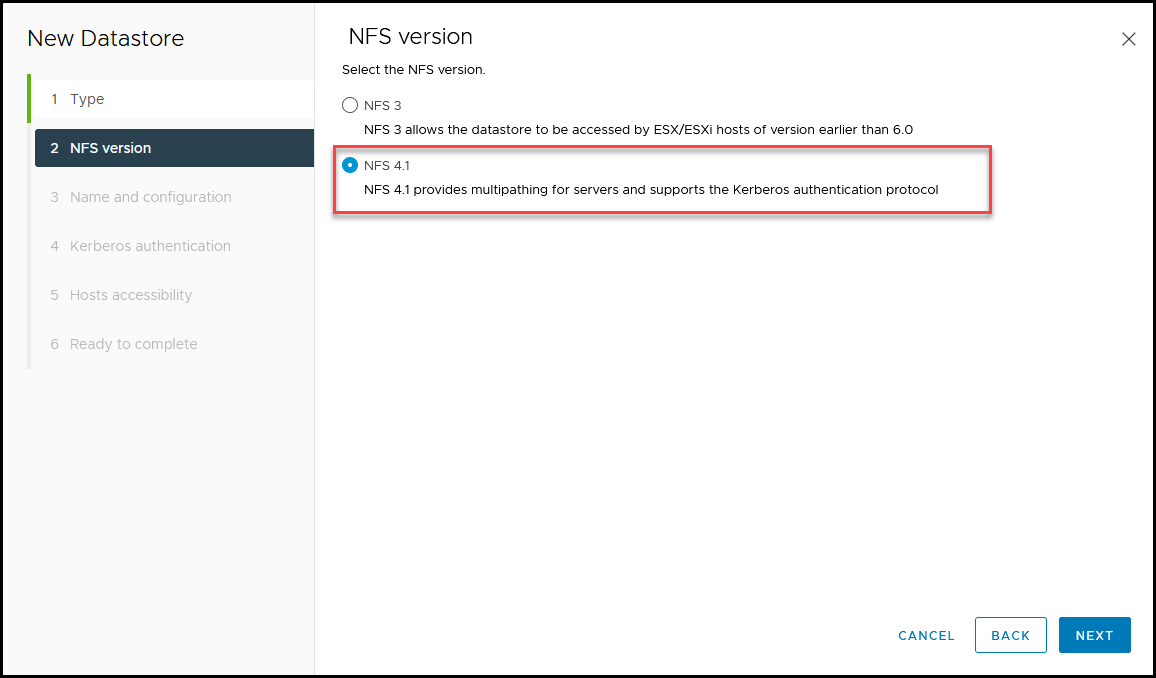
As I explained above, we can use a Single Target configuration or a Multi-Target configuration. Using one or more vmnics to the same Target. Here is where it is essential to select which NFS version to use. Only v4.1 supports multipath.
So if you are using Multipath configuration to connect to your NAS, your NFS Datastore needs to be created with version 4.1.
There are also some restrictions on NFS Datastores features when using NFS v4.1. You should double-check if you are planning any of those features before selecting v3 or v4.1.
Here is a board of what is supported and not supported when using NFS v3 or v4.1, Storage DRS is one example.
Now that we know what we can use with each version, we can create our NFS Datastore.
Since we will mount this NFS Datastore to all ESXi hosts in a Cluster, we can mount the NFS using the Cluster option and not by ESXi host.
In the Cluster, right click Storage – New Storage, and select NFS.
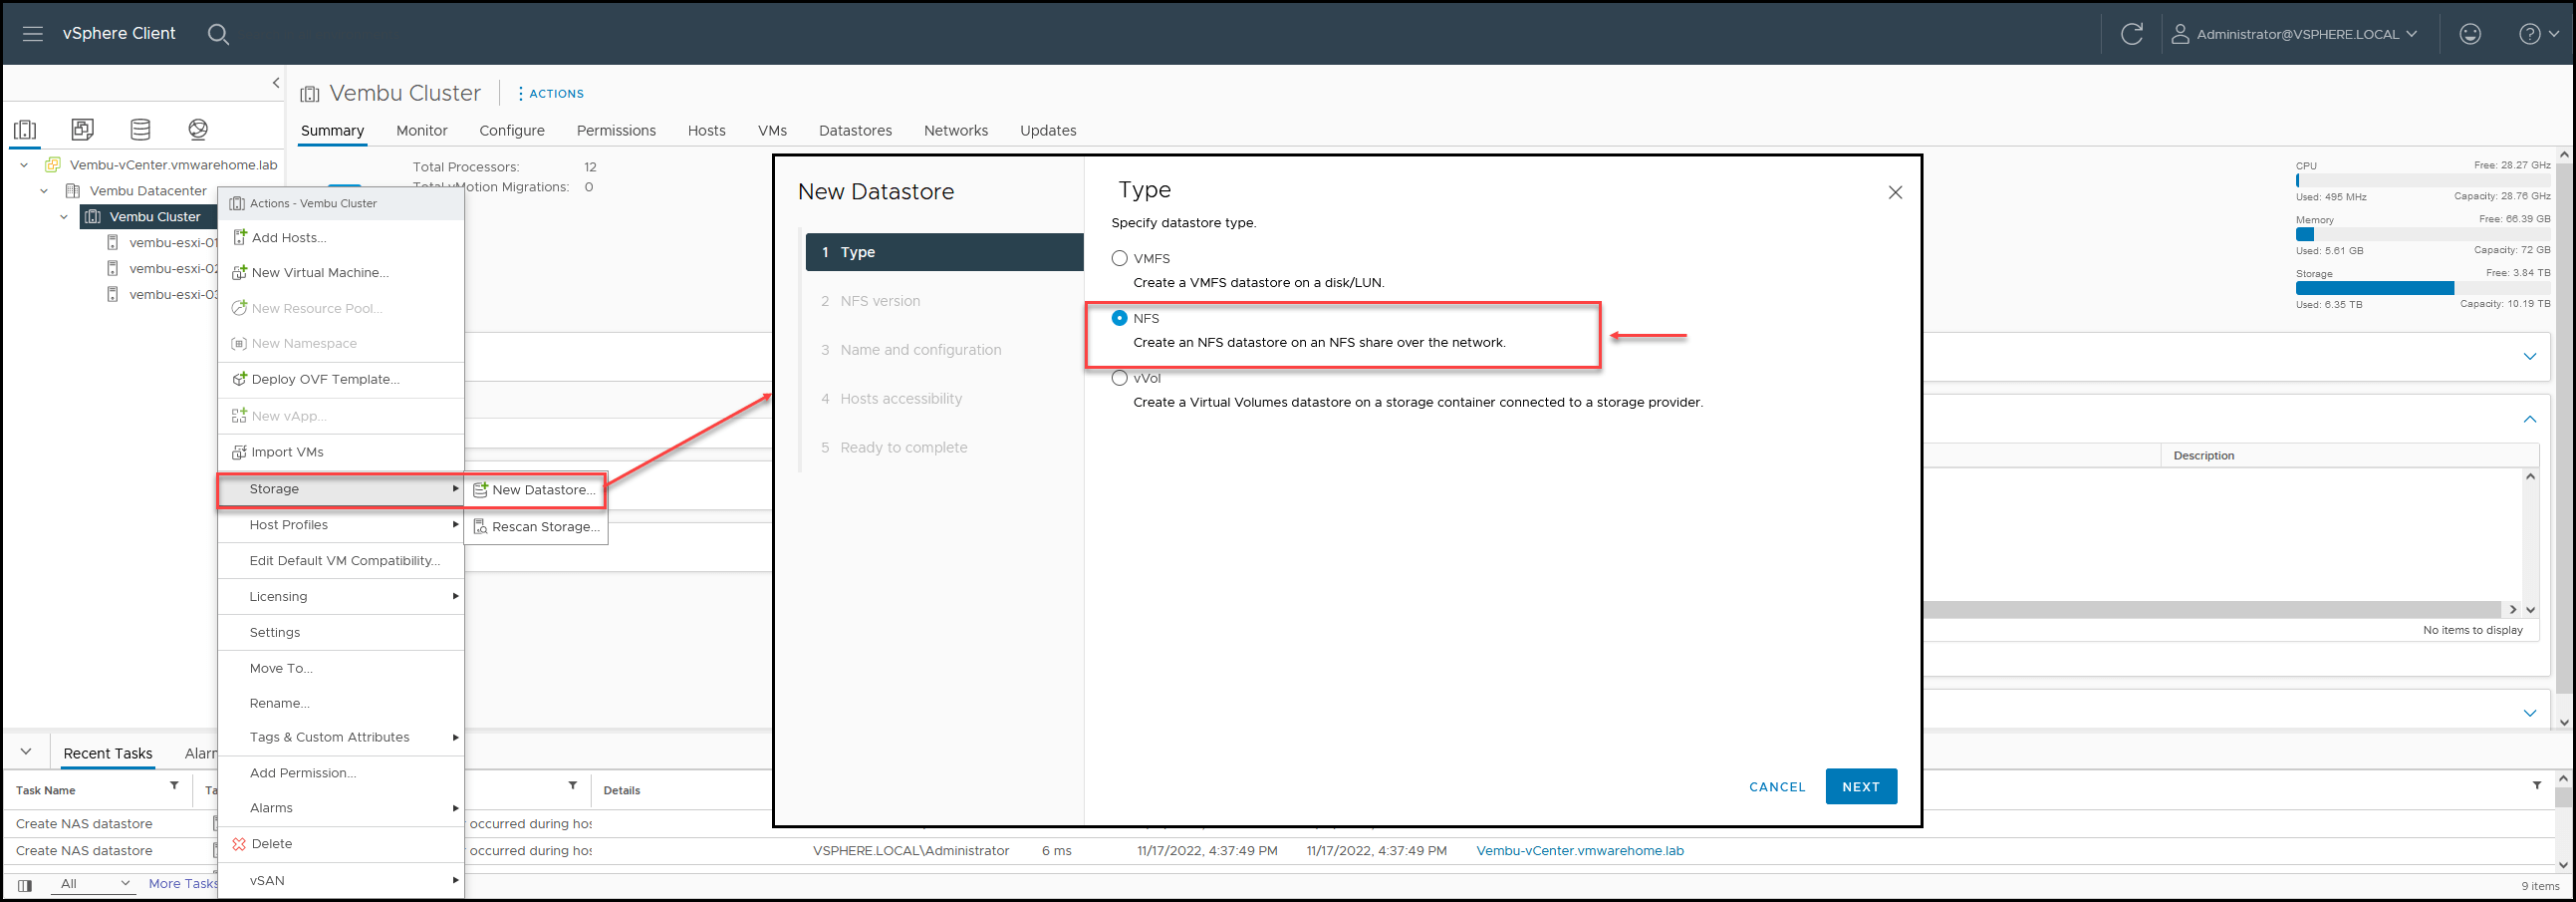
In our case since we will not need to use any of the features that are not supported, I will select the v4.1
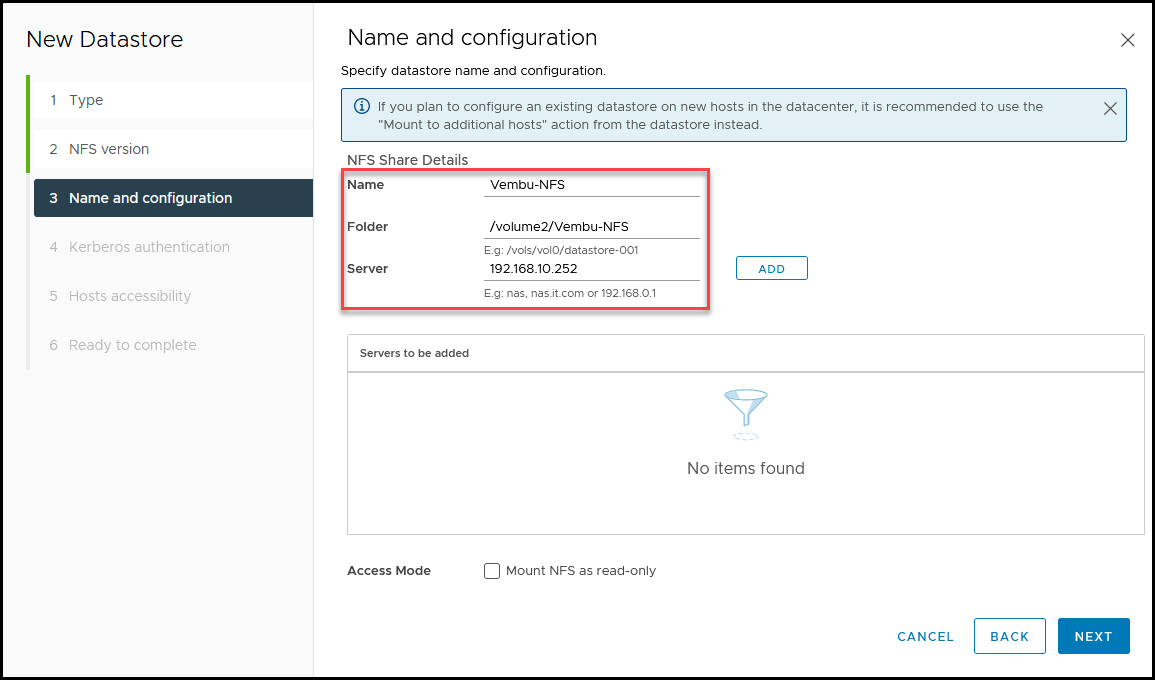
In this section, you add the information about your NFS Share.
First, give the Datastore a name, add the folder(shown above in the Synology NFS), and then add your NAS server.
If you have more than one IP address(Multi-Target option for Multipath), you can add all the NAS IPs addresses and click Add.
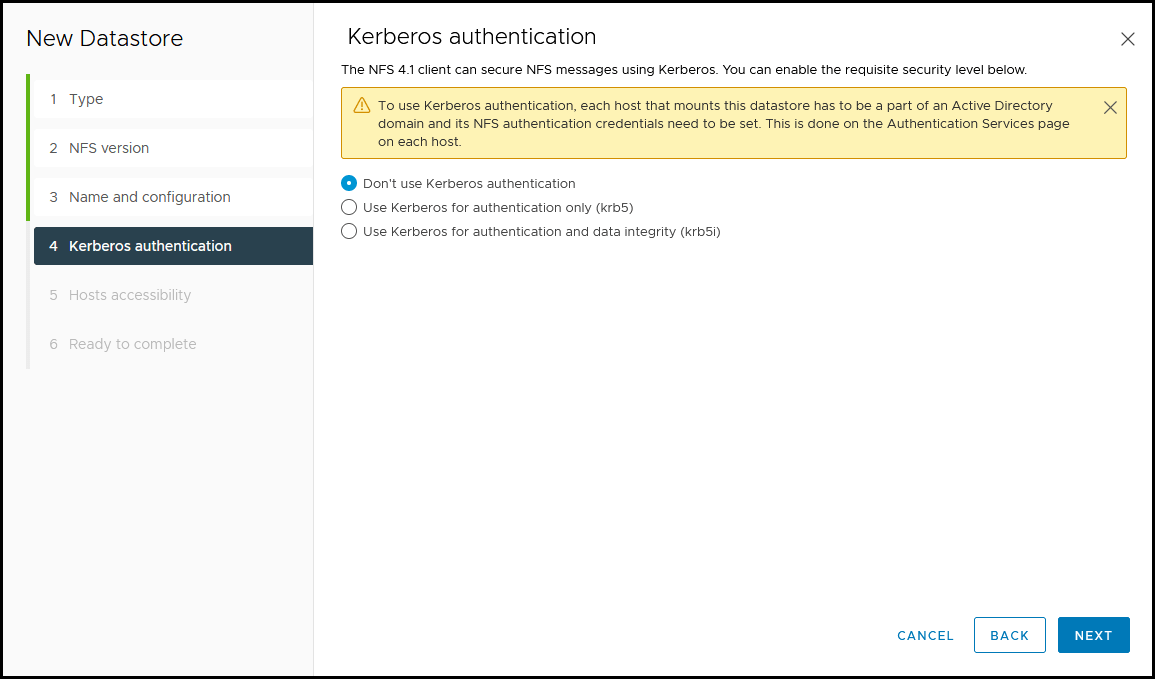
Next is the Kerberos authentication. If your NAS is using NFS share with Active Directory users, you can set it here. Since we are not using Kerberos, we can skip this.
Note: This is another feature that is only used in NFS v4.1.
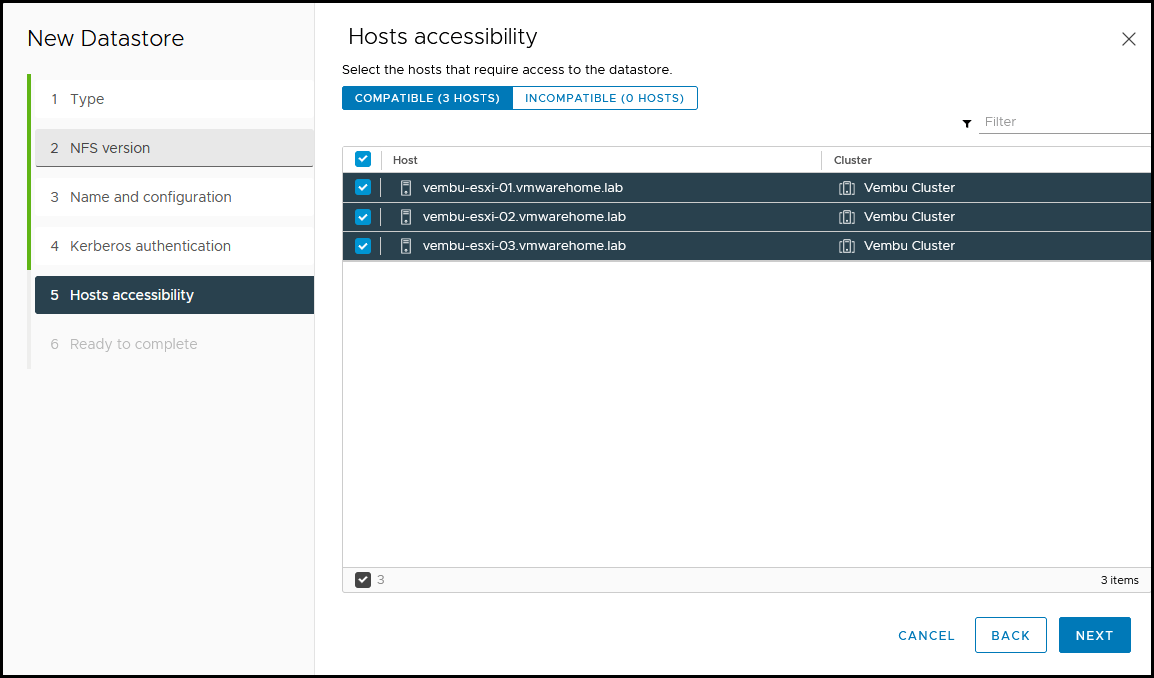
Now we set on which ESXi hosts we mount this NFS Share. We will use all.
Before finalizing, double-check the information. If all is good, click Finish.
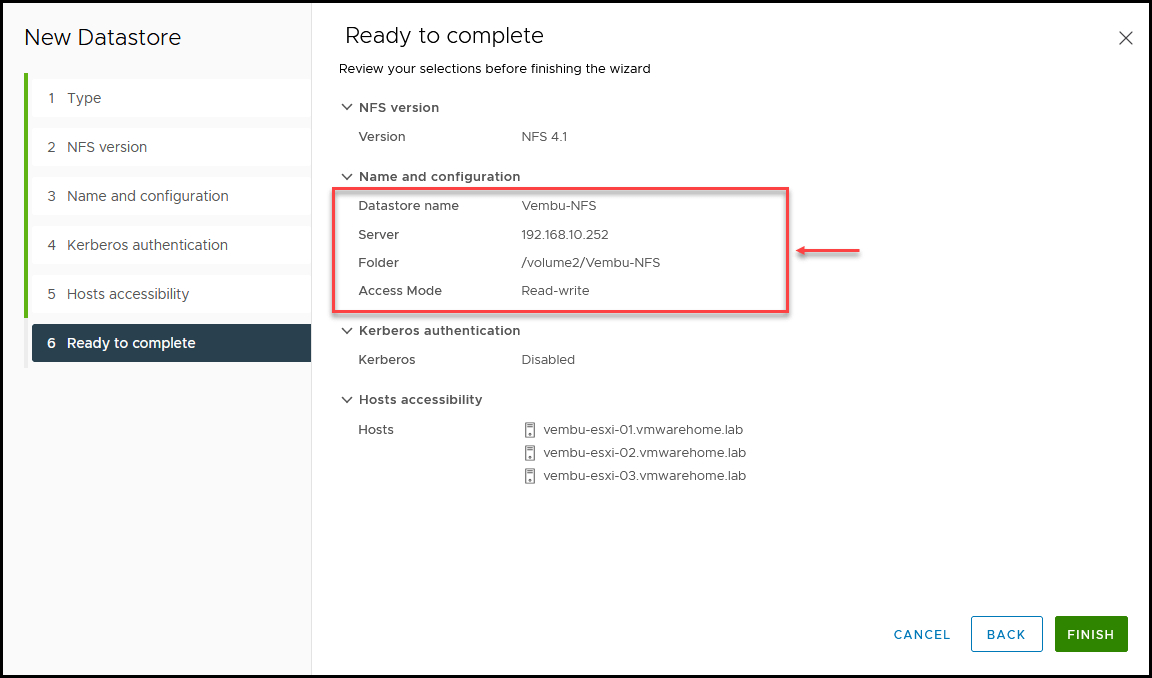
And now we have our NFS Datastore created.

Troubleshooting NFS issues
Before we finish, if you are getting any issues mounting the NFS share you can troubleshoot the network if it can reach the NAS Storage.
Login to ESXi host ssh console and ping using the vmkping command.
Using vmkping, you can ping using the VMkernel you created as the source for the ping.
First, let see what is the VMkernel vmk and IP using the command esxcfg-vmknic -l

As we can see, the NFS that we created before is the vmk3 with the IP address 192.168.10.119
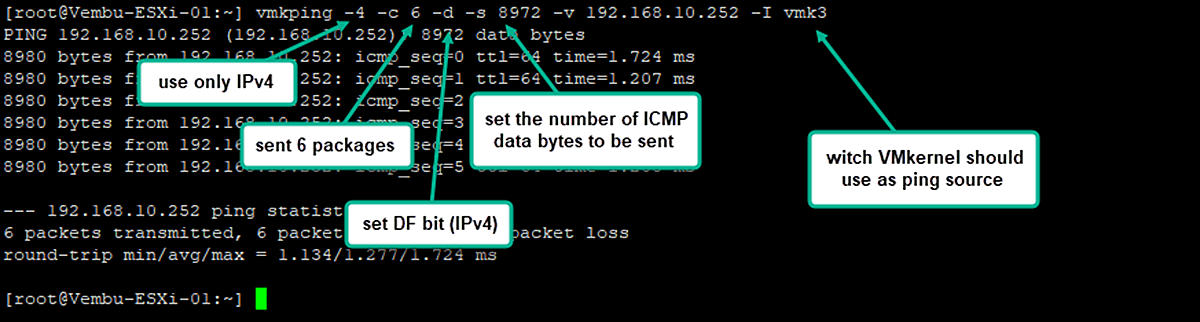
And now we ping the NAS Storage IP using vmkdping.

But what about Jumbo Frames? Are the VMkernel and vSwitch properly configured with MTU 9000 to use Jumbo Frames?
Using command: vmkping -4 -c 6 -d -s 8972 -v 192.168.10.252 -I vmk3

An explanation about all the parameters on this vmkping
Can’t mount NFS share, and you have an error: The NFS server denied the mount request.
Most of the time, this error is regarding permissions on the NAS Storage side.
Storage recognizes that NFS Share exists, but it is not allowed to mount it on this Server.

In this case, we can check ESXi host vmkernel.log for additional information about this or other errors.
The log is located in the ESXi hosts in: /var/log
Using the command: cat vmkernel.log | grep Vembu-NFS-02
We don’t have much information for this case since the ESXi host cannot check NAS Storage permissions.
But start by checking which IPs permissions are set in your NAS NFS Share Folder.
An example:
In this case, we don’t have any ESXi host VMkernel IP added to the permissions section. So this ESXi host cannot connect to this NFS Share Folder.
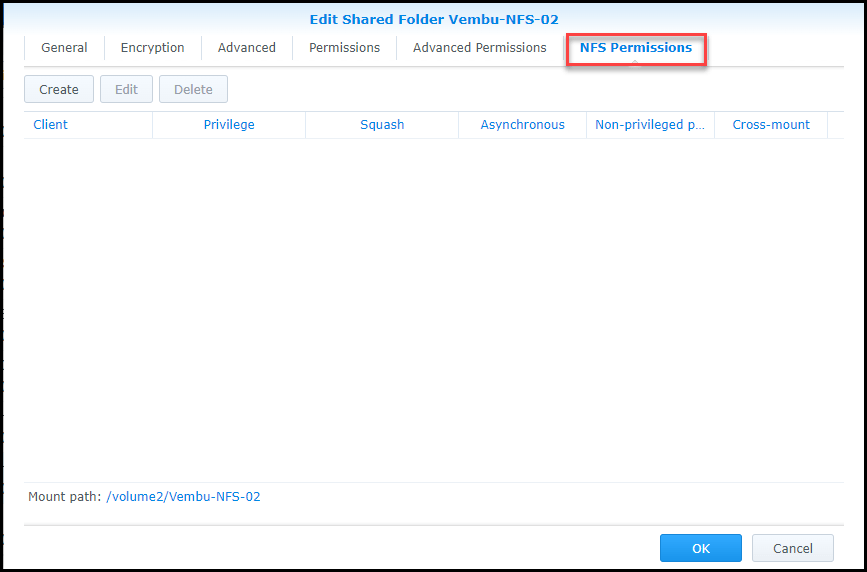
So we need to add the VMkernel IP address or add a subnet wildcard like: 192.168.10.0/24
After adding the IP address, the issue was fixed.
If the error is timeout, like: Mount failed: Unable to complete Sysinfo operation. Please see the VMkernel log file for more details.: Timeout
Then there is “not possible to connect to the NAS Storage”. Check the IP address you add for the Server(if that is the correct Target NAS Storage IP) or check if the VMkernel is adequately configured and test the network(as shown above using the vmkping command).
With the troubleshooting section, we finish the NFS Datastores subject.
Now that we have iSCSI or NFS Datastores created in our VMware environment is time to start buiding the Cluster Distributed Resource Scheduler(DRS), Cluster High Availability(HA), and also Cluster Storage DRS. These are the next subjects in the VMware for Beginners series articles.
Follow our Twitter and Facebook feeds for new releases, updates, insightful posts and more.