
Read on:
VMware for Beginners – Overview of vSphere: Part 1
VMware for Beginners – vSphere Installation Requirements: Part 2
VMware for Beginners – How to Install vSphere: Part 3
We finished How to Install vSphere Part 3, where we fully installed vSphere and made the initial post-install configurations.
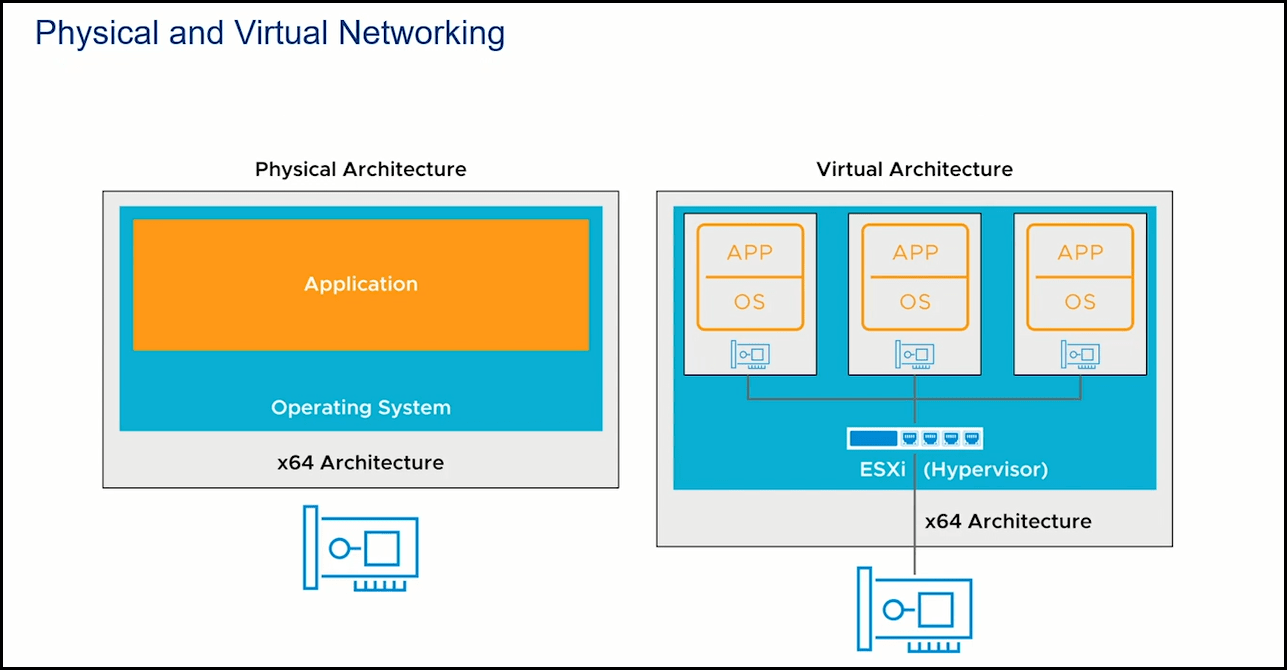
Now that we have our vSphere installed and have an IP, DNS, Hostname etc., it is time to configure the Virtual Networks.
The initial network configurations were only to access the ESXi host. We now need a network for our Virtual Machines, Storage, etc.
Since networking is a big subject in ESXi, we dedicate this entire article just to networking and talk about Storage in another article.

Let us show and talk about ESXi networking and how it works in ESXi.
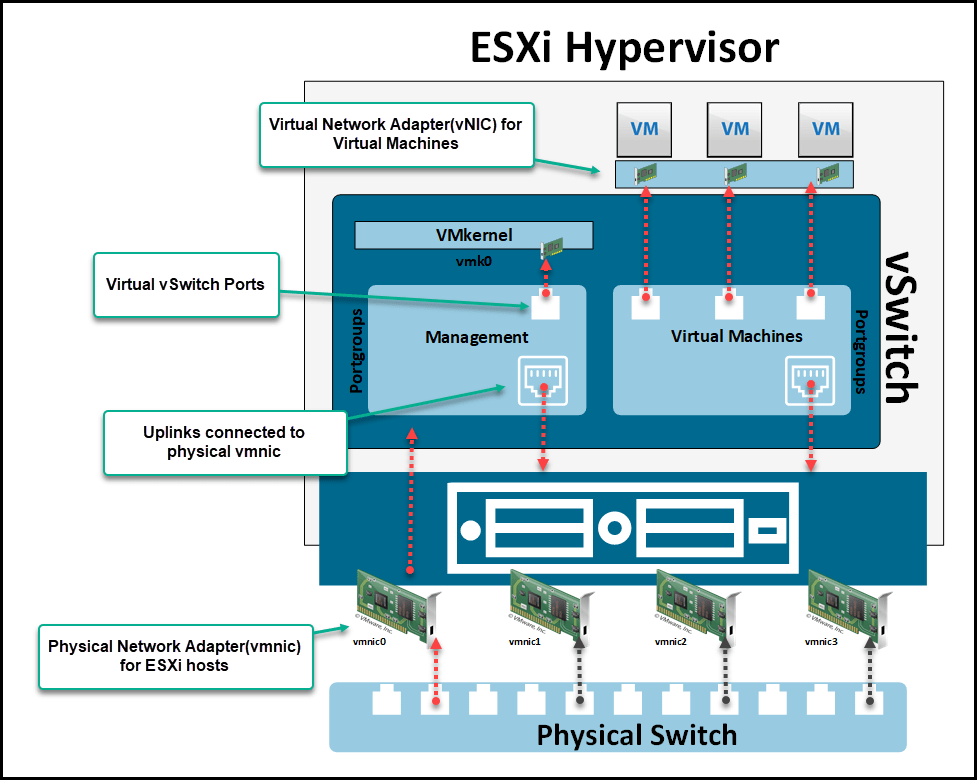
Virtual Network adapters and Virtual Switches are key virtual networking components.
First, I will show how we see our Virtual Networks, Port Groups, and network interfaces and then explain how they work.
Open a browser, connect to the VMware host Client using IP or a fully qualified domain name (FQDN), and enter the root and password in the installation.
In this next image, we see the dashboard, and also we can see a piece of information about your trial license(we talk about changing licenses in other lessons).

Our first step is to check our Network configurations. Click the Networking.
In the first tab Port groups, we can see the list of our port groups.
What are port groups?
It is a group of virtual ports on our virtual switch. Each port group has a specific network label, which must be unique to the host.
To better understand, I will call sub-networks(they are not, but just to make it simple to understand) on a Virtual Switch.
Each of these port groups has an uplink(network interface) attached that belongs to the physical server.
When installing an ESXi host, by default, it creates one Management portgroup and one VMs Portgroups.
The Management portgroup is the network that manages the ESXi host network. For example, we created the IP, Gateway, and DNS in the post-install.
VMs Portgroup is the network that was created to provide a network to Virtual Machines Guest OS.

Next image, we see the Virtual Switches in the ESXi host. By default, the ESXi installation creates one called vSwitch0 (the name is created by default, but we can create any Virtual Switch with a different name).
As we can see, it says that there exists 2 port groups in the Virtual Machine(shown in the previous image).
All port groups inside the same Virtual Switch shared the existing uplinks(network interfaces).

Next, we see the existing number of network interfaces in this ESXi host.
These are the actual physical network ports. It can be a physical card with 4 ports or 2 network cards with 2 ports each.
Each network port is called vmnic(x) with the port number on your physical network card. Something like in Linux with eth0, eth1, eth2, etc.

Next is an example of the initial Network configuration.
As we can see above, we have 4 physical network cards in our ESXi host, and only one(red arrow) was added to the Virtual Switch(vSwitch0). So we only have one Uplink in our Virtual Switch.
Both port groups use the same physical connection, but in the Virtual Switch, traffic is separated by the port groups and Uplink on each one.
This is the standard default ESXi configuration after installation.
In the Management portgroup, we have the VMkernel for the ESXi connection. VMkernel is where we have IP, subnet mask, and Gateway.
What is a VMkernel?
VMkernel is a POSIX (Portable Operating System Interface) that runs directly on the ESXi host and is basically used to connect the Hypervisor(which could be a service) to the outside world.
Simply put, It is a network point of contact from outside networks and works as a destination or source for the network.
Examples of services and network traffic that need a VMkernel:
- Management traffic
- vMotion traffic
- iSCSI Storage traffic
- NFS Storage traffic
- vSAN traffic
- vSphere Replication traffic
- Fault Tolerance traffic
All the above to be configured needs an IP address, subnet mask, and Gateway. We should use the ESXi host default gateway for all VMkernels. Only in exceptional cases should we manually change the Gateway.
Note: Before we start configuring the networking, we only go through the most basic configurations to be able to put the ESXi host network and the Virtual Machines network available. We will show more advanced networking using separated Virtual Switches when we install vCenter.
From vCenter, we will configure more advanced networks and use Standard Switches and vSphere Distributed Switch (only available in vCenter).
Since we are only using one network card, for redundancy purposes, let us add a second network card from the ESXi host to our vSwitch and port groups.
First, go to Networking, then the Virtual Switches tab, and click on the Virtual Switch you want to configure. In our case, it is the vSwitch0

As we see in the following image, we only have one vmnic, and we need to add another.
Click in the Add uplink and select a new Uplink. Since we have 4 network cards we see all here, we selected vmni1
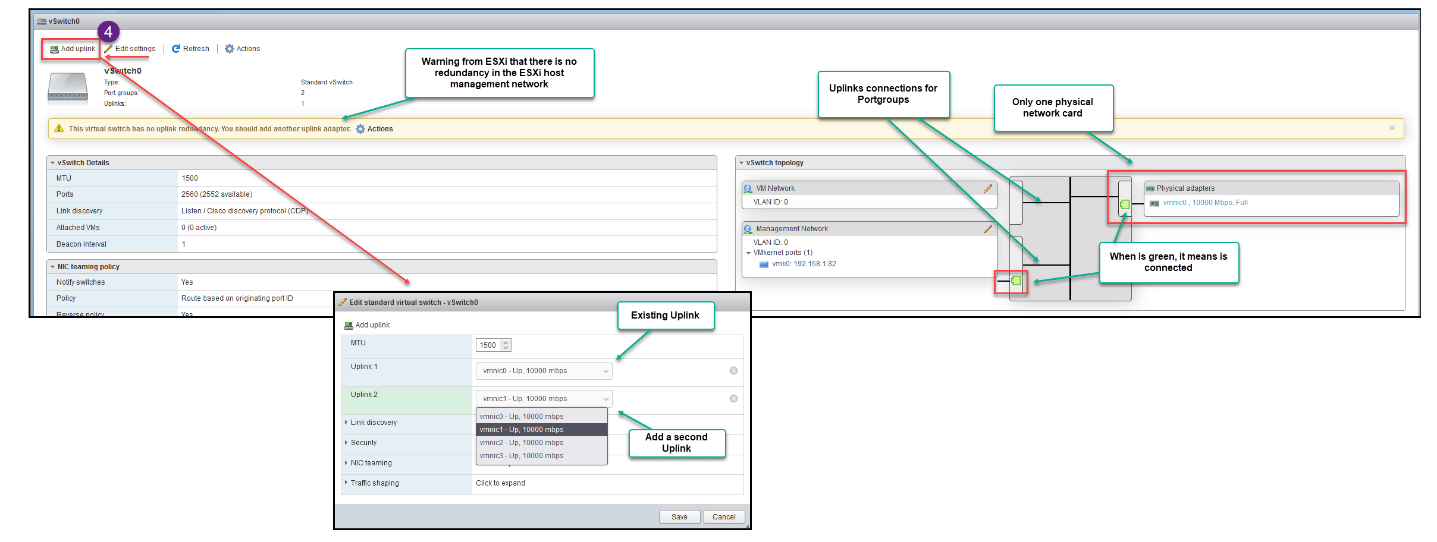
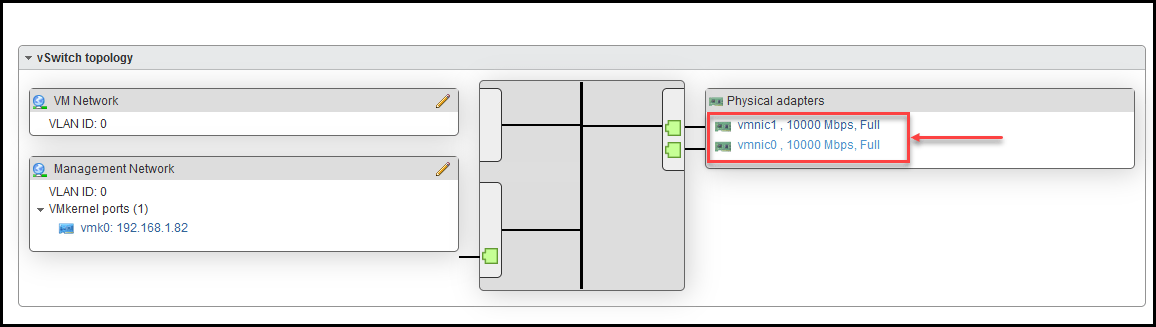
Now we have two Uplinks in this Virtual Switch, and both are connected to the two Port Groups.
Why do we need two Uplinks(don’t forget that when we refer to Uplinks, it is always a physical network adapter) in our Management network? Because if one Uplink is down(a cable problem, switch port issue, or a hardware problem with the network adapter), you will lose the connection to the ESXi host.
This is not mandatory, it can only work with one Uplink, but for redundancy, so is always good to use 2.
Because of redundancy, every VMkernel should have a minimum of 2 Uplinks. But we can discuss this later on.
Now we have our management and VMs networks with 2 Uplinks. We need to set the NIC Teaming by setting the Load Balancing policy and Failover Order to work in case one Uplink fails, the other Uplink takes over.
This can be done using the following option:
Load Balancing:
You can configure various load balancing algorithms on a virtual switch to determine how network traffic is distributed between the physical NICs in a team.
- Route Based on Originating Virtual Port
The virtual switch selects uplinks based on the virtual machine port IDs on the vSphere Standard Switch or vSphere Distributed Switch
- Route Based on Source MAC Hash
The virtual switch selects an uplink for a virtual machine based on the virtual machine MAC address. To calculate an uplink for a virtual machine, the virtual switch uses the virtual machine MAC address and the number of uplinks in the NIC team
- Route Based on IP Hash
The virtual switch selects uplinks for virtual machines based on each packet’s source and destination IP address. Similar to Link Aggregation and LACP on physical Switches.
- Route Based on Physical NIC Load – This option is only available in vCenter
Route Based on Physical NIC Load is based on Route Based on Originating Virtual Port, where the virtual switch checks the actual load of the uplinks and takes steps to reduce it on overloaded uplinks. Available only for vSphere Distributed Switch
- Use Explicit Failover Order
No actual load balancing is available with this policy. The virtual switch always uses the Uplink that stands first in the list of Active adapters from the failover order and passes failover detection criteria. If no uplinks in the Active list are available, the virtual switch uses the uplinks from the Standby list
Check the VMware page HERE for more information about Load Balancing.
Failover Order:
- Active, Active(both are always active, and there is always one connected in case of a failure)
- Active, Standby(only one if connected while the second only takes over if the first one fails)
Virtual Switches settings can be set in the Virtual Switch level or the Portgroup level. If set in the vSwitch level and not changed in the Portgroup level, Portgroups inherit settings from the vSwith.
If you change settings in the Portgroup, it ignores the settings from vSwitch and assumes the Portgroup settings.
For the VMs network, set the Load Balancing policy to Route Based on Physical NIC Load and Failover Order to Active, Active
For Virtual Machines, Storage, vMotion etc., it is essential to set a good Load Balancing policy to balance traffic between the vmnics.
In the Management Portgroup, we don’t need to set a special policy, so we set the Load Balancing policy to Use Explicit Failover Order and Failover Order to Active, Active and leave the rest of the settings to inherit from the vSwith.
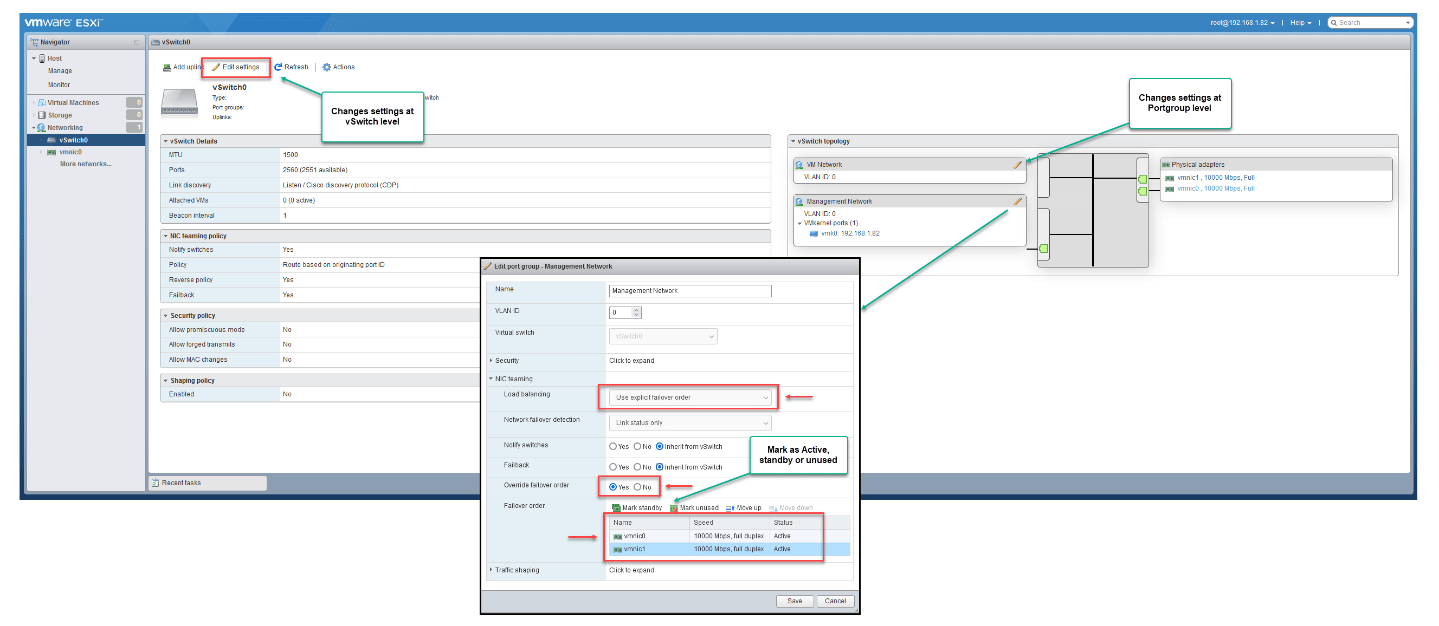
We can have multiple vmnics added and distribute them to the Portgroups but link specific vmnics to specific Port Groups. We can also set a vmnic as unused. Then the vmnic will not be used in this portgroup or vSwitch.
But as I said, we will discuss these settings and policies more in detail when we have a vCenter.
After the changes, our design is like this:
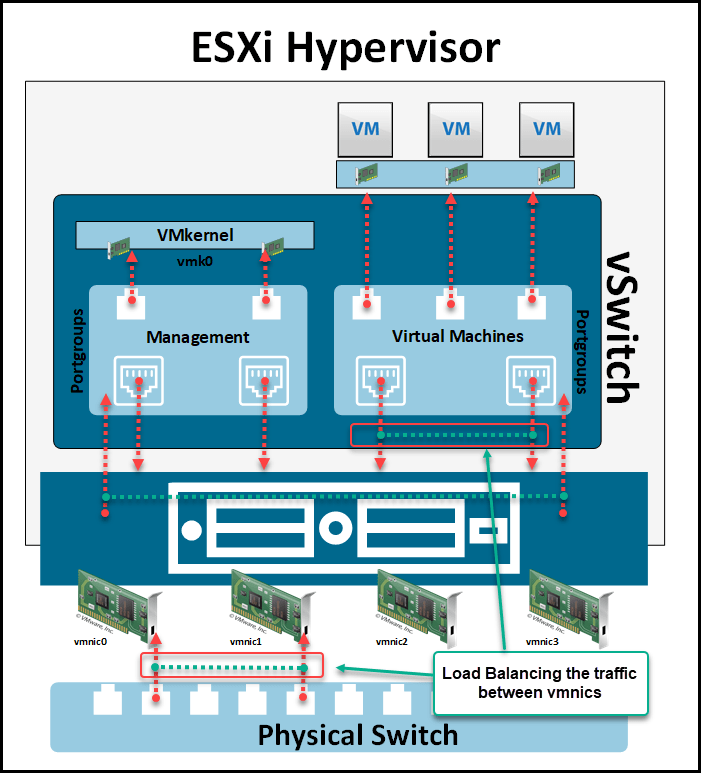
We have Management Portgroup with Active/Active and the Virtual Machines Portgroup with Load Balancing traffic.
To finalize VMware for Beginners – vSphere Networking – Part 4, when configuring the networking in your ESXi host, all traffic should be separated, which means a physical adapter for each traffic.
Example:
- 2x network adapters for Management Network
- 2x network adapters for Storage and vMotion
- 2x network adapter for Virtual Machines network
This is often impossible in production because not all servers have 6 network ports or more. But for example, we shouldn’t mix the Storage with the Virtual Machines network, which means using the same physical network cards.
VMs network uses considerable traffic, and vMotion or Storage, and unless you have 3 or 4 network cards with 10Gb set to Load Balance or 25Gb connections, you could have traffic congestion in vMotion vs Storage with high latency and possible timeouts.
For vMotion and Storage, connections should always be a minimum of 10Gb.
So for your production VMware Infrastructure, always take the time to create a proper network configuration.
In the next article, we will configure and discuss Storage and Storage networking. We will also discuss ESXi host partitions.
Follow our Twitter and Facebook feeds for new releases, updates, insightful posts and more.