
Read on:
VMware for Beginners – Overview of vSphere: Part 1
VMware for Beginners – vSphere Installation Requirements: Part 2
VMware for Beginners – How to Install vSphere: Part 3
VMware for Beginners – vSphere Networking: Part 4
VMware for Beginners – vSphere Datastores – Part 5
VMware for Beginners – vSphere Virtual Machines – Part 6
VMware for Beginners – How to Install vCenter: Part 7
VMware for Beginners – Datacenter and Clusters – Part 8
VMware for Beginners – How to Create and Configure iSCSI Datastores: Part 9(a)
VMware for Beginners – How to Create and Configure iSCSI Datastores : Part 9(b)
VMware for Beginners – How to Create NFS Datastores – Part 10(a)
VMware for Beginners – How to Create NFS Datastores: Part 10(b)
In the last VMware for Beginners article, we created iSCSI and NFS Data-stores, and since now we have a shared Storage, we can install our vMotion Network and enable it.
In this article about vMotion and DRS, we will learn the following:
- What is vMotion
- How to create a vMotion VMKernel network
- What is DRS
- How to create a Cluster DRS
What is vMotion?
vSphere vMotion allows you to migrate workloads from one server to another without downtime, so your users will never know the difference.
Live Migration is a high-availability feature that allows you to automatically move virtual machines from one server to another without any downtime.
How do Live Migrations work?

If you know ahead of time when system downtime is expected, such as for maintenance or natural disasters, you can vMotion the VMs on that server to a different one. That way, your workload will still be available if a server goes down or needs to be shutdown.
VMware vSphere vMotion makes it possible to move workloads from one server to another without ever stopping the application. During the Live Migration, your application is still running, and users can still access their systems. No downtime means your productivity never stops!
- Automatically optimize virtual machines within resource pools
- Perform hardware maintenance without scheduling downtime or disrupting business operations
- Move virtual machines away from failing or underperforming servers
We can vMotion between ESXi hots, Cluster, Datacenter, and vCenters. It is also possible between sites with cross vCenter vMotion.
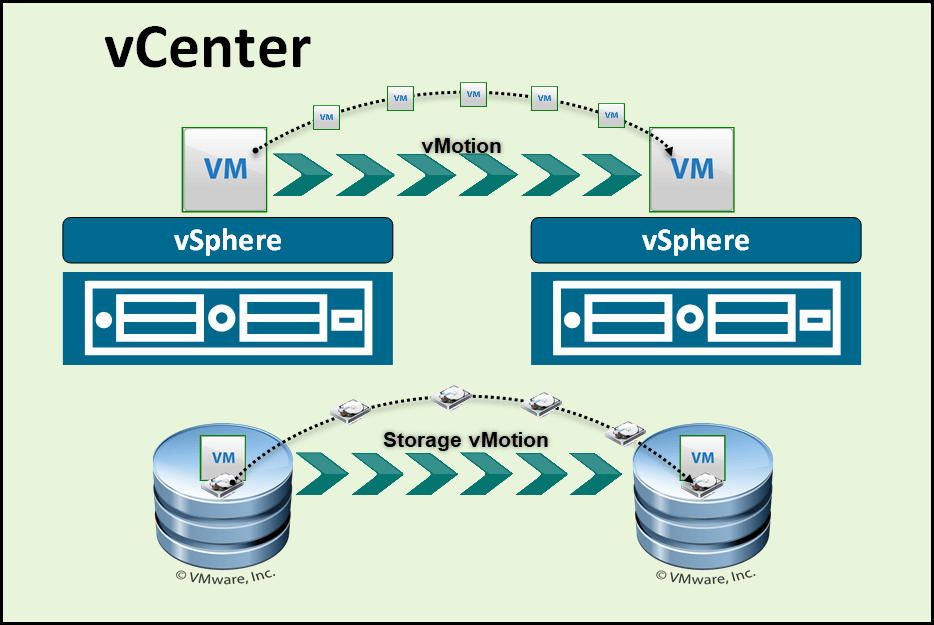
The next image shows us a vMotion between ESXi hosts in the same Cluster, but it can also be between Clusters or Datacenters inside the same vCenter.
There is also an example of Storage vMotion(vStorage). vStorage is the possibility to migrate a VM between Datastores. VM stays in the same ESXi host, only migrating the Virtual Disks and VM configuration files to another Datastore shared between the ESXi hosts.
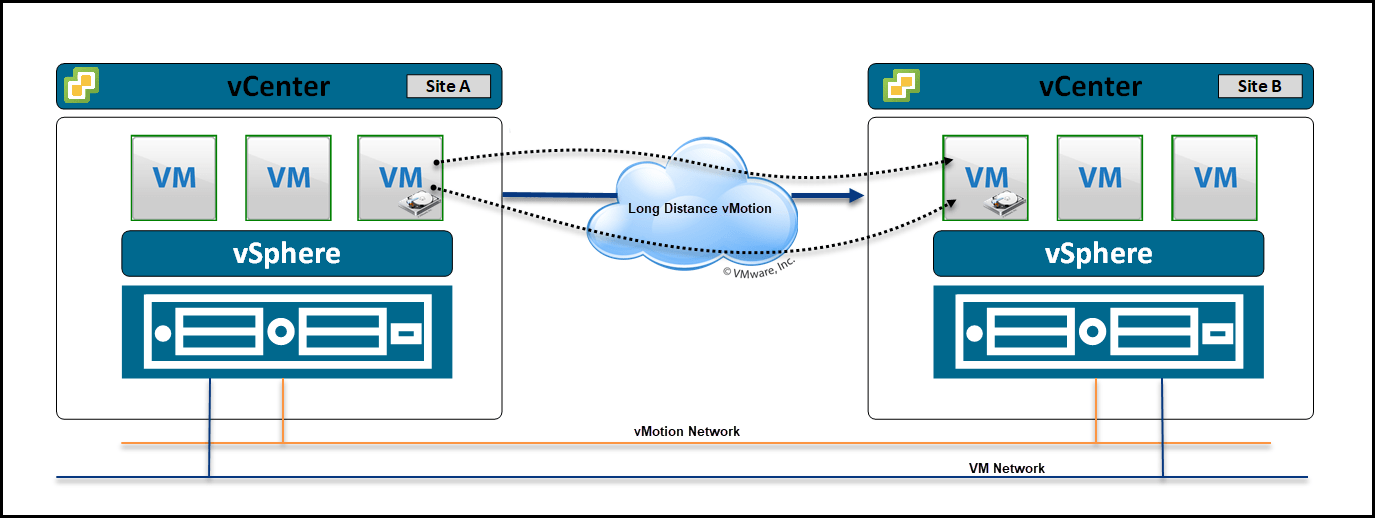
The next example is a vMotion between vCenter to vCenter (can be in the same physical Datacenter) or between two different sites/buildings, by using Long Distance vMotion option.
Using the vMotion feature, we can migrate any VM inside or outside the infrastructure without the need to power off the Virtual Machine.
The above designs and explanations give us an idea of what vMotion is and how Live Migrations works.
How to create a vMotion VMKernel network
To create a VMkernel network, we need to create a VMkernel as we created in iSCSI/NFS, but this time for vMotion service.
We need an IP address for each ESXi host that uses this vMotion Network. In this case, for all the ESXi hosts in the Cluster. That means we need 3 IP addresses.
A vMotion network should be isolated from any other network. So we should use a unique subnet, or if you want a VLAN. In our case, we will use a unique subnet.
The vMotion Network will only be used internally. No traffic is going outside the vMotion Network. The traffic is always between the ESXi hosts, even if you use Cross vCenter vMotion. That also means that it doesn’t need a gateway.
For our configuration, we will use the subnet 192.168.0.0/24.
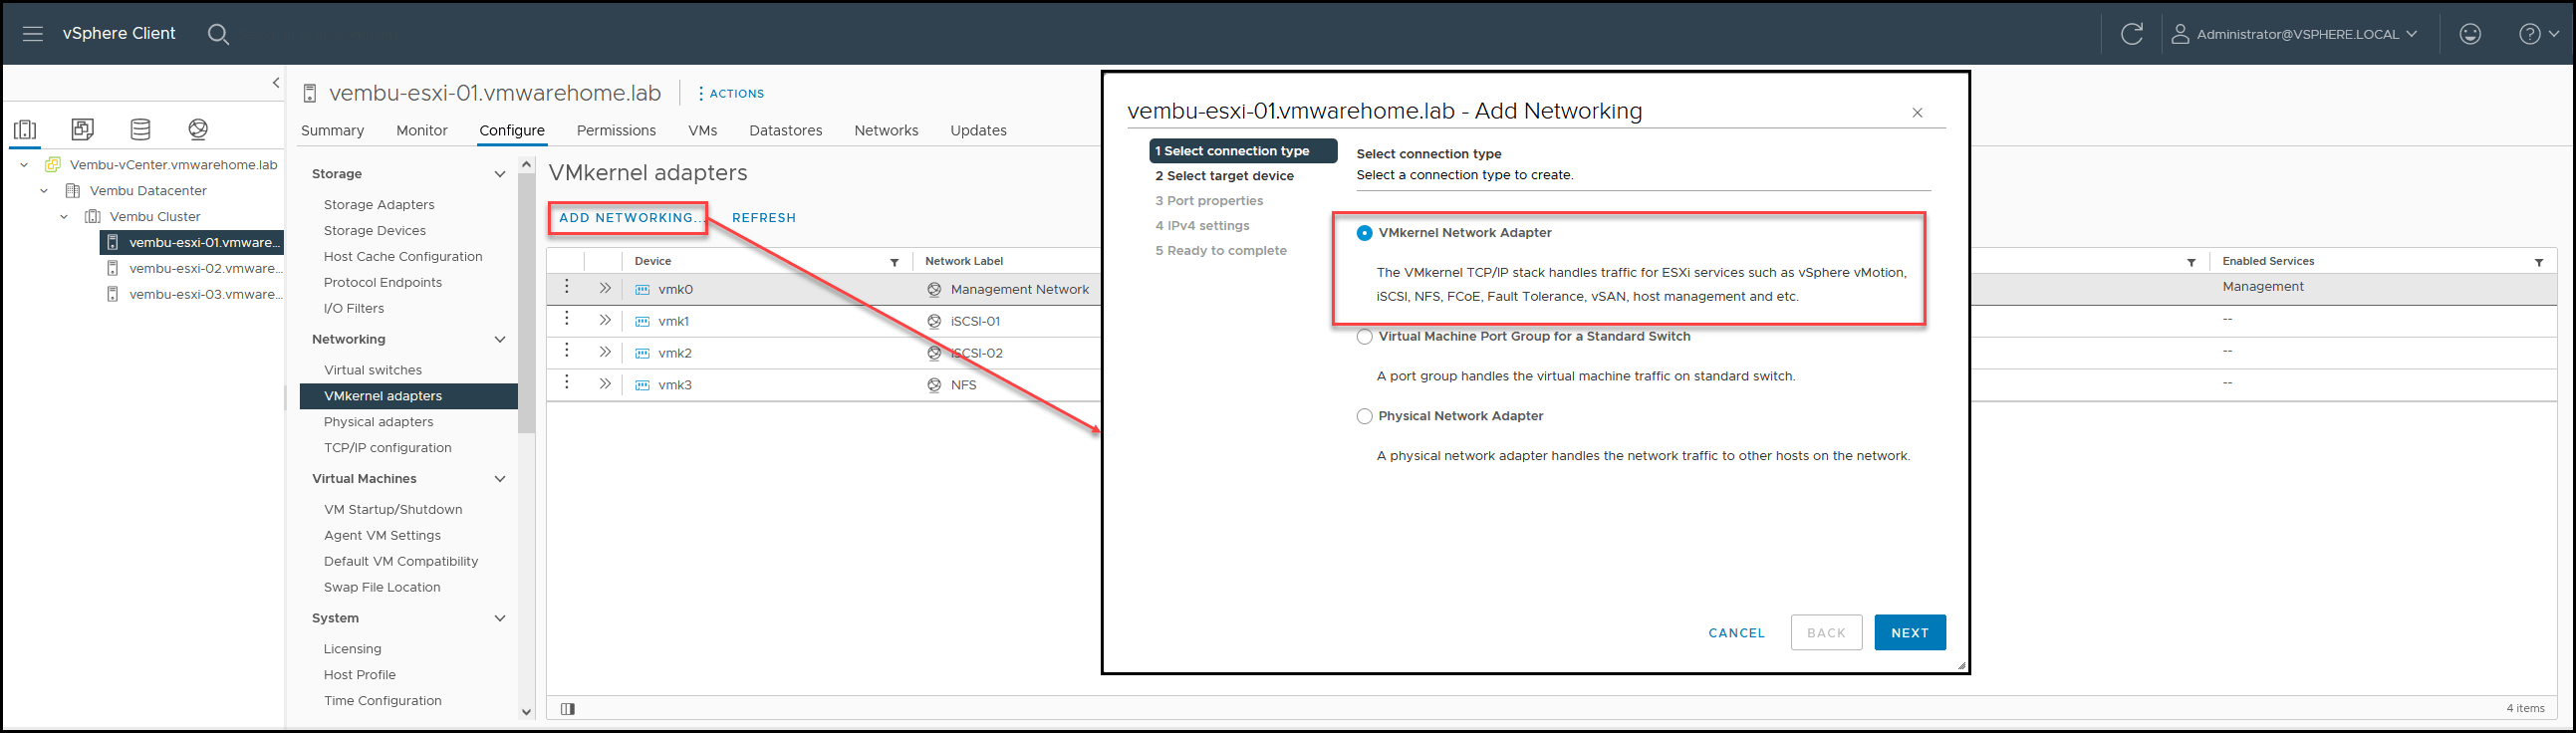
As we learned previously, go to the ESXi host, Configure – VMkernel Adapters – Add Networking and create a new VMkernel Network Adapter.
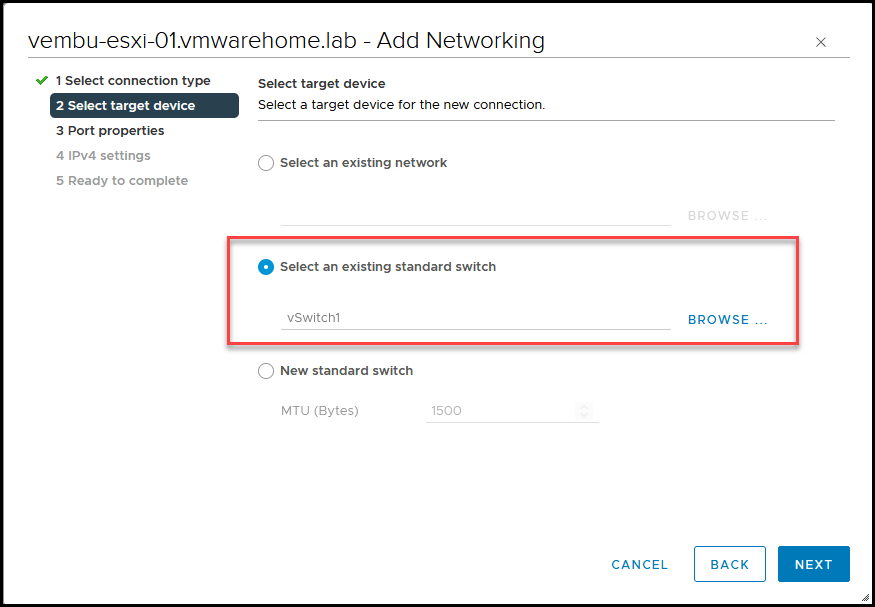
Next, we select the Virtual Switch. Since vMotion needs a good bandwidth, we will use the Storage vSwitch to add our vMotion.
If you have extra vmnics, you should create a new Virtual Switch and use the new vmnics so that vMotion works appropriately without any latency. Even 10/20Gb network interfaces are enough for most cases for Storage and vMotion.
Note: Don’t forget Best Practices for the vMotion Network; you should use 10Gb connections.
After you select your vSwitch, you need to enable the vMotion service for this VMkernel.
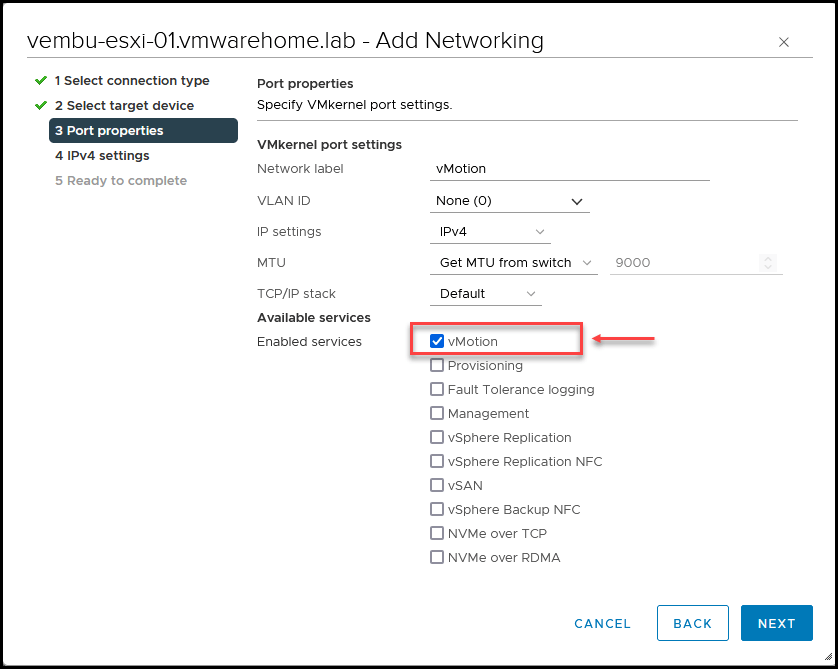
Add your IP and continue.
Note: I have seen some deployments where customers used DHCP for vMotion or even vSAN. This is an option that could give you problems in the future.
We had an example of some Physical Switches firmware upgrade that cleaned all DHCP table entries, and systems stopped working because all DHCP were lost. You can use it, but it should continuously be monitored. But to bypass any future issues, I never use DHCP for this type of service.

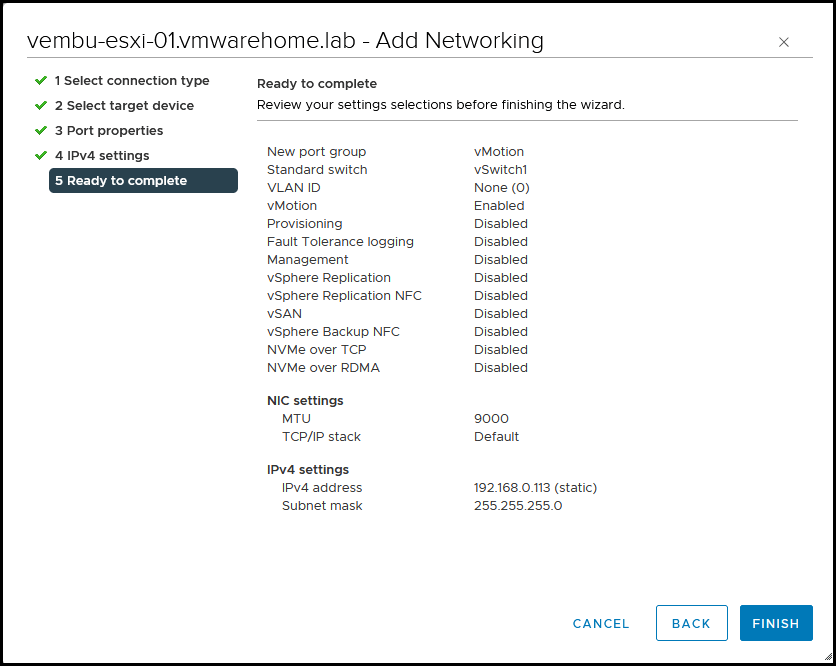
Next, check the information. If all is ok, click Finish.
As we can see in the next image, we now have a new VMkernel for vMotion.
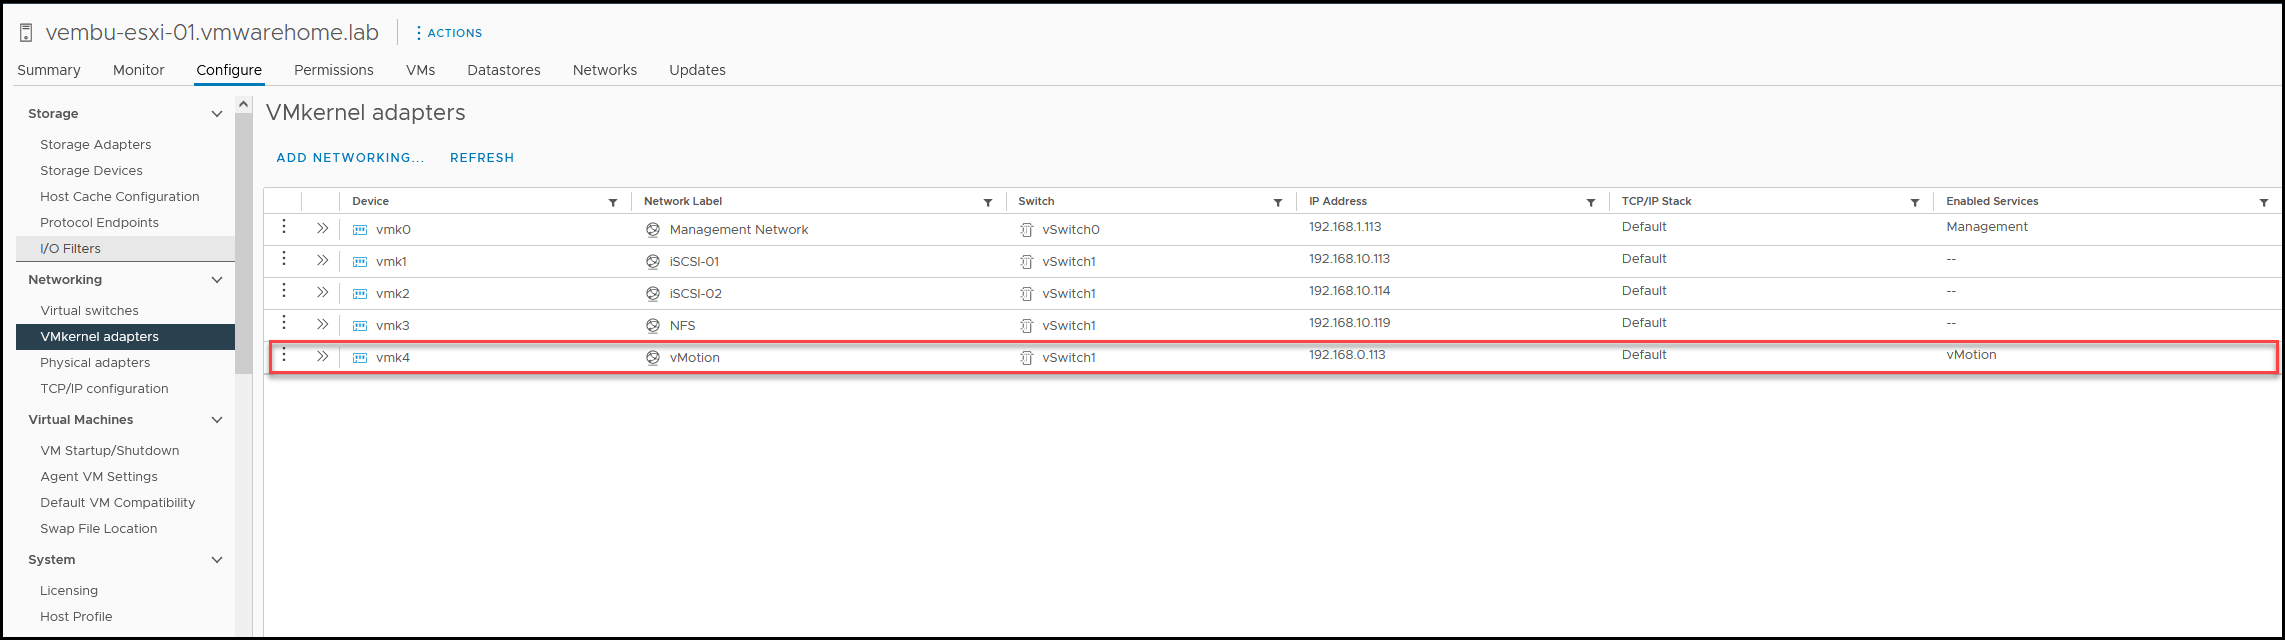
Note: For better performance and if there are vmnics available, we can create multiple vMotion VMkernel.
After you create a vMotion VMkernel in all ESXi, let us test our new vMotion Network.
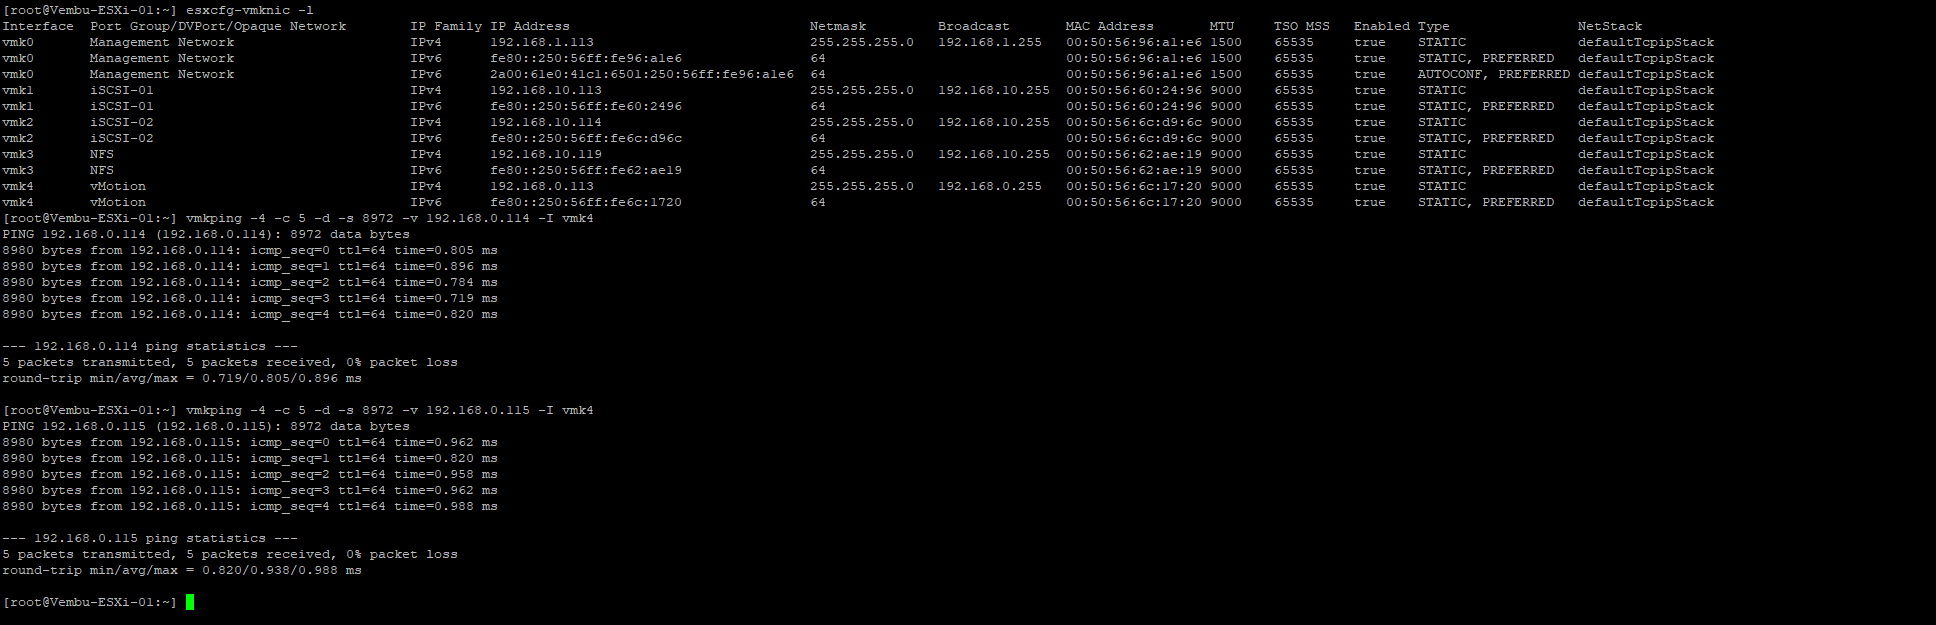
As we learn in previous articles, we use the ESXi command vmkping to test the VMkernel networks. So from one ESXi host, I will ping all the VMkernel in other ESXi hosts.
First, to make sure, I must identify the vMotion VMkernel with the command: esxcli-vmknic –l
Then ping all the ESXi hosts VMkernel IPs using Jumbo Frames(we learn in previous articles what are Jumbo Frames and MTU 9000).
All pings were successful, so the vMotion Network is working without issues.
Some quick vMotion migrations examples:
- It migrates only the VM to another ESXi host and doesn’t change the Datastore location
- It migrates the VM to another Datastores and doesn’t change the ESXi host location
- It migrates the VM location, ESXi host, and Datastore
- It migrates the VM to another vCenter (explained in the above design)

What is DRS
Now we have our vMotion Network created. We can now start enabling Distributed Resource Schedule(DRS).
First, let us talk a bit about DRS and how it works.
vSphere Distributed Resource Scheduler (DRS) offers the resources you need to run reliably. This utility works on a cluster of ESXi servers and manages load balancing and virtual machine placement. DRS also honors resource allocation policies at the cluster level while supporting system-level constraints.
How DRS Works
Dynamic Resource Scheduling (DRS) is a function of VMware vSphere that ensures virtual machines and their applications have access to the CPU, memory, and disks they need to run at optimal efficiency. In other words, DRS always tries to keep your VMs happy by providing them with the required compute resources as soon as they are powered on so that the VM’s performance is always balanced across the entire Cluster.
If a VM’s workload changes, it can have an impact on the balance in the Cluster. DRS monitors the Cluster at regular intervals (once every five minutes) to prevent bad performance and takes the necessary actions to restore balance.
For example, when DRS detects an imbalance, it migrates the virtual machines from one host to another using vMotion.
Automatic DRS ensures that each virtual machine in the Cluster has adequate host resources, such as memory and CPU, at all times.
For a deep dive into DRS and how it works, check this DRS document from VMware.
How to create a Cluster DRS
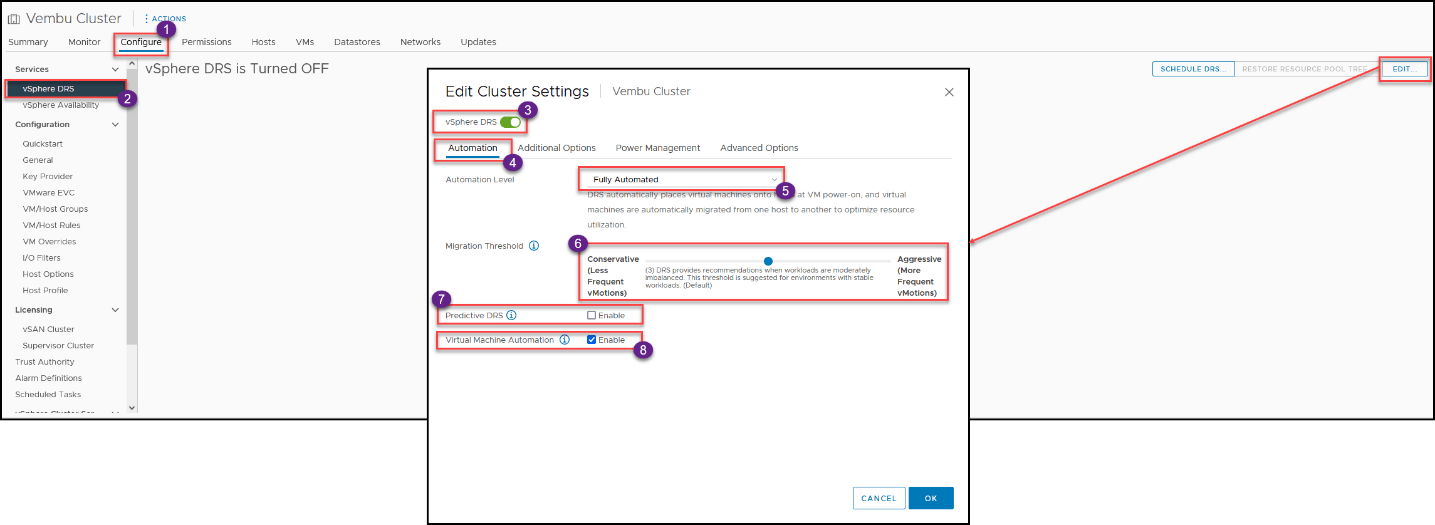
At the Cluster level, go to Configure and vSphere DRS and click Edit and in the vSphere DRS option, enable it.
There are some options that we can configure in DRS. Let us explain each one.
Automation Level
There are 3 levels of automation:
- Fully Automated – DRS applies both initial placements and load balancing recommendations automatically
- Partially Automated – DRS applies recommendations only for initial placement. Any VM that is Power on DRS asks and recommends the ESXi hosts that should be used
- Manual – The administrator must apply both initial placement and load balancing recommendations. An administrator needs to apply those recommendations manually
Migration Threshold
DRS can regulate migration and re-balancing behavior by adjusting the level of aggression. DRS has five levels ranging from 1 (most conservative) to 5 (most aggressive).
The more aggressive the level, the less parity is tolerated in the Cluster. The more conservative, then, the more parity is tolerated. As a result, DRS might initiate more migrations when you increase aggression.
By default, DRS aggression is set at 3. This number seems to be sufficient and balances peaks equally across all nodes in the Cluster. For most Clusters, this level of DRS works best.
An example: You have 3 ESXi hosts that have many workloads and are used, and ESXi hosts constantly reach the 100% capacity used. In that case, a more aggressive Threshold could be set to migrate VMs and have more balanced resources used.
But we need to consider that a more aggressive Threshold means more vMotion migrations and puts more stress on the vMotion Network and the Storage.
So always set the Threshold wisely, considering the benefits and downsides of the selected option.
Predictive DRS
Predictive DRS makes VM placement more accurate by utilizing VMware vRealize Suite data. Predictive DRS also provides automatic load balancing and host in-guest power control features that can minimize potential failures.
Enabling this option is unnecessary if you are not using VMware vRealize Suite data.
Virtual Machine Automation
This is individual virtual machine automation levels enabled and can override the cluster level settings for individual VM settings. Meaning that we cat set the DRS per VMS or VM groups.
Example: If you have sensitive VMs or applications that should not vMotion often because it will impact VM performance. The VM settings always override the DRS Cluster settings.
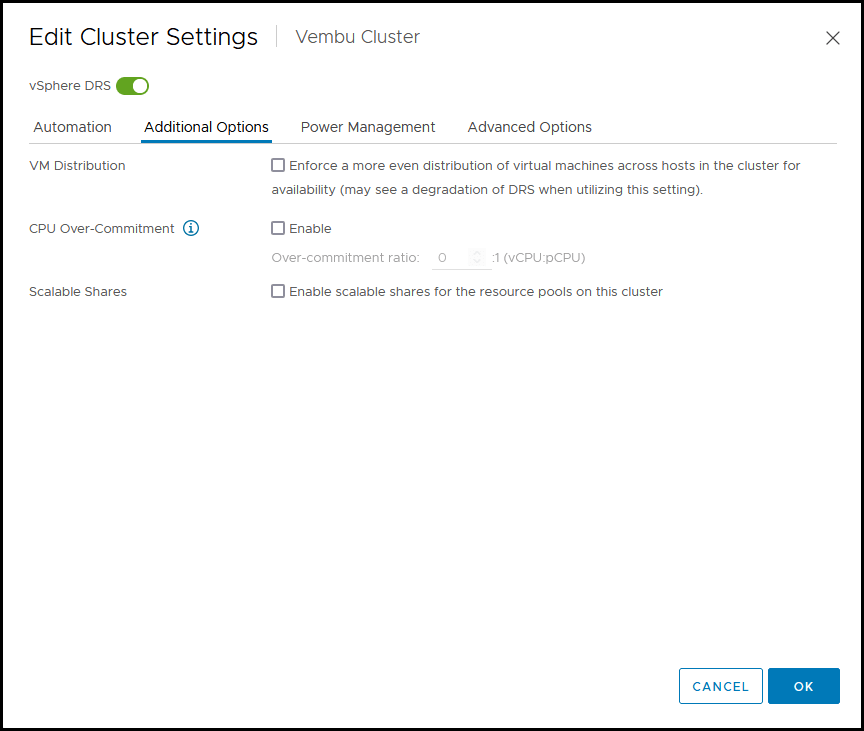
Additional options that we have in DRS.
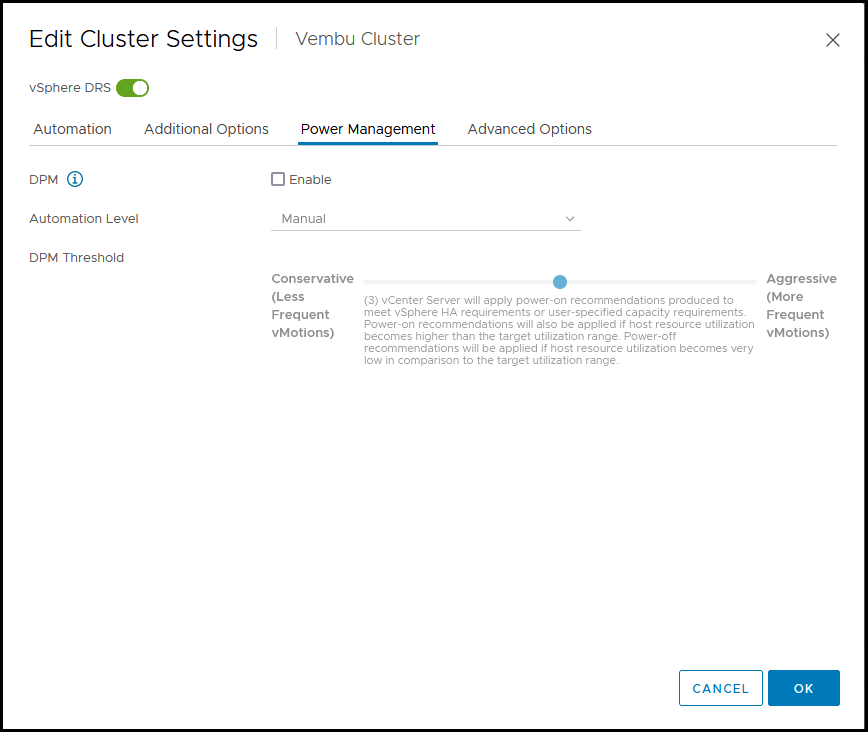
Power Management options for DRS.
What is DPM?
With vSphere DPM (Distributed Power Management), a DRS cluster can reduce its power consumption by powering off hosts when their usage is low. The feature monitors the demand for memory and CPU resources across the whole Cluster and turns off one or more hosts once enough excess capacity is found.
Once this has been completed, vSphere DPM migrates virtual machines to other hosts in order to maintain availability while conserving power.
When there isn’t enough capacity, DRS can power on hosts that are in standby mode and migrate virtual machines to them. DPM even takes into account resource reservations you make for your virtual machines.
Example: If you have 3 ESXi hosts in the Cluster, and let us say 20 VMs and 2 ESXi hosts is enough to run those 20 VMs, then DPM will power off one ESXi host to save power.
It saves power while providing enough processing power to keep the environment running without a lack of resources.
And with these last details about DRS and the options, we have finished and configured our DRS.
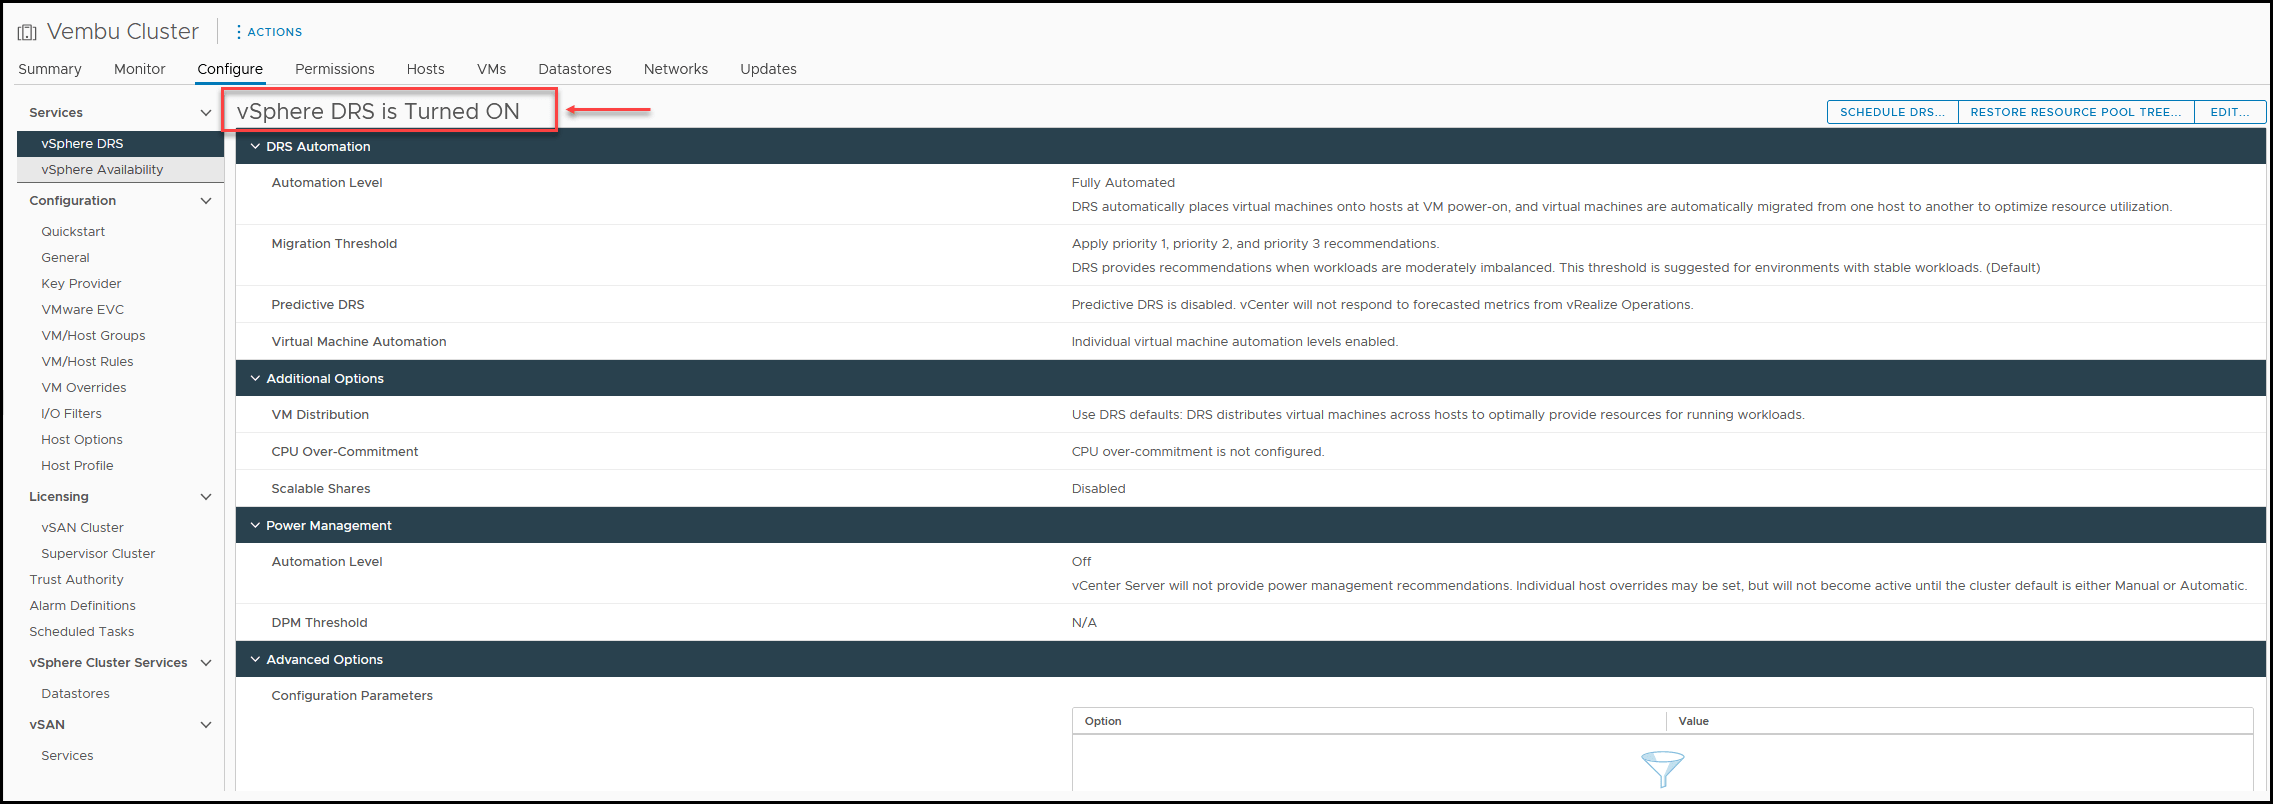
With the DRS section, we finish the vMotion and DRS subjects.
Now that we have vMotion Network configured and DRS enabled in our VMware environment, we can configure Cluster High Availability(HA) and Cluster Storage DRS. This is the next subject in the VMware for Beginners series articles.
Follow our Twitter and Facebook feeds for new releases, updates, insightful posts and more.

Leave A Comment