
In this vSphere Distributed Switch part D in VMware for Beginners, we will continue to discuss this subject and focus on creating and configuring vSphere Distributed Switch.
What will we discuss in this fourth blog post about vSphere Distributed Switch?
- How to use VLANs in vSphere Distributed Switch
- How to migrate from Standard vSwitch to vSphere Distributed Switch
In this fourth blog post about vSphere Distributed Switch, we will discuss migrating the networks between Standard vSwitch to vSphere Distributed Switch and migrating VMkernel(from ESXi management and iSCSI/NFS). We will also discuss how to use VLANs and LACP.
How to use VLANs in vSphere Distributed Switch
Since we cannot migrate our networks before we add VLANs, we will first add VLANs to our new vDS and port groups.
Note: Even though this section is only for environments that use VLANs, it is an important part of the vDS configuration, so we will discuss it here. You can skip this step if you are not using VLANs in your environment.

First, you need to add all VLANs at the vDS level.
This is done on the Logical vDS port group(created automatically by the vDS).
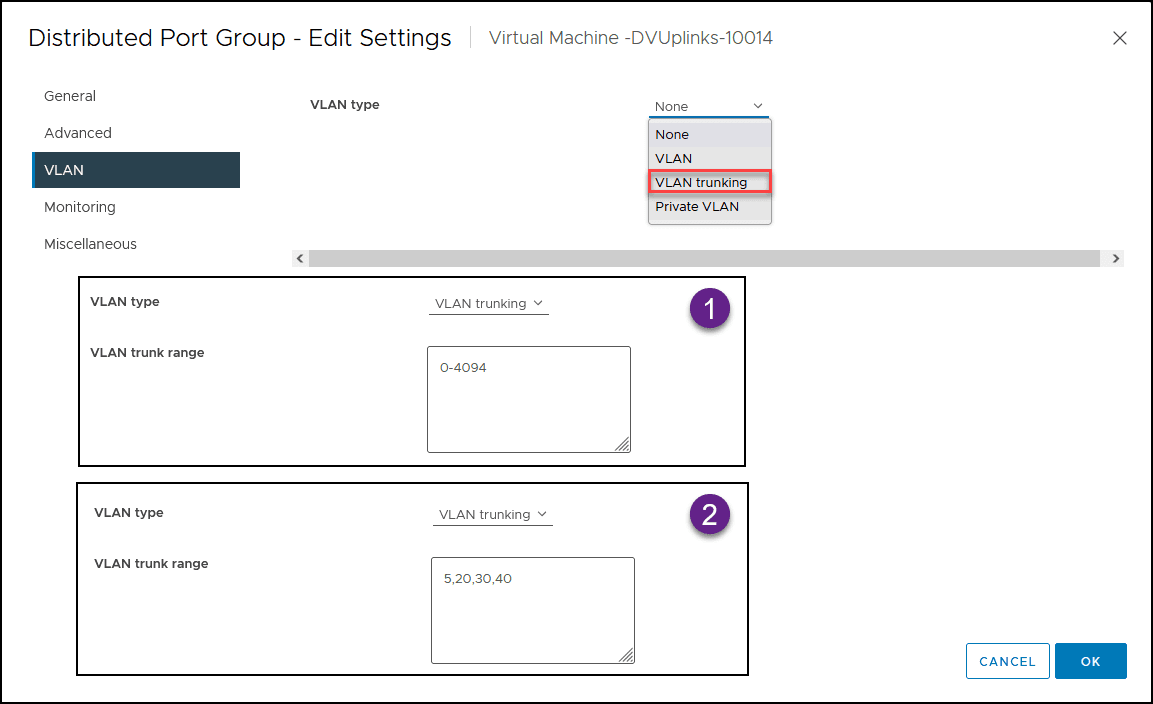
If you have only one VLAN to use, use VLAN option. If you have several port groups and several VLANs(as in our case), then you select the option VLAN trunking.
In VLAN trunking, you add VLANs in two different ways if you want to add the whole VLANs number(0-4094) or just add the VLANs that will be used separated by a comma.
For security reasons(users not using the wrong VLANs) and for better management of your networks, the second option is better.
After you add the VLANs that your vDS will use, you can add a VLAN for each Port group.
In this example, I will add the Management Port group VLAN. You can use this example to add to the rest of your Port groups.
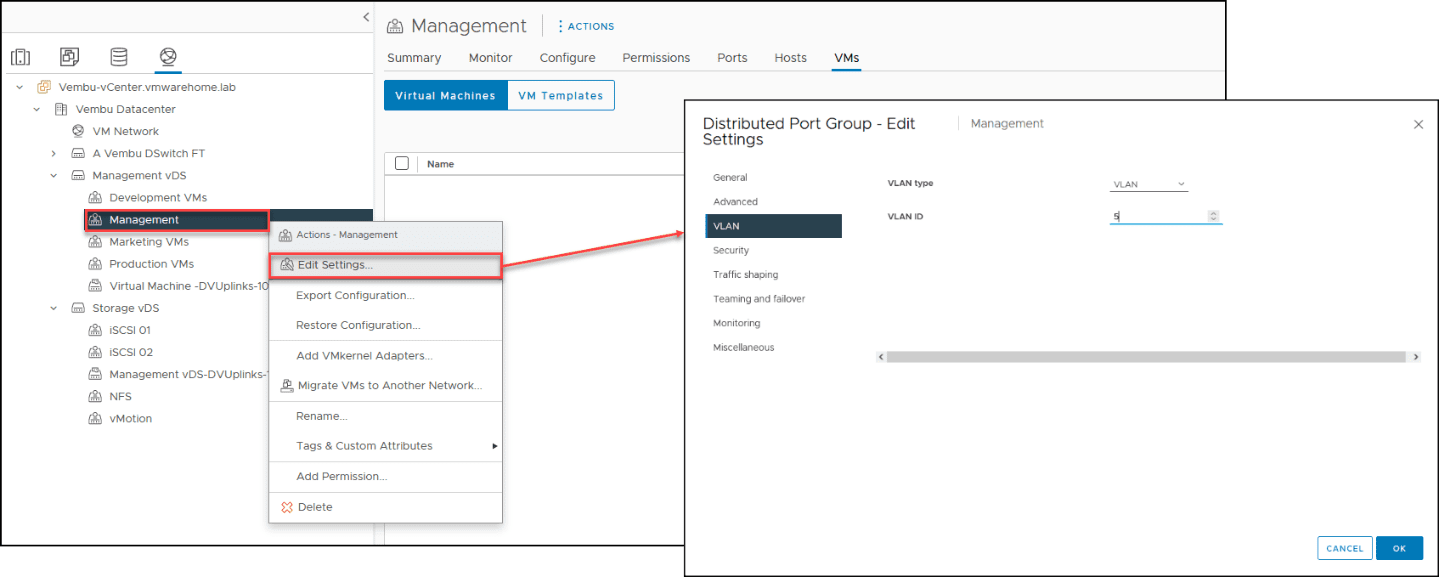
And now all your Port groups are using individual VLANs.
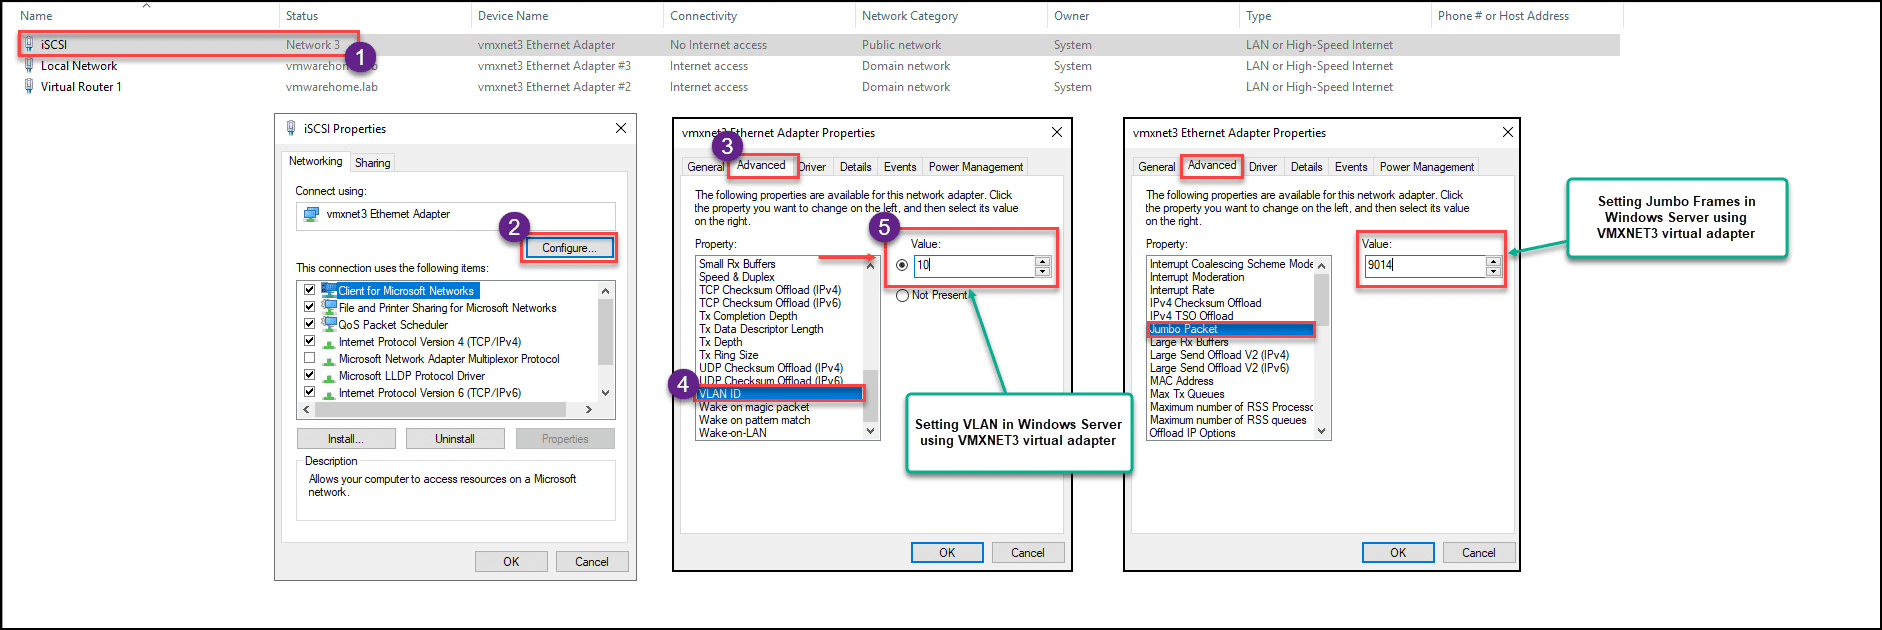
When you use VLANs in your VMs Networks, you need to consider that the Guest OS network adapter may also need to use the VLAN(if you are trunking the VLANs or using more than one VLAN in a Port group).
I will show a simple example of a Windows Server adding the VLAN to the VMXNET3 VMware network adapter.
Note: I use this example to show how to add Jumbo Frames to a Windows Server when using a VMXNET3 VMware virtual adapter.
Now we have our vDS and Porgroups ready for the network migration.
Note: In the above configuration, we assume you understand VLANs and how to configure them in your Physical Switch. Because any VLAN that is used in any vmnic is connected to a Physical Port Switch, and that port needs to have VLANs configured.
How to migrate from Standard vSwitch to vSphere Distributed Switch
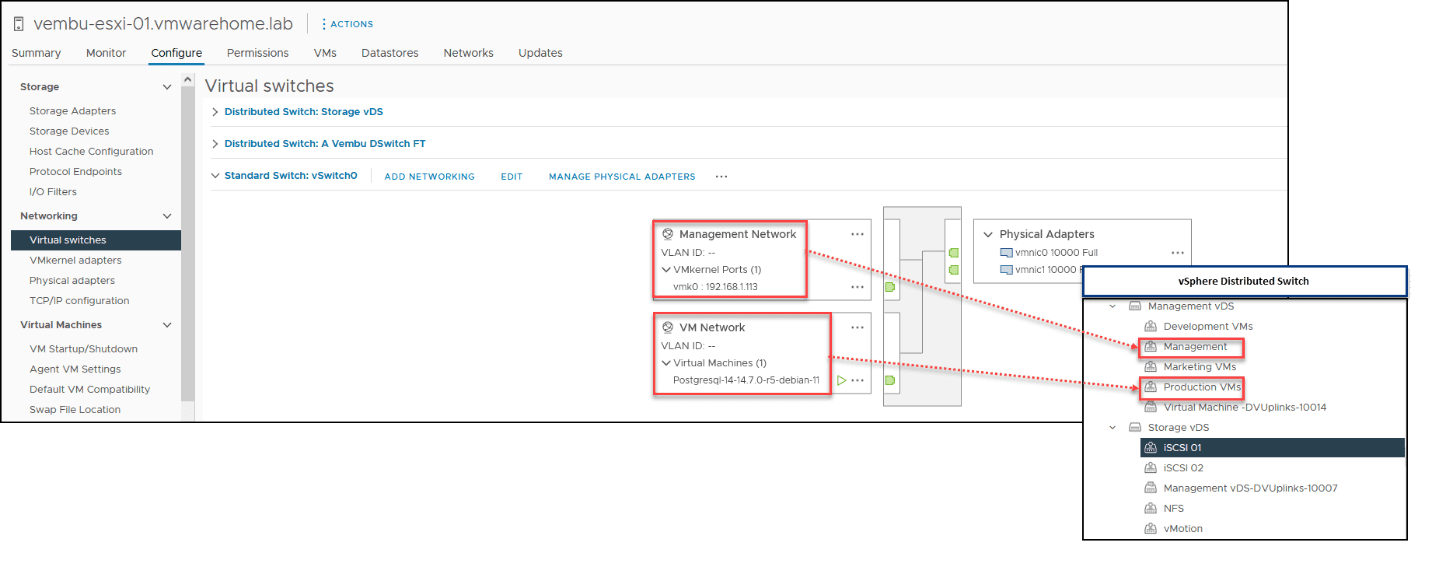
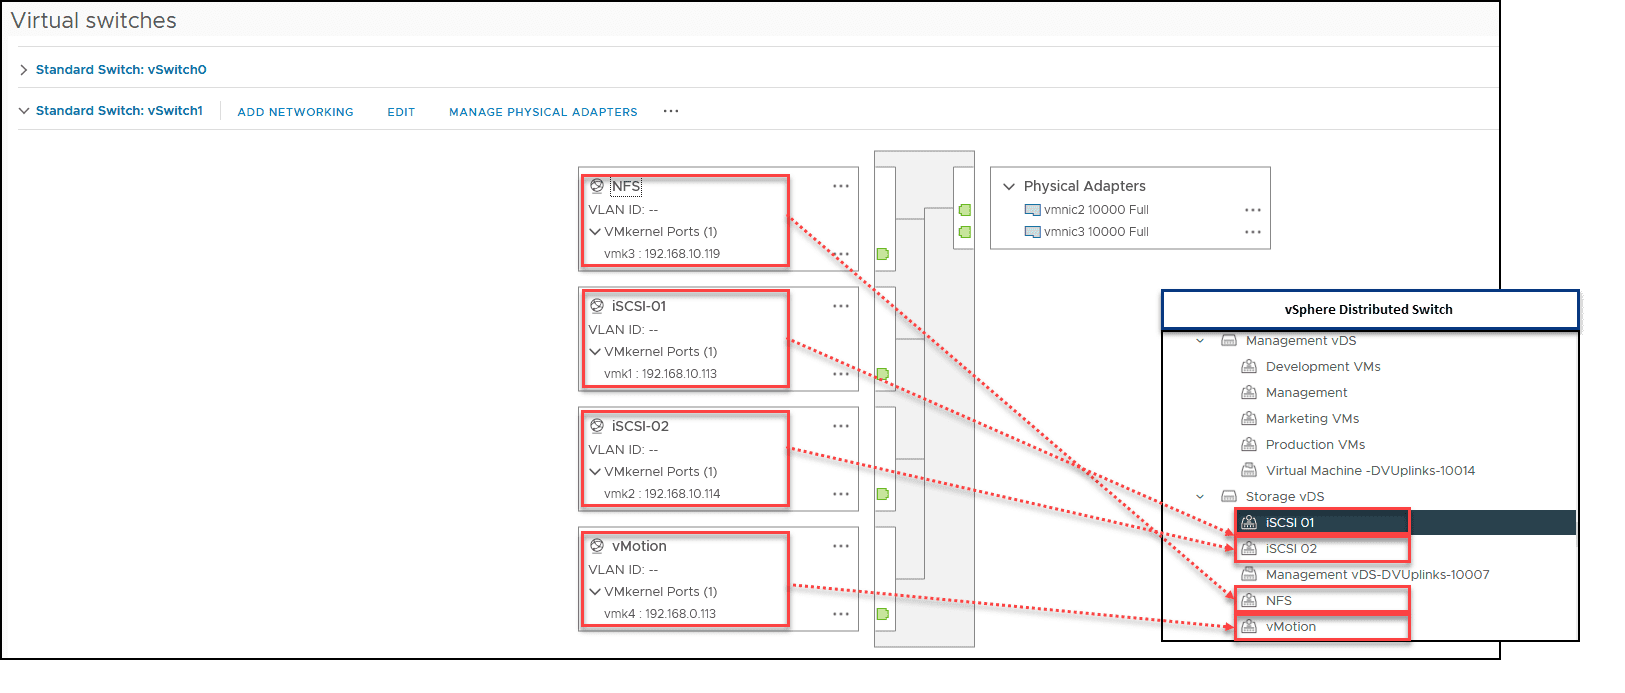
Since the VMware environment we have built since the beginning of this VMware Series has some specific Storage networks(like NFS and iSCSI), the next image is already updated with the same Port groups we have in the Standard Switch. I also updated the Storage vDS to consider those Port groups needing migration.
For the Management and Virtual Machines network
In the next images, we see the Standard Switches, the vSphere Distributed Switches, and the migration between Port groups.
For the Storage network
Next, we will go through how to add the vmnics to the vDS and how to migrate the VMkernel and the Port groups. We will also migrate the Virtual Machines network.
We will assume that you have already created the vDS, so we will only do the network migration. If you have not created the vDS, follow the Create a vDS section in the previous blog post.
As shown in previous articles, we have already created all the vDS, so we will only do a network migration.
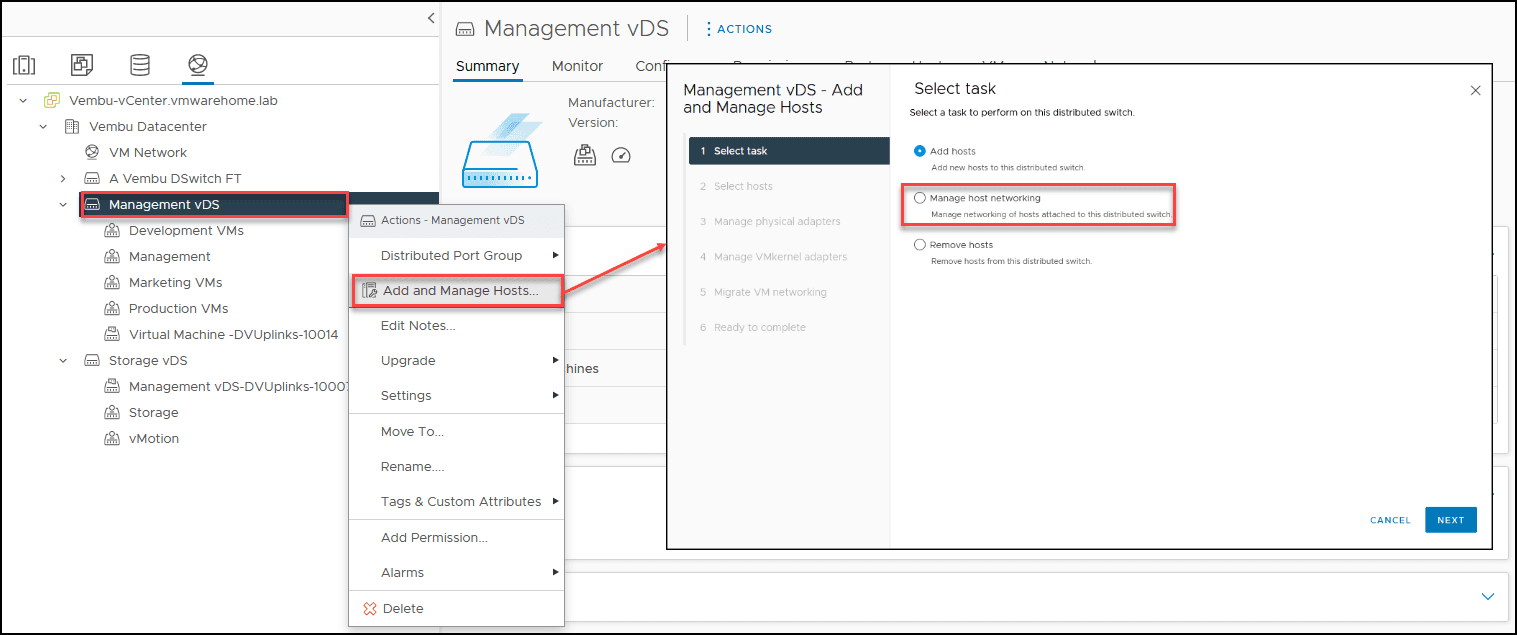
If you have already created your vDS and added the ESXi hosts but have not added vmnics and migrated the networks, you select the Manage Hosts Networking. Select Add Hosts if you have created the vDS or are creating it for the first time. Both options have the same steps(except when adding the hosts since no hosts are added to the vDS).
Right-mouse click and select Add and Manage Hosts and select Manage Hosts Networking.
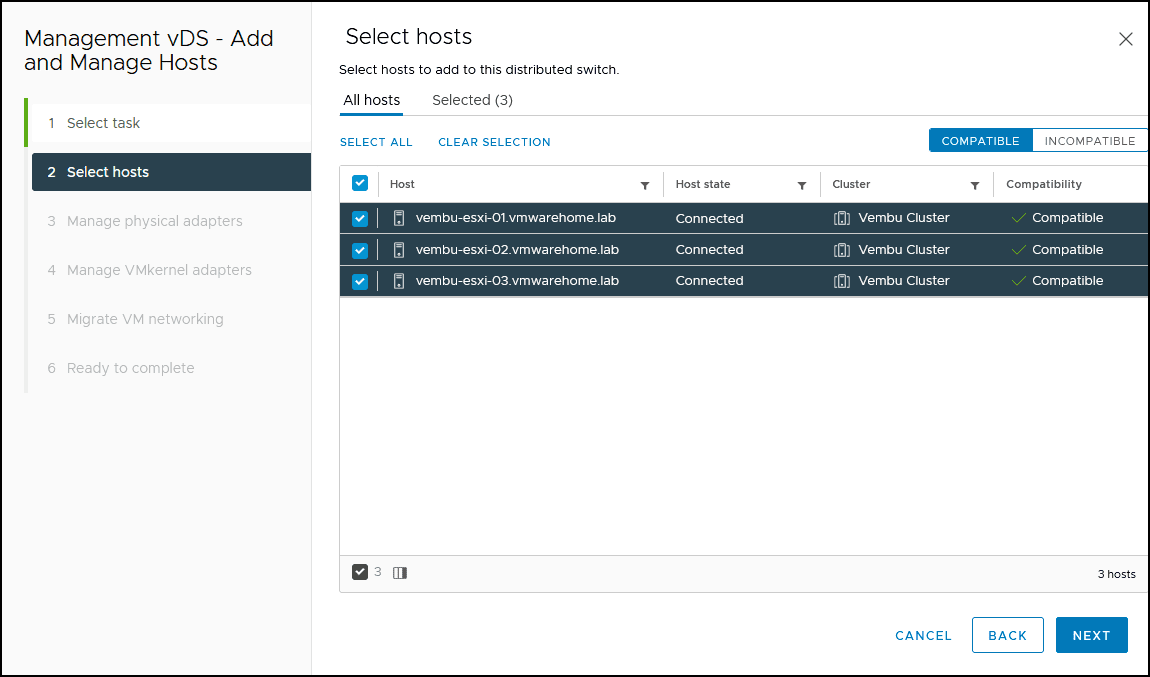
Next, select the hosts we are migrating to the network. Since we are migrating the full Cluster, we will select all the ESXi hosts.
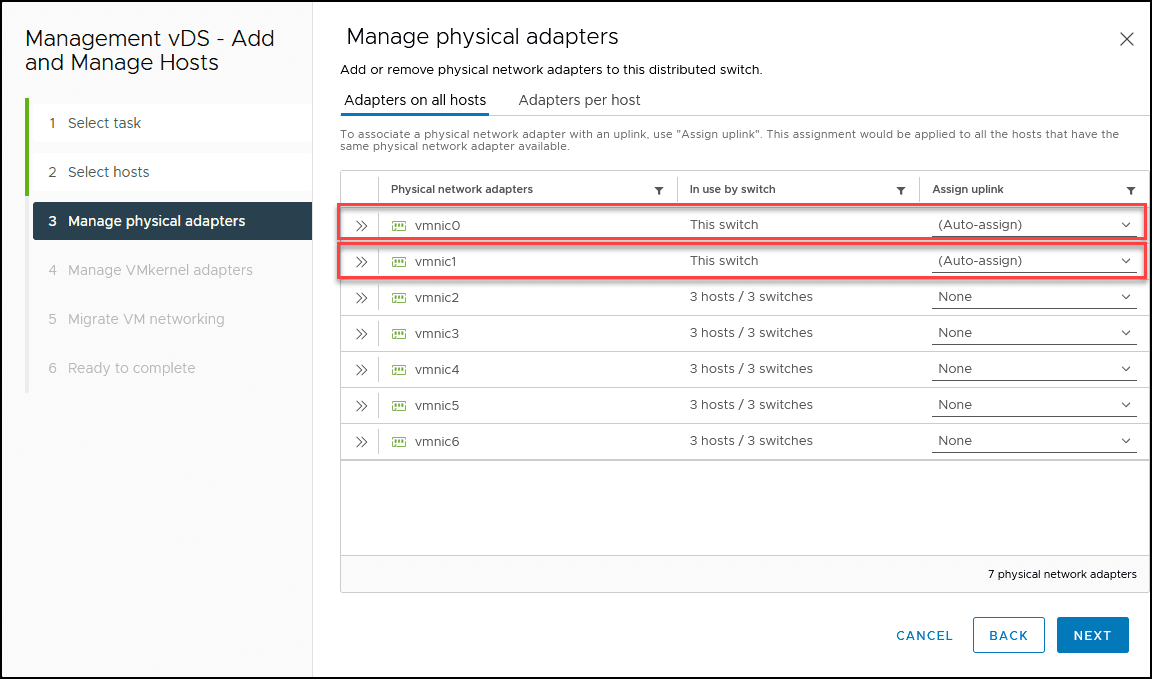
Next, select the vmnics that will be used on this vDS. Since we are migrating the Management network, as shown in our design, it uses vmnic0 and vmnic1.
Select Auto-assign, or select the uplink number.
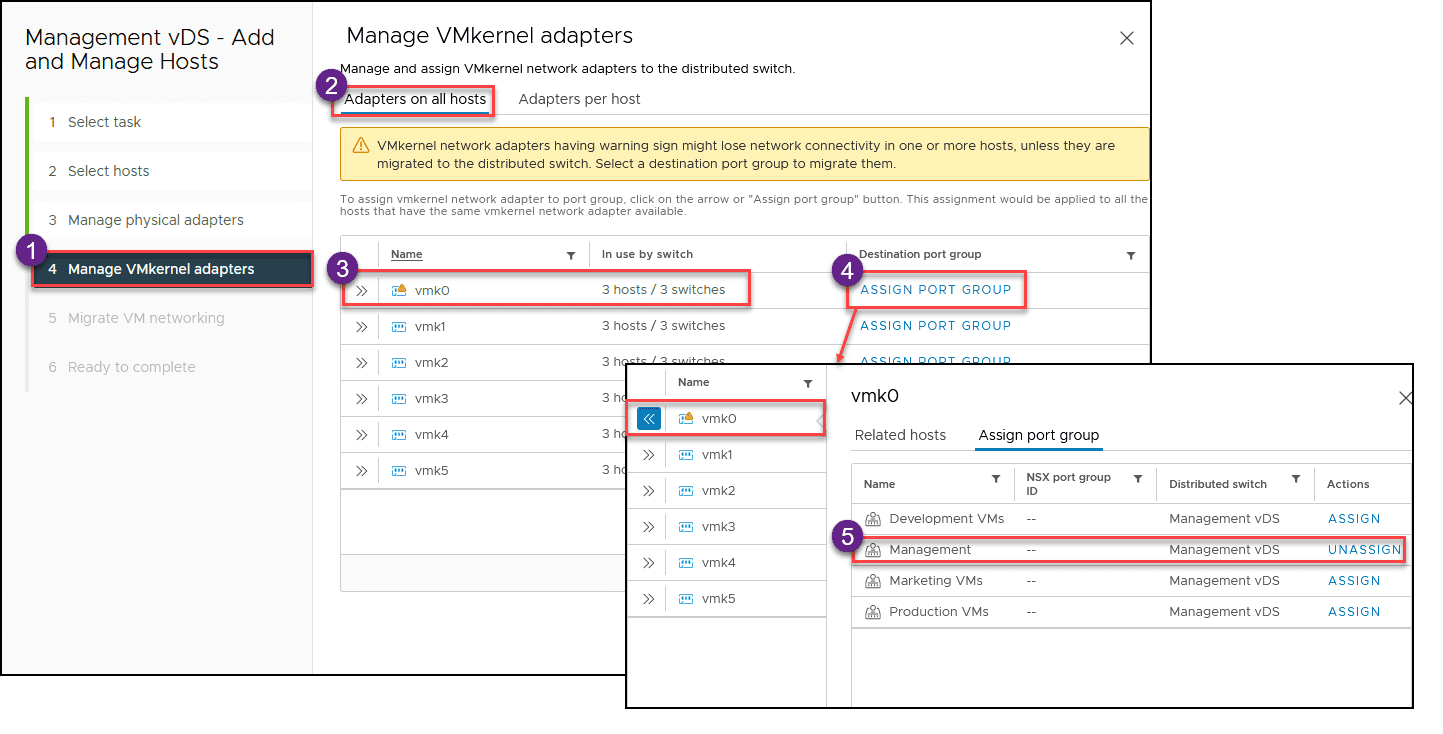
Next, we will migrate the VMkernel network for the management and VMkernel for the ESXi host management is vmk0 (check previous articles on how to check management VMkernel) and we will assign a port group by clicking the Assign Port Group option. Then select the port group, Management in this case, and click Assign.
Note: Since all ESXi hosts use the vmnics for management, we can do this for all ESXi hosts in just one step. You must use Adapters per host option if your environment uses different vmnics on different ESXi hosts.
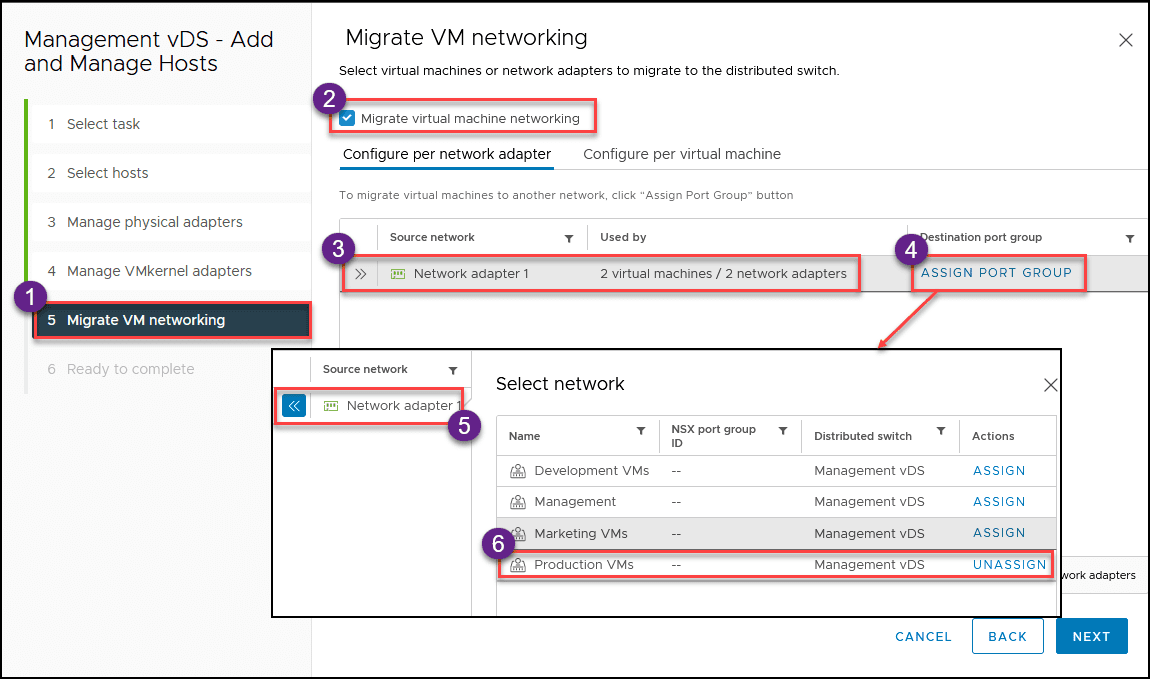
Next, we will migrate the Virtual Machines network. Our environment has 2 Virtual Machines using the Standard Switch network.
Since migrating VMs networking is disabled by default, you need to enable it (option 2). The process is similar when we migrate the VMkernel network and assign a port group by clicking Assign Port Group and select a port group to use on this VMs. For this case, we use the Productions VMs port group.
Note: In this example, VMs only have one Network adapter. In this case, it is adapter 1. If VMs have more, it will show here, and we would need to assign a port group for each adapter.
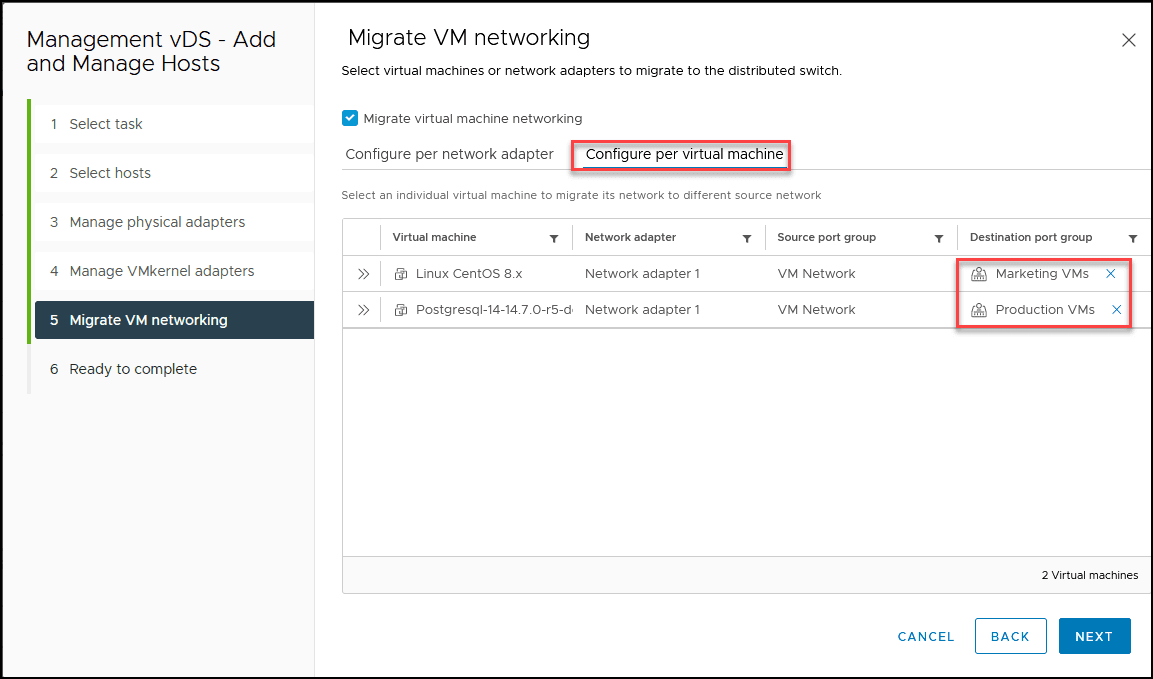
But if you have several VMs and some belong to different departments, we need to use Configure per virtual machine option.
Next is an image with that example, where we put one VM in the Production VMs network and the other in the Marketing VMs network.
After we select all VMkernel and Virtual Machines networks, it will show all the information(how many networks or VMs will be migrated), then click Finish to start the migrating from your Standard Switch to the new vDS.
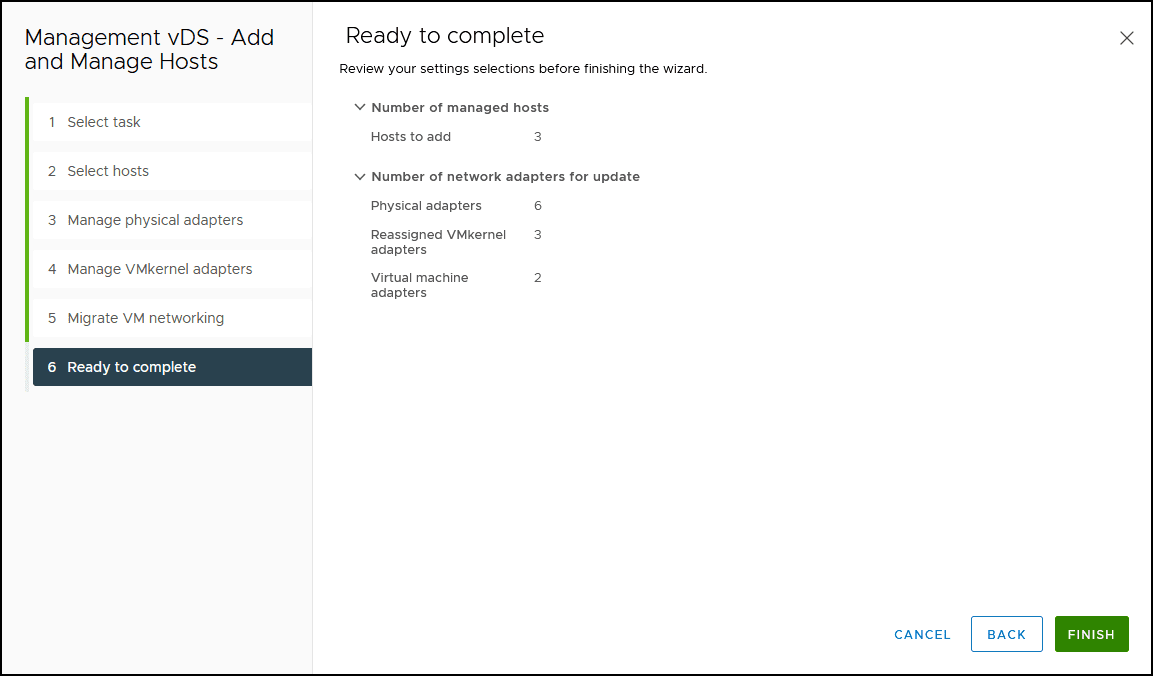
If all is okay with no issues, you will see the tasks, and vCenter will migrate all the networks without downtime(for the ESXi hosts and VMs).
Note: If there is any issue with the ESXi hosts migration, missed configuration in the new vDS, and ESXi hosts are not connected, vCenter will roll back the migration and give an error/warning. This is a protection, so you don’t lose any ESXi host network.
In my case, in one port group, there was an added wrong VLAN (a typo), and the first attempt did not finish properly. I needed to double-check all vDS to find the problem.
Now you can select an ESXi host, go to the Switches option and select the new vDS and you will see vmk0 now migrated to the new vDS created.
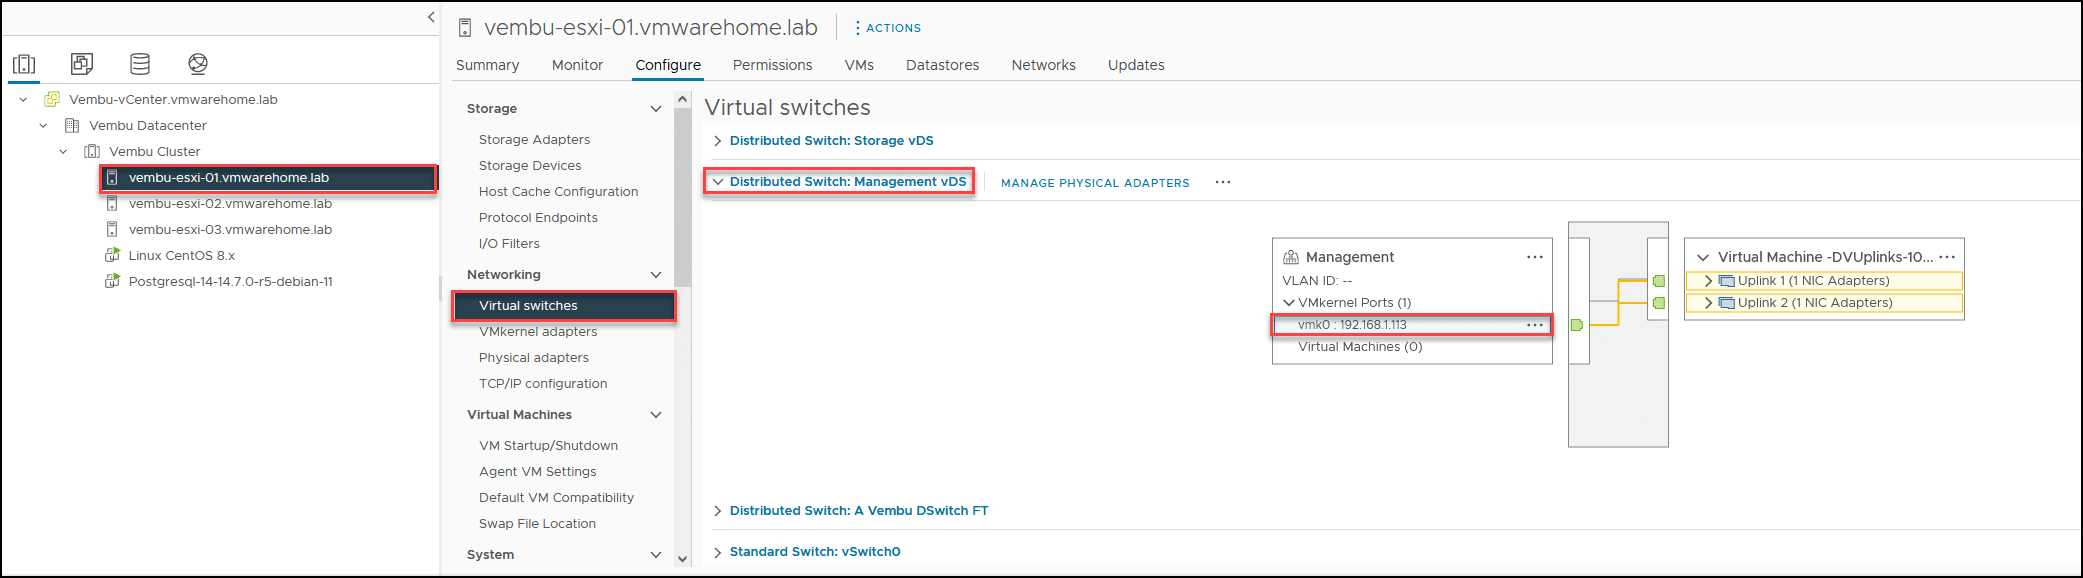
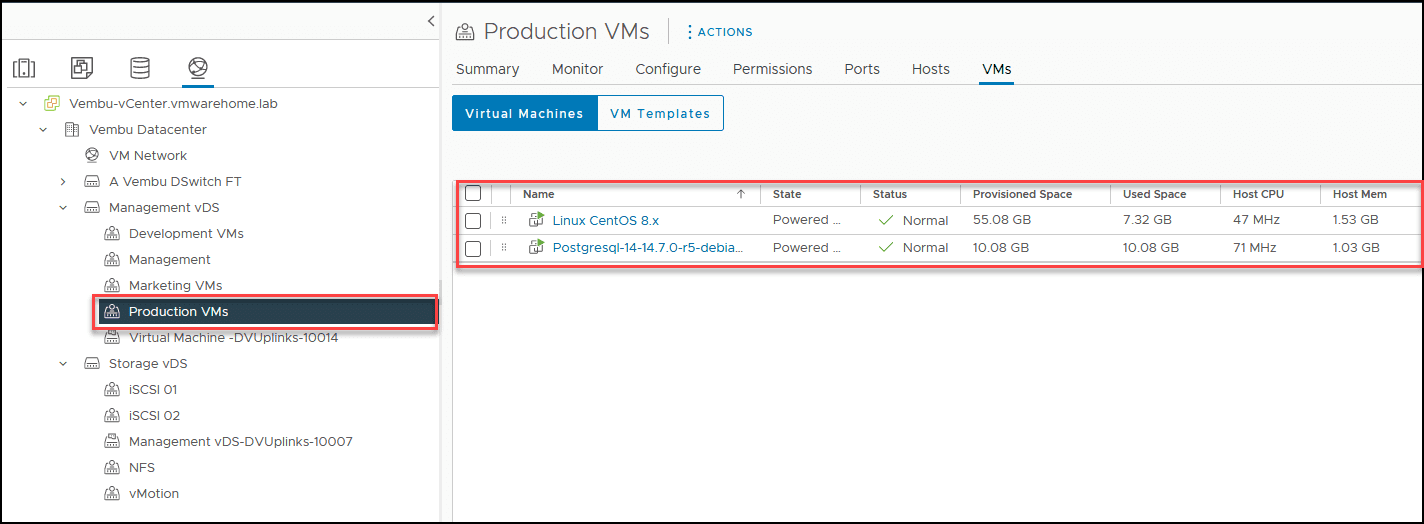
In the vDS, in this case, the Management vDS, you can click in the VMs section and see the VMs that were migrated.
Note: For troubleshooting on the safer side and to check the migration, you should ping one or two VMs during the migration to double-check that there is no problem with the VMs network.
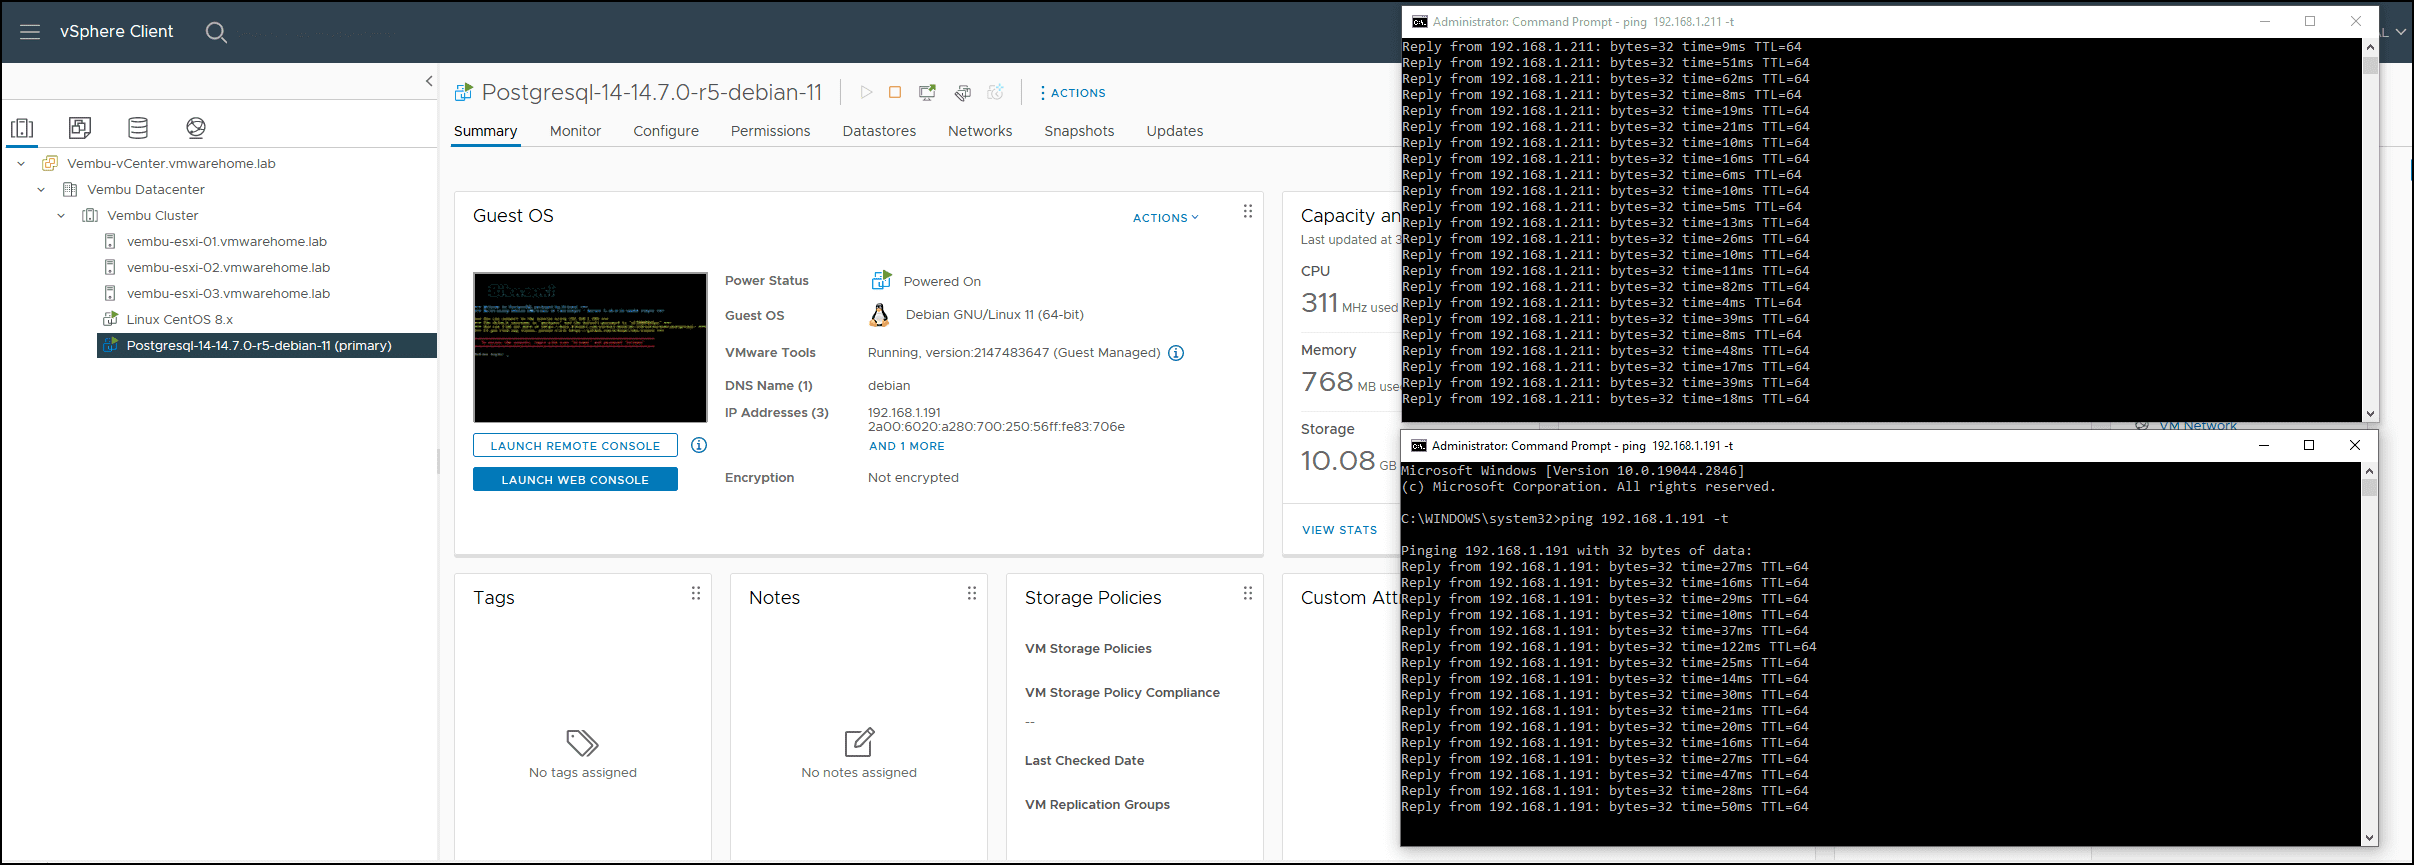
As we can see above, all migrations were done successfully.
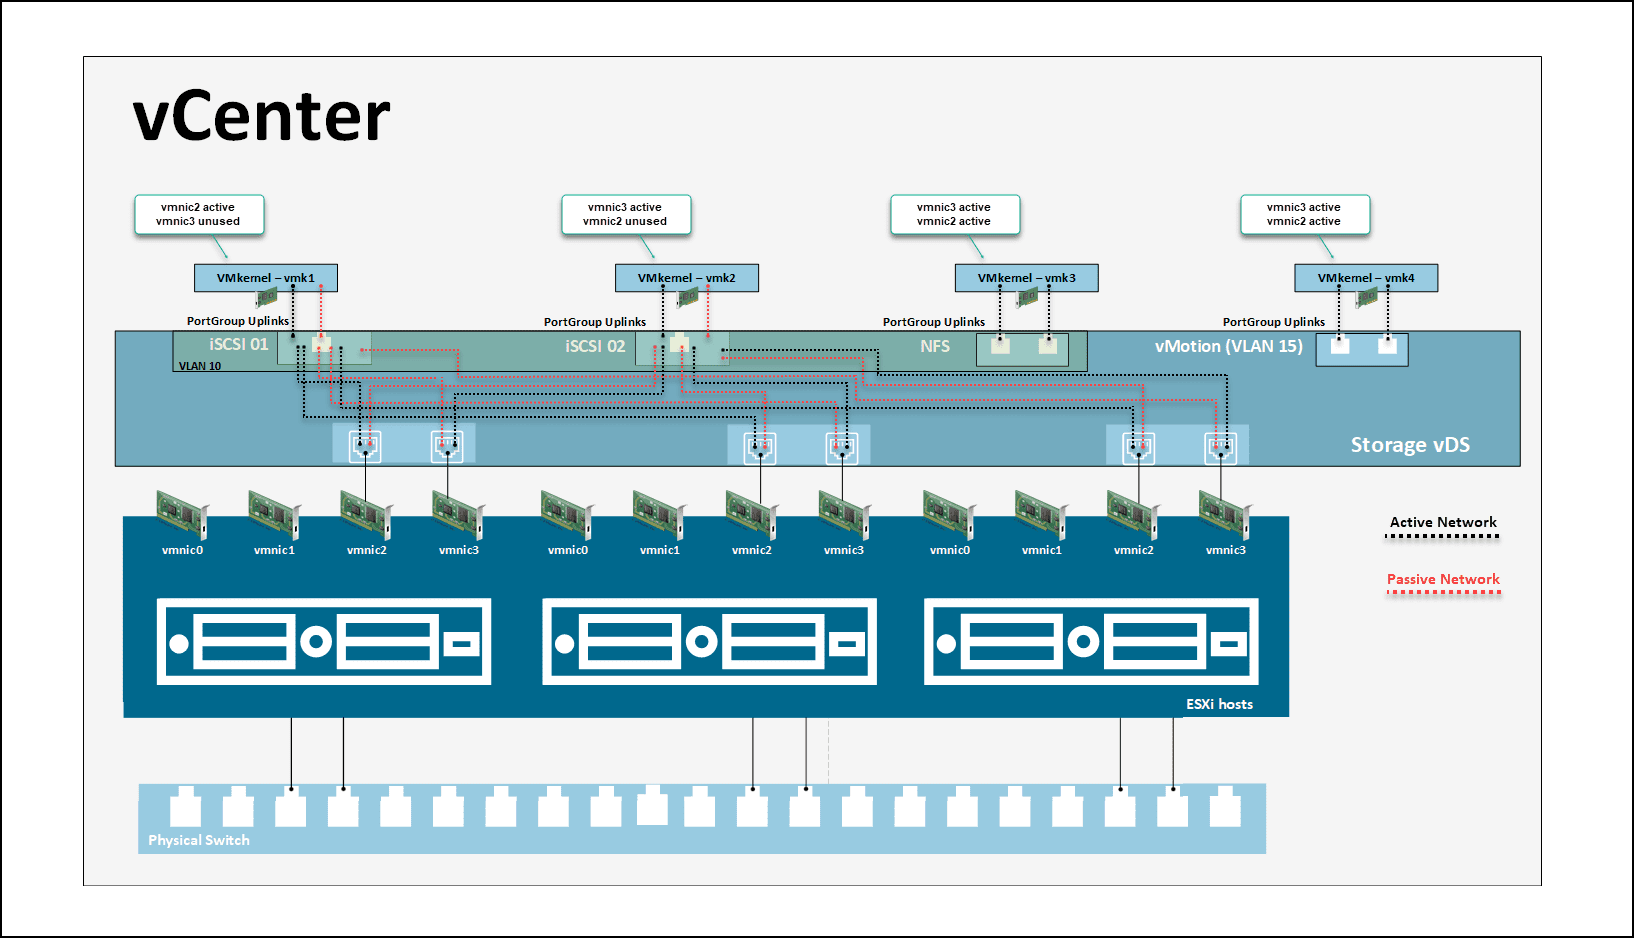
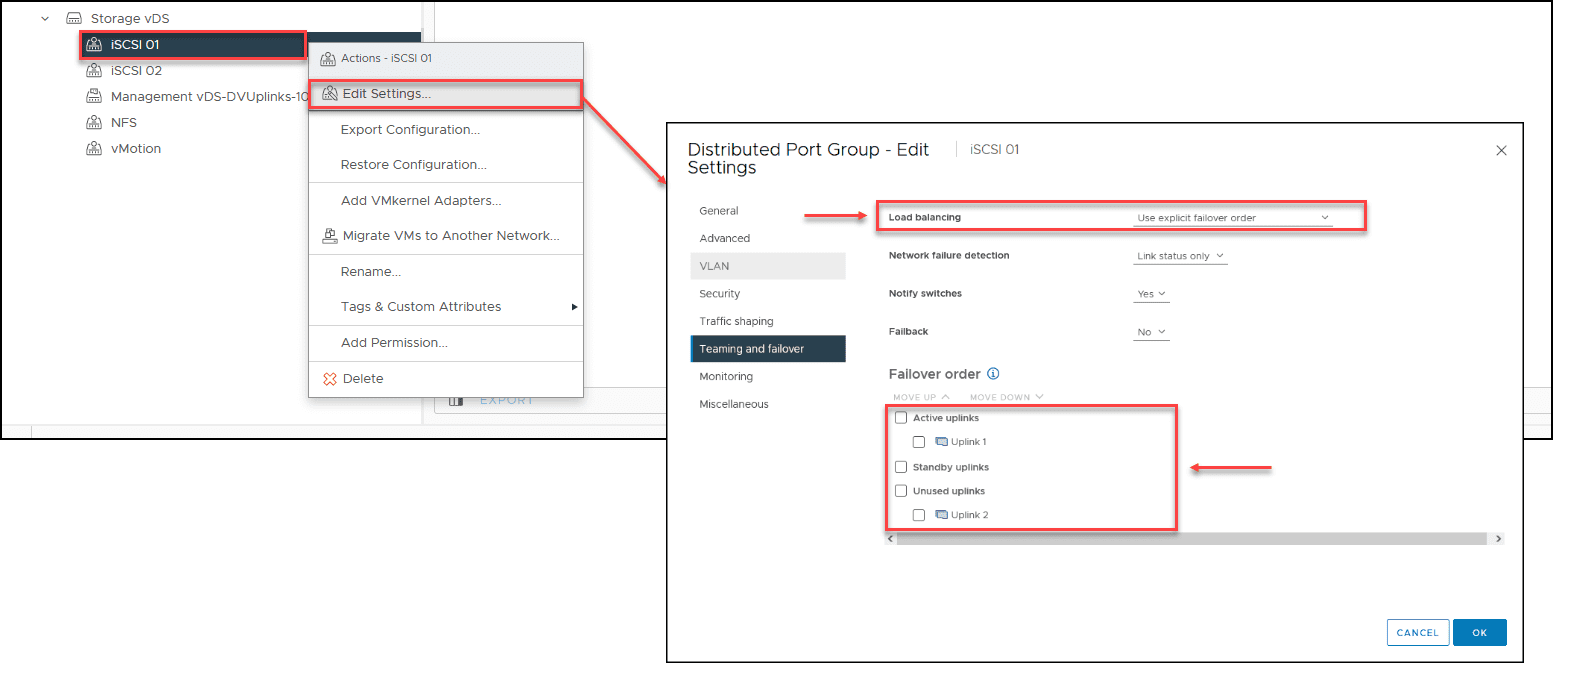
Before we finish this fourth blog post about vDS, I will review the other vDS that use Storage. Since this Storage vDS will use iSCSI, it needs some special configuration in the uplinks. Similar to what we have done in the article that we discuss iSCSI, but now in the vDS.
First, this is the output of our Storage vDS.

As you remember from the previous article, when we discuss iSCSI, it needs to have 2 separated port groups, each with a vmnic active and the second unused. We need to do the same in the vDS.
As we can see in the next image, our iSCIS 01 port group has Uplink 1 active and Uplink 2 unused. So the iSCSI 02 port group needs to have Uplink 2 active and Uplink 1 unused so that we can use iSCSI Port Binding.
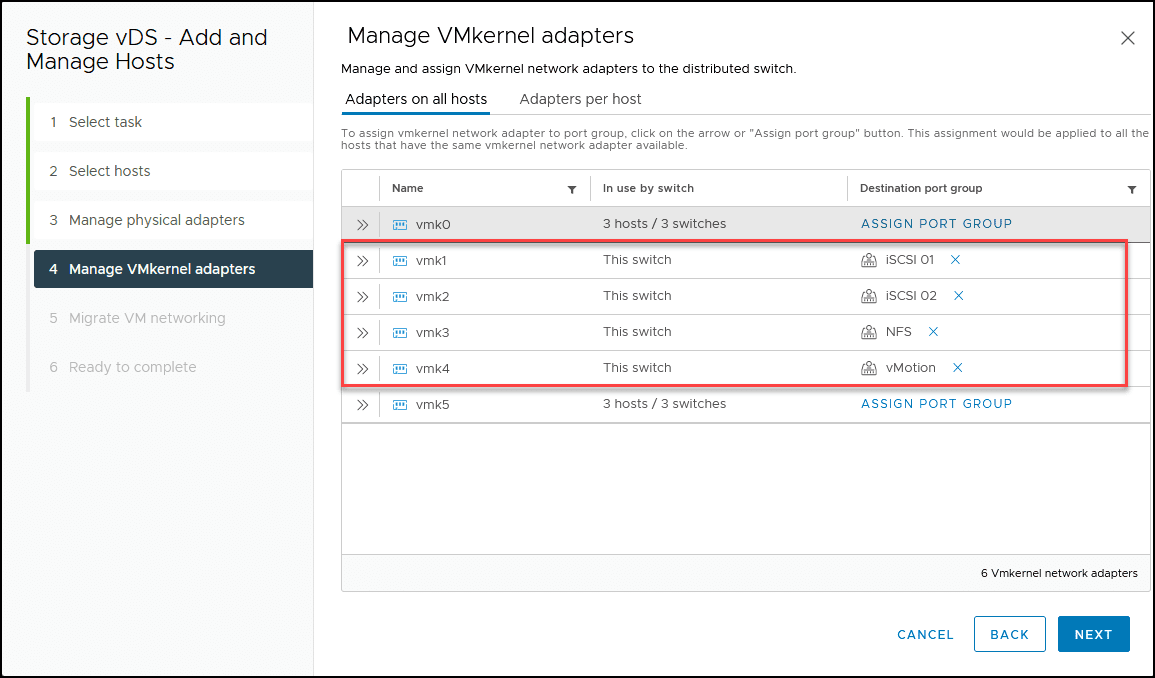
We set Teaming and Failover both Uplinks to active for the vDS level, NFS, and vMotion port group.
Then when we migrate all the Storage VMkernel – it should be like shown in the below screenshot, when migrating the vmnic2 and vmnic3(used for Storage like shown in our design).
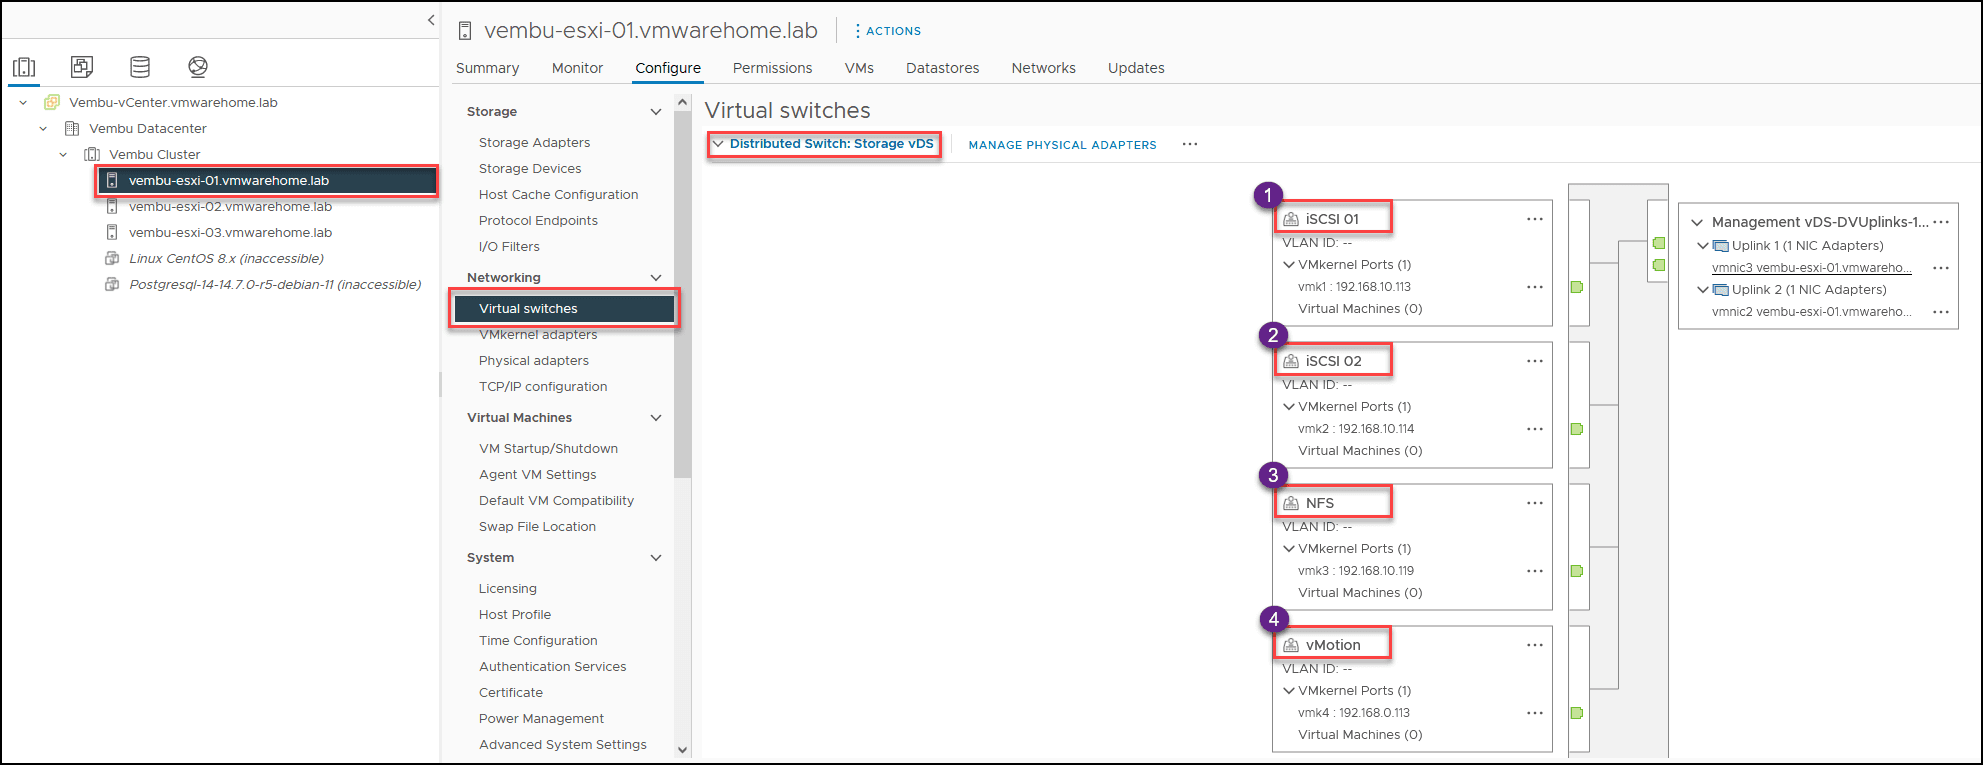
And in each ESXi host you will not see the Storage vDS migrated from the Standard Switch.
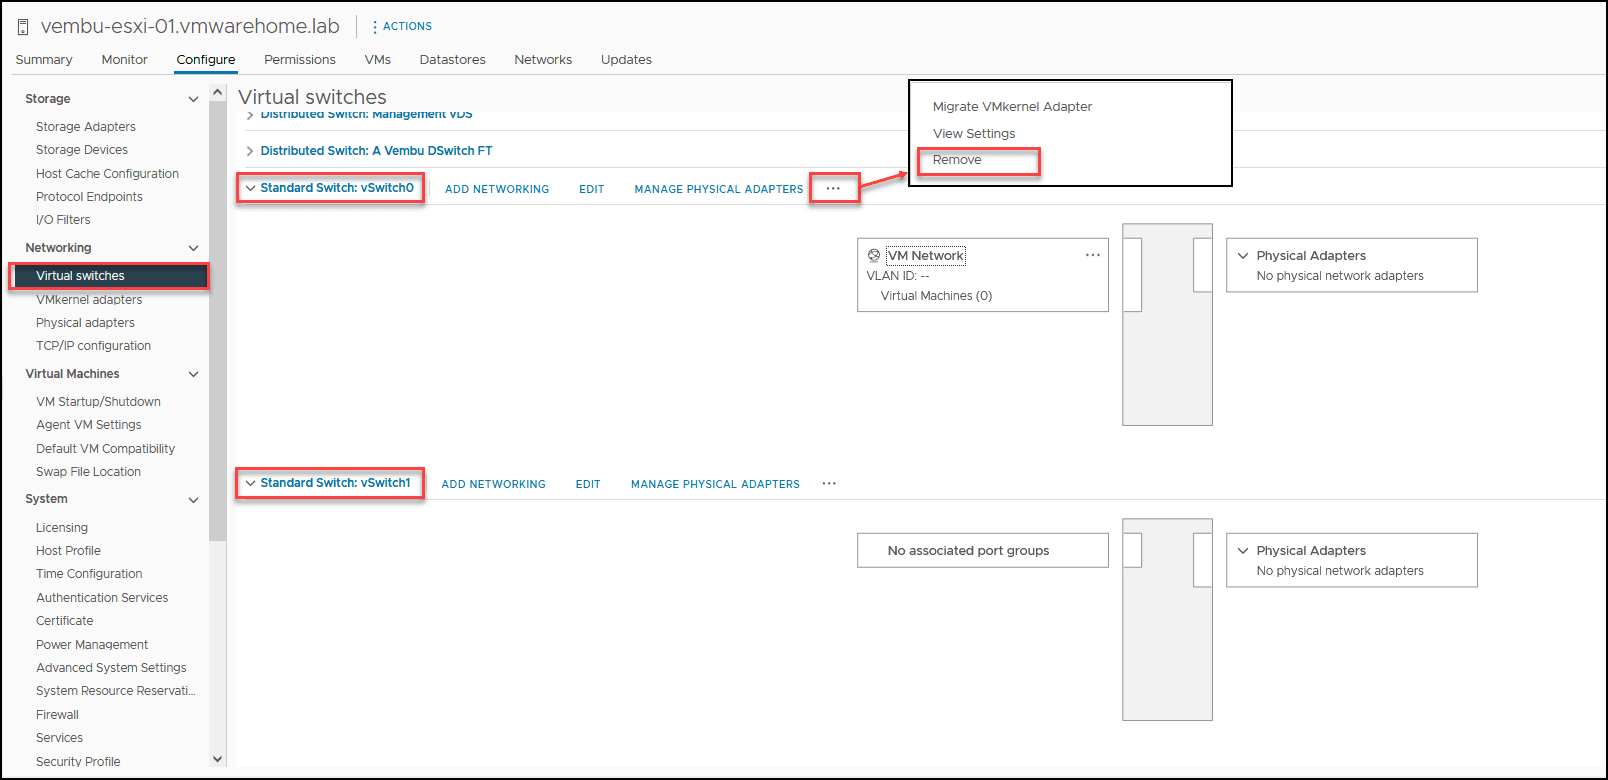
For the final step, we should delete all the old Standard Switch from each ESXi host.
With this section and the last step, we finish this fourth blog post about vSphere Distributed Switch. In the next blog posts, we will continue to discuss more on vDS configurations.
Related Posts:
VMware for Beginners – What is vSphere Distributed Switch: Part 15(a)
VMware for Beginners – What is vSphere Distributed Switch: Part 15(b)
VMware for Beginners – What is vSphere Distributed Switch: Part 15(c)
Follow our Twitter and Facebook feeds for new releases, updates, insightful posts and more.