
In this second part, How to use LACP in vSphere Distributed Switch in VMware for Beginners series, we will continue to discuss LACP in vSphere Distributed Switches and focus on creating and configuring vSphere Distributed Switch.
What will we discuss in this second part of How to use LACP in vSphere Distributed Switch?
How to configure LACP in vSphere Distributed Switch
During the LACP session, we will explore the implementation of LACP in the vDS and guide you through the process of migrating your networks to the newly implemented vDS LACP.
Let’s begin by configuring LACP in a vSphere Distributed Switch (vDS). We will create our vDS named “Vembu LAG” with a portgroup called “LACP-LAG vDS”.

Note: Please be aware that in the following demonstration, we will use different names for ESXi hosts, vDS, and Portgroups. This variation is due to the limitations of enabling LACP in a nested environment.
Although we will showcase the steps using our nested environment(the same we have been using since the beginning of this VMware for Beginners series), it’s important to note that the actual LACP and physical configurations are performed in our physical VMware environment, which has been expressly set up with LACP for the purpose of this article.

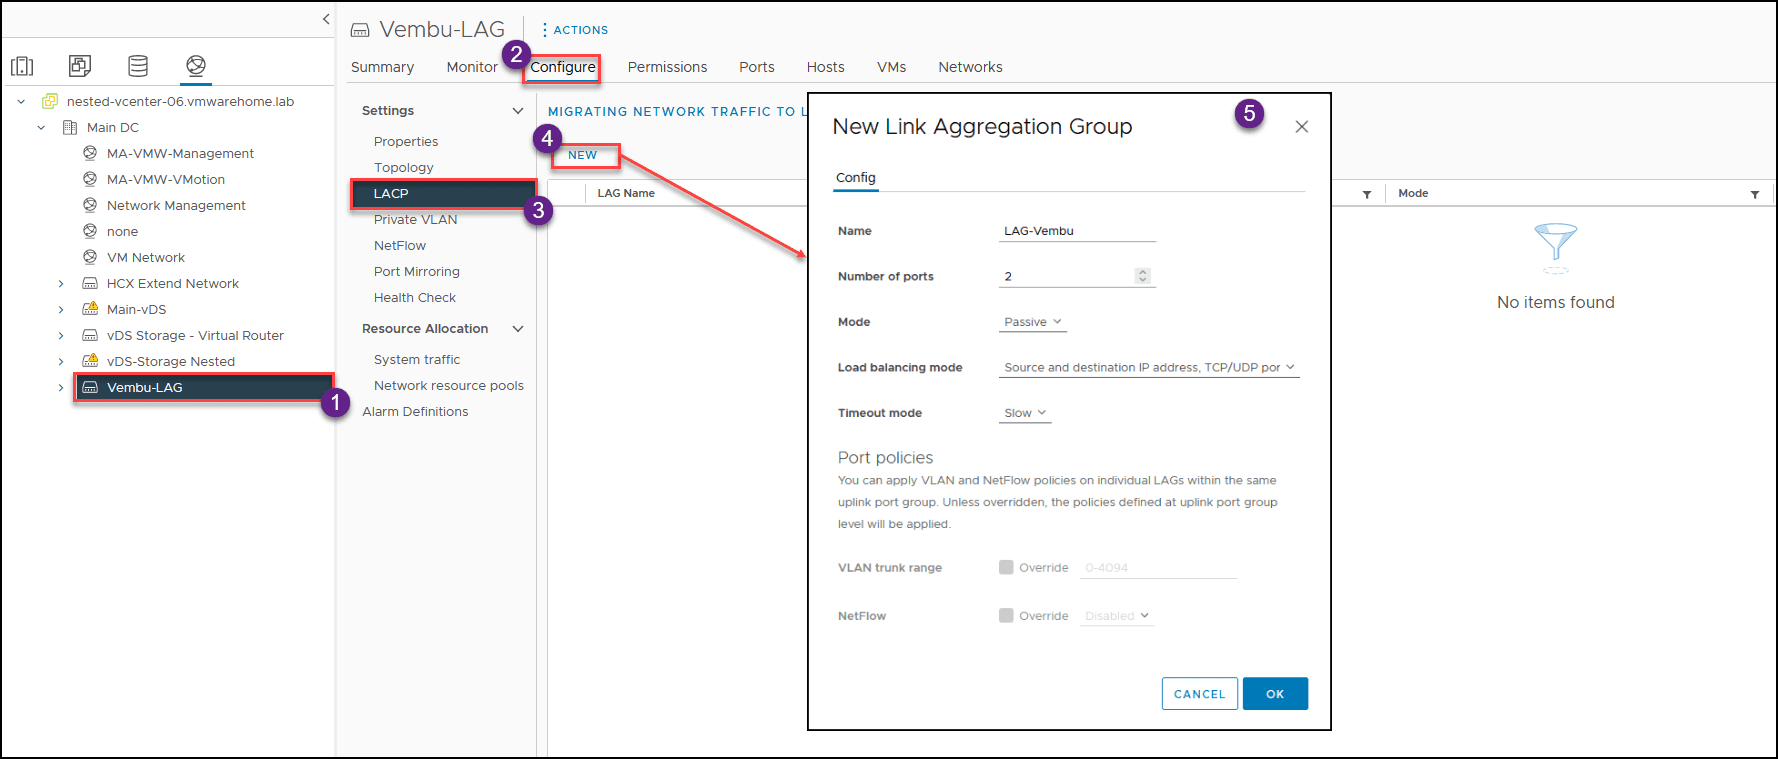
After vDS and Portgroup are created, select the vDS you just created, go to Configure Tab and LACP option, then click NEW. We will create a LAG called “LAG-Vembu”.
Add the number of ports you will use in the Link Aggregation Group (LAG) . We will use the same number since we used 2 uplinks in your vDS.
Link Aggregation Group mode
The vSphere Distributed Switch (vDS) LACP mode option is a configuration setting that determines how the vDS handles LACP negotiation with physical switches.
There are two LACP mode options available in vSphere vDS:
- Active LACP mode: In Active LACP mode, the vDS initiates the LACP negotiation with the physical Switch. The vDS sends LACP packets to the Switch and waits for a response. If the Switch responds, the vDS forms a LAG with the Switch
- Passive LACP mode: In Passive LACP mode, the vDS does not initiate LACP negotiation with the Switch. Instead, it listens for LACP packets from the Switch. If it receives a packet, it will respond and form a LAG with the Switch
The choice of LACP mode depends on your network configuration and requirements. Active LACP mode is recommended if you have control over the physical Switch and want to ensure that the vDS initiates the LACP negotiation. This allows you to configure specific settings, such as the LAG load balancing algorithm, on both the vDS and the physical Switch.
On the other hand, Passive LACP mode may be more appropriate if you connect the vDS to a third-party switch or an external service provider’s network. In this scenario, you may not control the switch configuration, so Passive LACP mode allows the vDS to adapt to the Switch’s negotiation behavior.
Overall, the LACP mode option in vSphere vDS allows you to configure the LACP negotiation behavior to match your network environment, ensuring optimal performance and reliability.
In our example, passive mode is used in the vDS LAG and Active in the Physical Switch.
Load balancing mode
In vSphere vDS, the load balancing mode determines how traffic is distributed across the physical uplinks within a Link Aggregation Group (LAG). It controls the algorithm used to determine which uplink is used for transmitting traffic from virtual machines.
Several load balancing modes are available in vSphere vDS, but since we are using Route based on the IP hash in our vDS, we will use the Source and Destination IP address(default) here.
This load-balancing mode is helpful for traffic that flows between the same source and destination IP addresses. The source and destination IP addresses is used to create a hash value in this mode. The hash value is then used to determine the traffic’s uplink.
Port Policies
Even though we are not using Port Policies in our LAG example, let us explain how Port Policies work.
In vSphere, a LAG combines multiple physical network connections into a single logical connection, increasing bandwidth and redundancy. LAG Port policies are a set of rules that define how the LAG is configured for each port.
When configuring LAG Port policies, you can specify VLAN policies and NetFlow policies for individual LAGs within the same uplink port group. This allows you to apply different policies to different LAGs within the same group based on their specific requirements.
By default, the policies defined at the uplink port group level will be applied to all LAGs in the group. However, if necessary, you can override these policies for individual LAGs by specifying different policies at the LAG level.
For example, you may want to apply a different VLAN policy to a particular LAG to isolate traffic from other LAGs in the same port group. Alternatively, you might want to apply a different NetFlow policy to a specific LAG to monitor traffic flow more closely.
Overall, LAG Port policies provide a flexible and granular approach to configuring LAGs in vSphere, allowing you to tailor your network configuration to meet the specific needs of your environment.
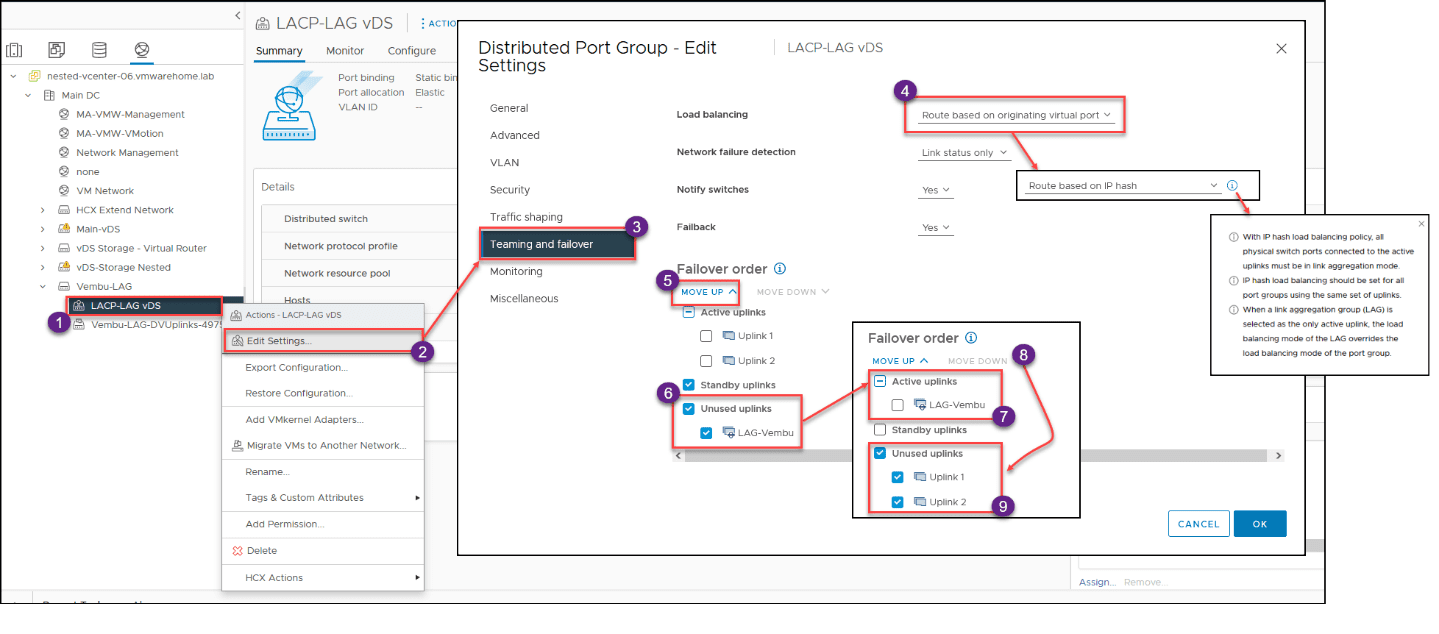
Now that we have a vDS, a Portgroup, and a LAG, we need to set our Teaming from the vDS uplink to our LAG created in the previous step.
We need to move down the vDS uplinks to unused and move the LAG to active.
As we explain above when using LACP, the vDS Load Balancing needs to be set to IP Hash.
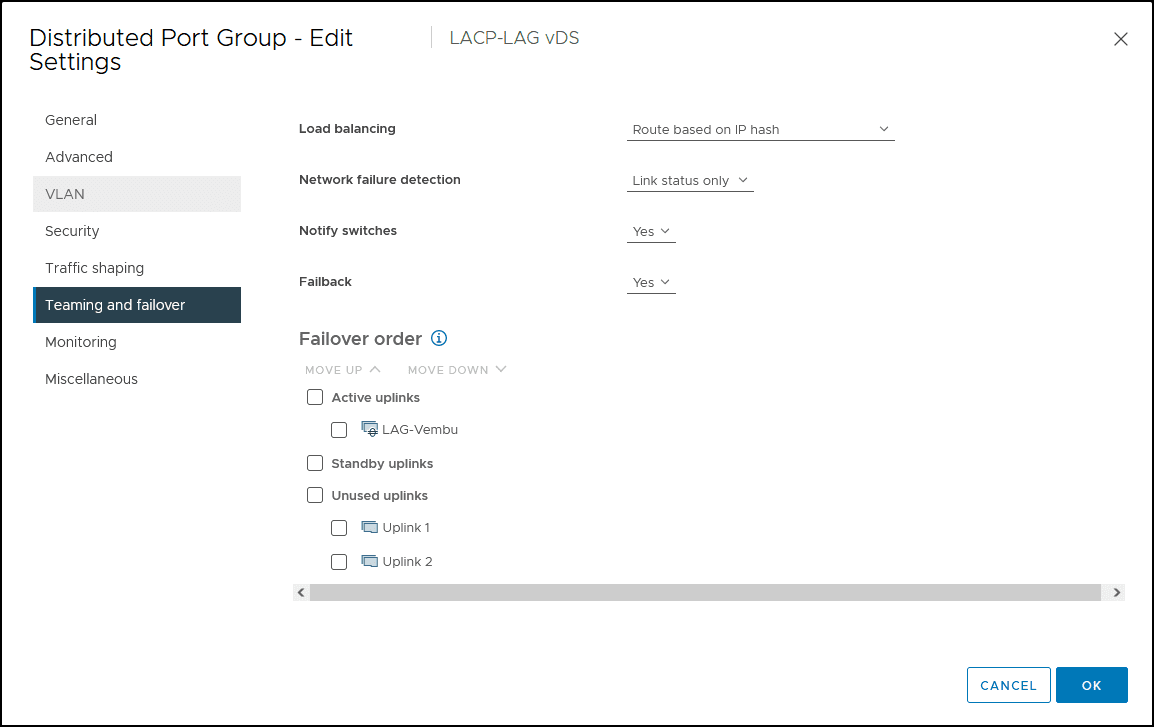
This is the final result after finishing our vDS reconfiguring to use LAG.
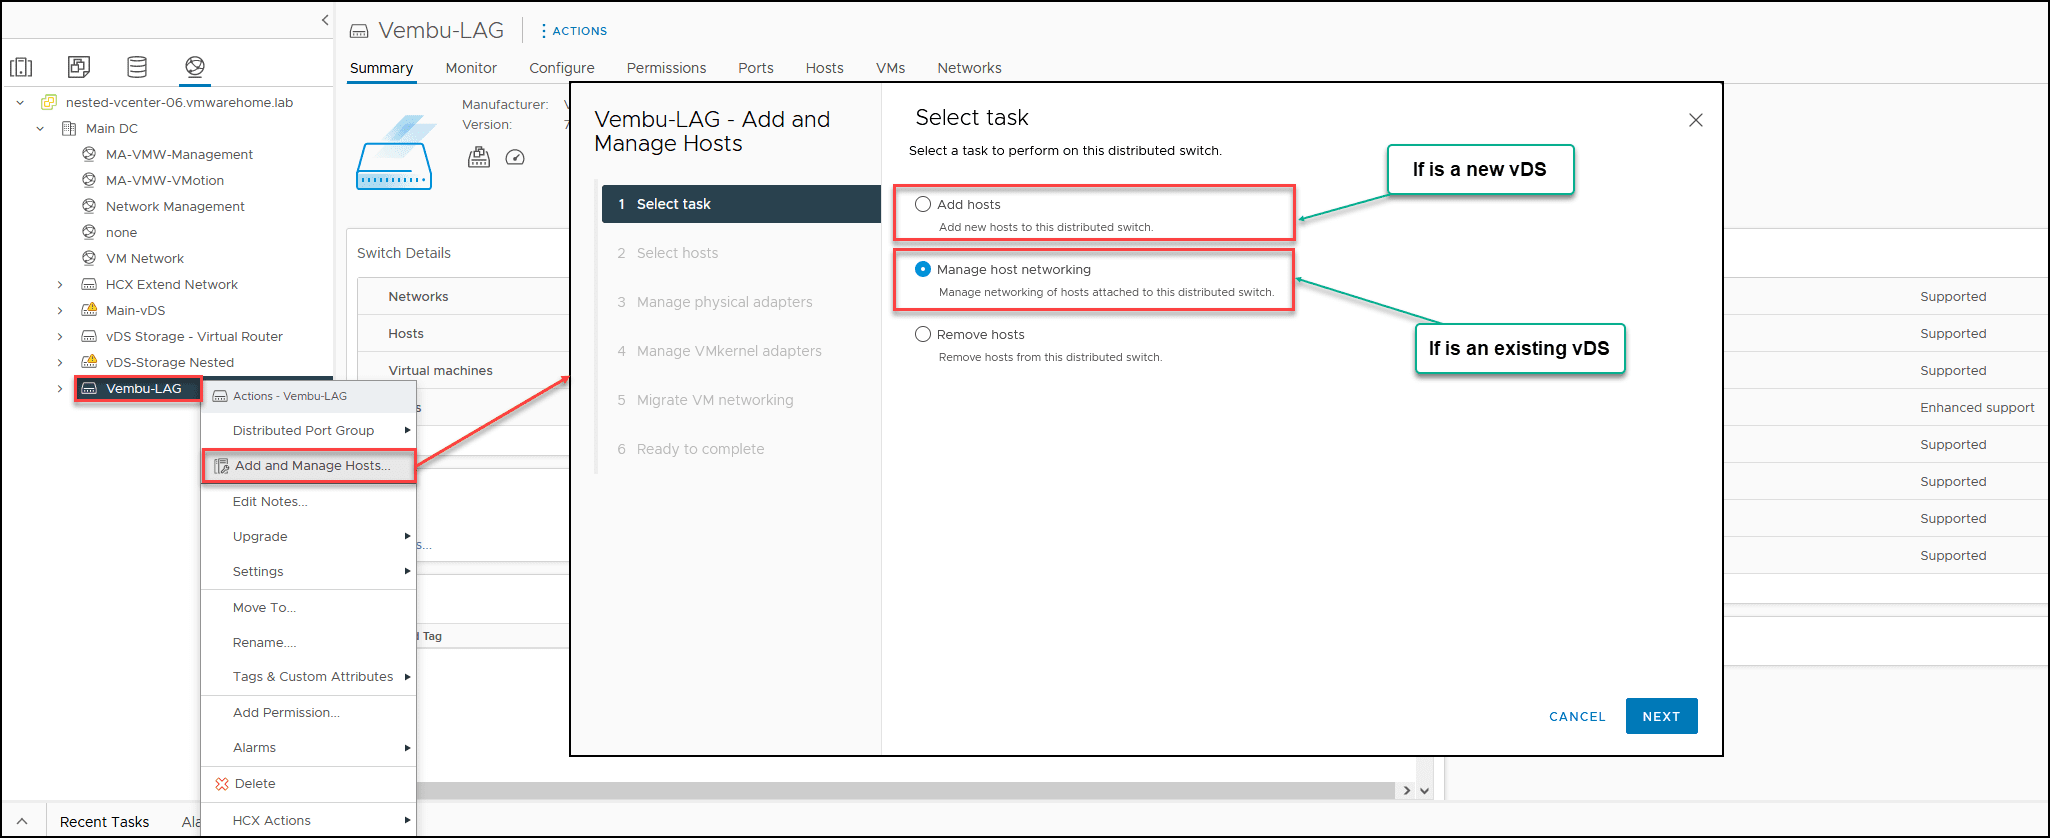
Now that we have our LAG configured in our new vDS we will add ESXi hosts to our vDS.
In this example, I will show if you are configuring LAG for a new vDS or an existing vDS and doing the changes.
Since this is a new vDS we select Add hosts option, but if it was already an existing vDS that we just created a LAG, then we need to use the Manage Host Networking option.
We have learned this in previous articles regarding creating a vDS.
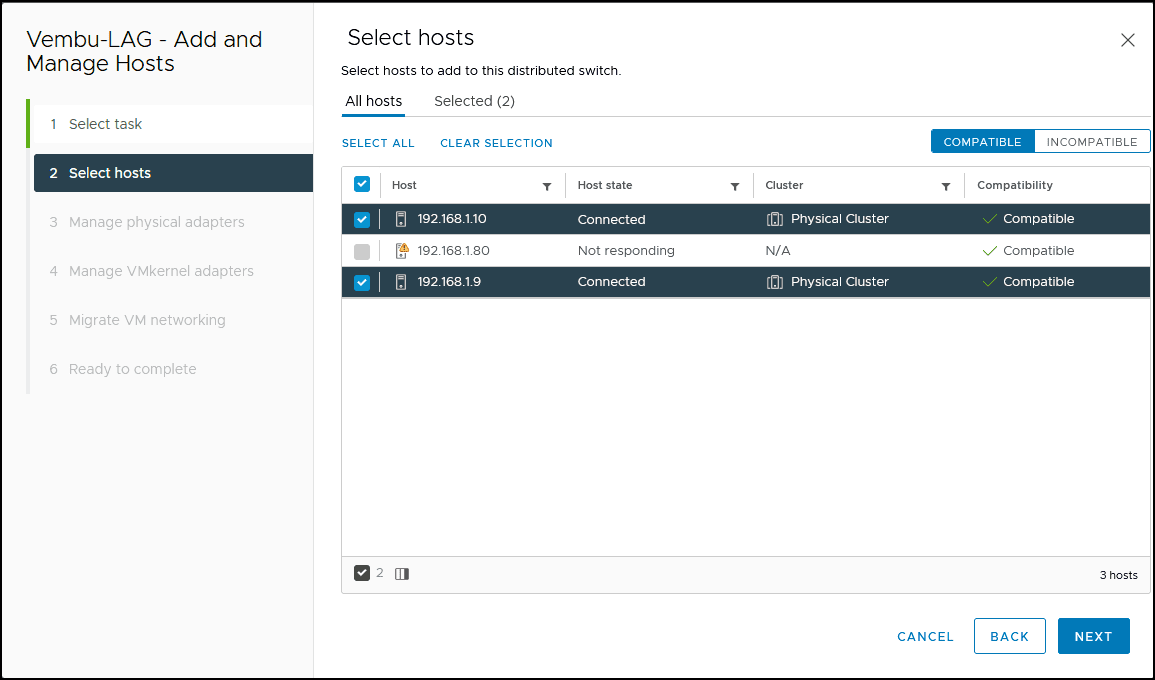
Next, select the ESXi hosts that we will add to this vDS.
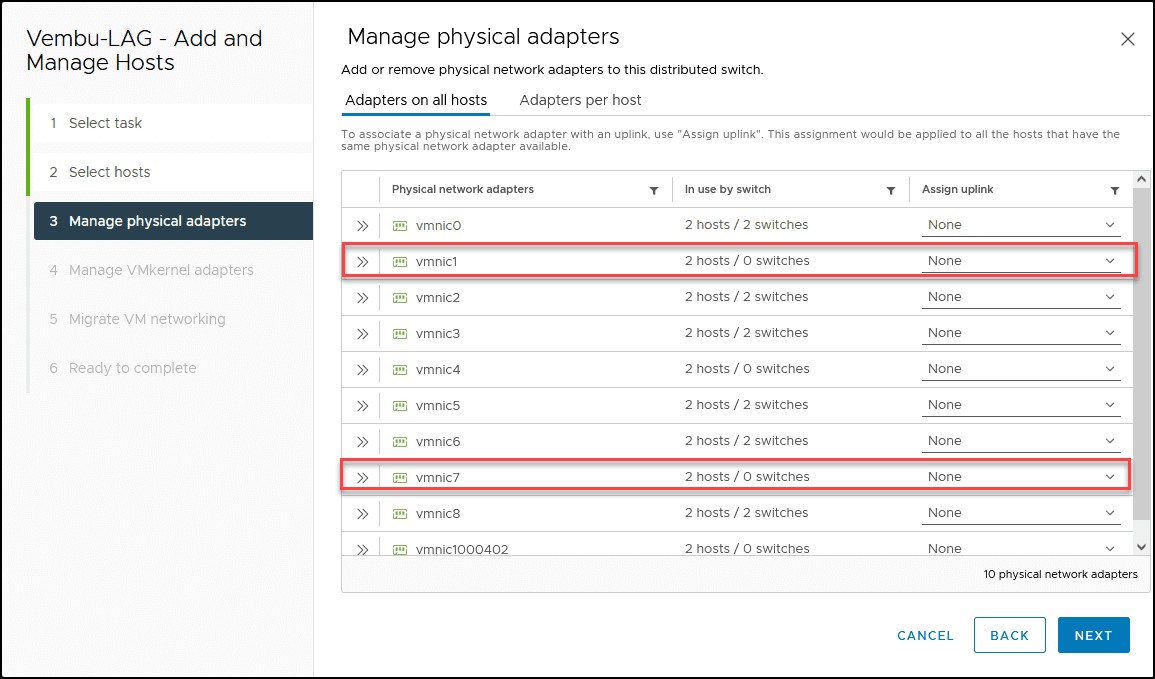
Next, we must select the vmnics connected to the Physical Switch ports and configured with LACP. In our case, vmnic1 and vmnic7.
Note: Do not forget that all your ESXi hosts network interface connections need to be set as LACP in your physical Switch.
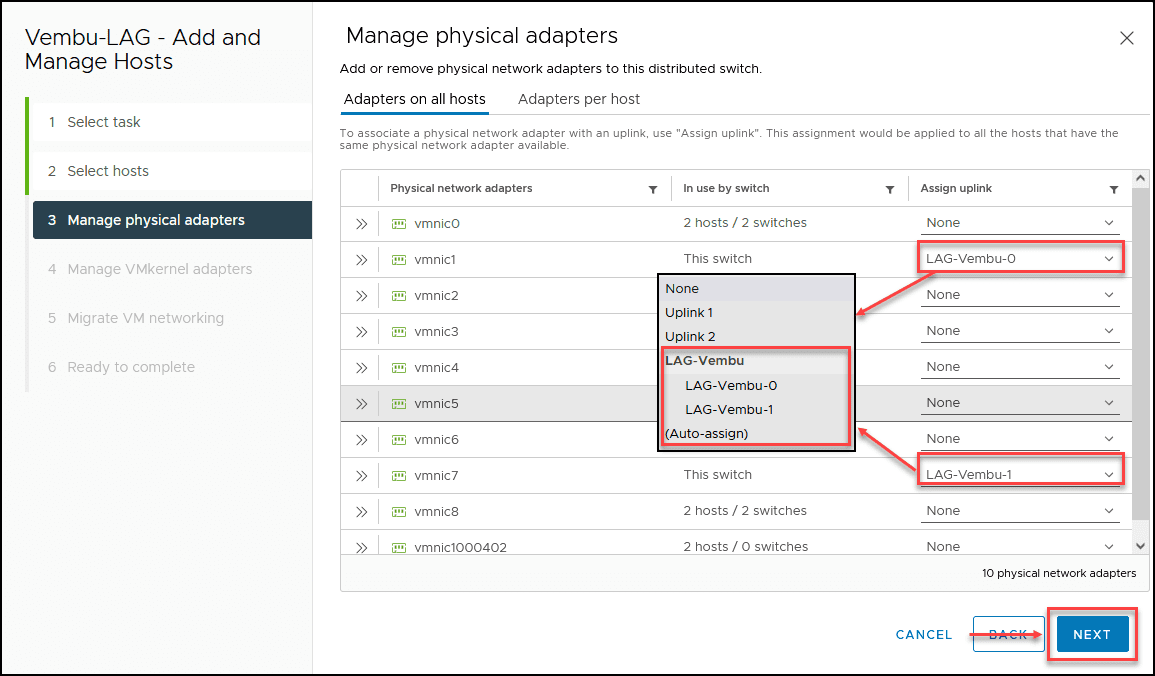
Next, we need to bind the vmnics with the LAG that we created before.
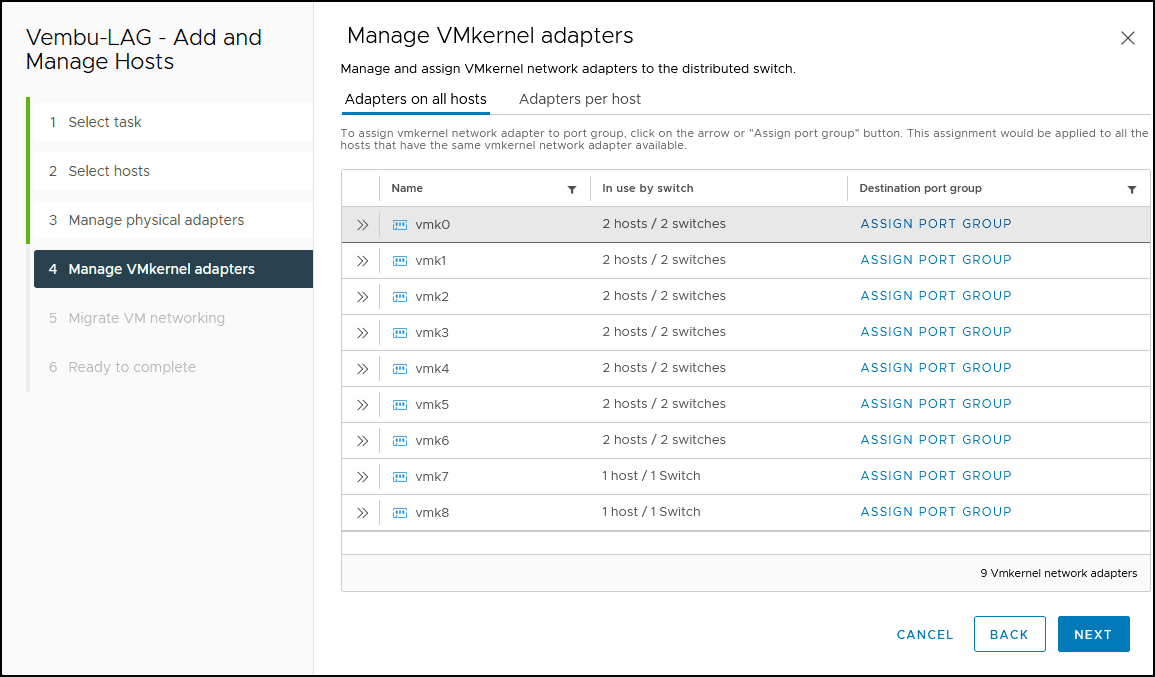
The following section is about migrations of the vmkernel networks. In the next section, we will skip this step and do this task, when we discuss migrating the vDS network with LAG.
In this section, we migrate existing VMs connected to this vDS to use the LAG portgroup.
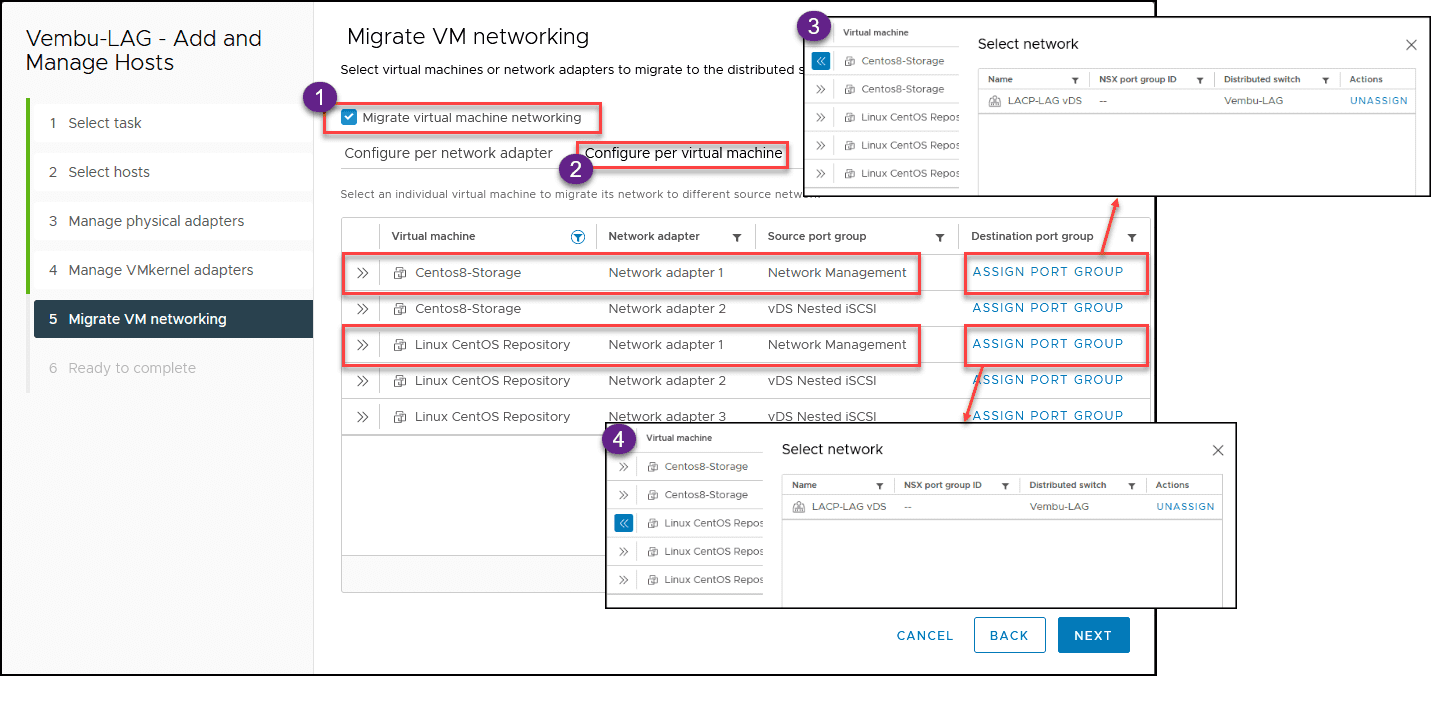
Just enable the Migrate virtual machine networking option and use the Configure per virtual machine option.
If your VMs have more than one virtual network adapter and are in different networks(one using LAG and the other not), but all are in the same network(for example, nic1 is management, and nic2 is production) then you should select Configure per network adapter.
In our case, all VMs have more than one network adapter, but we want to change only the VM network management.
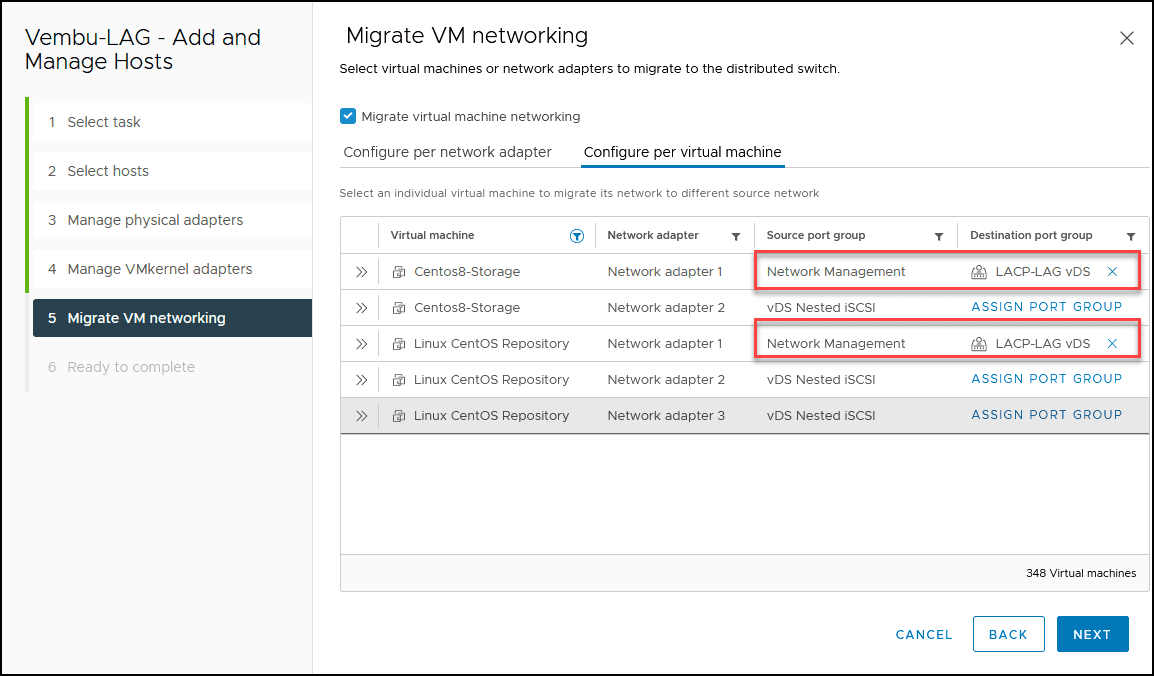
Select the VM and the network adapter, click Assign Port Group, and Assign.
After VMs are not connected to the LAG, they will use an LACP network.
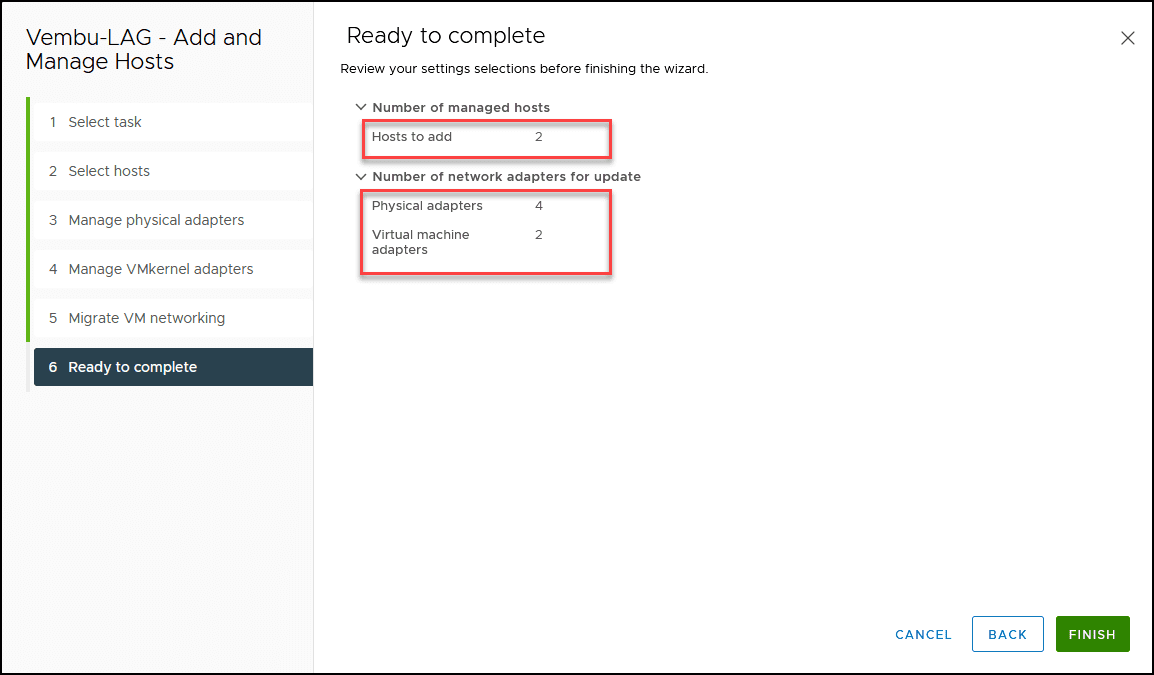
Verify the details and select the Finish option to complete the PortGroup configuration for utilizing LAG.
With the completion of all LACP configurations, we have successfully executed the following steps:
- Create a vDS for LACP
- Create a LAG (link aggregation group)
- Set up the portgroup with LAG
- Associate the LAG uplinks with vmnics
- Transfer the VMs’ networks to the LAG portgroup
Now we can check on the ESXi host console if the host uses LACP and is enabled on the Physical Switch.
Running the command: esxcli network vswitch dvs vmware lacp status get
If we see the physical Switch and the physical ports number, then LACP is active and working.

This command shows us the configuration of our vDS with the LAG.
Command: esxcli network vswitch vmware lacp config get

With the information, we have the guarantee that our LACP is adequately configured and active on both sides (in the VDS and the physical Switch).
This concludes the section on How to configure LACP in vSphere Distributed Switch. In the subsequent and final article on vDS with LACP, we will focus on migrating vDS vmkernel networks to vDS with LACP.
Read More:
VMware for Beginners – Create and configure vDSwitch: Part 18(a)
Follow our Twitter and Facebook feeds for new releases, updates, insightful posts and more.