Read on:
VMware for Beginners – Overview of vSphere: Part 1
VMware for Beginners – vSphere Installation Requirements: Part 2
VMware for Beginners – How to Install vSphere: Part 3
VMware for Beginners – vSphere Networking: Part 4
VMware for Beginners – vSphere Datastores – Part 5
VMware for Beginners – vSphere Virtual Machines – Part 6
VMware for Beginners – How to Install vCenter: Part 7
VMware for Beginners – Datacenter and Clusters – Part 8
VMware for Beginners – How to Create and Configure iSCSI Datastores: Part 9(a)
VMware for Beginners – How to Create and Configure iSCSI Datastores : Part 9(b)
The last VMware for Beginners article discusses how to create iSCSI Datastores and how to create an iSCSI network in your ESXi hosts. In this article, we will discuss NFS Datastores.
As we did in the iSCSI Datastores articles, since I will try to add as much detailed information as possible, we need to slip the NFS Datastores article into two parts.
In this NFS Datastores part 1 article, we will talk about NFS Datastores:
- Explain NFS Storage and NFS Datastores
- How to create an NFS Volume in your NAS
- Type of NFS Network configurations
Before starting the how-to process, let us talk about the Network File System (NFS) and how it works in the ESXi host.
- NFS
An NFS volume on a NAS server is accessed by an NFS client built into ESXi using the Network File System (NFS) protocol over TCP/IP.
The Volume can be mounted and used by the ESXi host as Storage. Versions 3 and 4.1 of the NFS protocol are supported by vSphere.
A storage administrator typically creates the NFS volume or directory and exports it from the NFS server.
The NFS volume does not require formatting using a local file system like VMFS.
NFS datastores can store ISO images, virtual machine templates, and other types of files in addition to virtual disks.
Using the Datastore for the ISO images, you can link the virtual machine’s CD-ROM device to an ISO file. After that, you can use the ISO file to install a guest operating system.
Instead, you mount the Volume directly on the ESXi hosts and utilize it the same way you would for a VMFS datastore to store and boot virtual machines.
vSphere NFS Datastores can use NAS (Network Attached Storage) by creating shared Folders at the Storage level.
I have written an article in the Vembu blog about iSCSI and NFS. Please read it to understand better both types of Storage.
How to create an NFS on your NAS?
Note: I will provide an example from my Synology, but for other NAS vendors, options are different, but the process is the same. Check your vendor manual to create an NFS on your NAS.
To create an NFS in your Network-attached Storage (NAS) Storage, you need to create a volume and then a shared folder bound to that Volume.
Note: You could select a folder in your NAS and create a shared folder to share with your ESXi host. But to store Virtual Machines, this is not the best practice.
1. Create a volume from your free space in your NAS, or use an existing Volume and create a shared folder with a quota.
Note: Since I already have a Volume of 1.5Tb, I don’t need to create a volume.
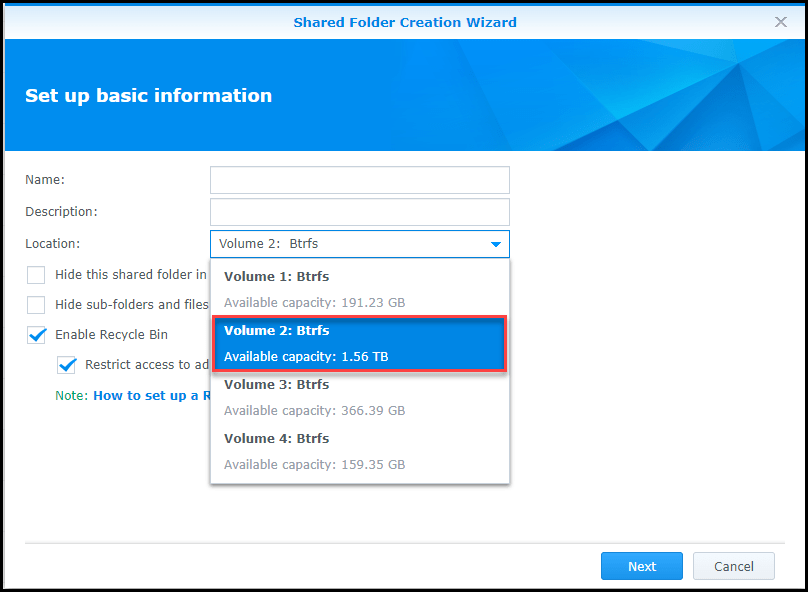
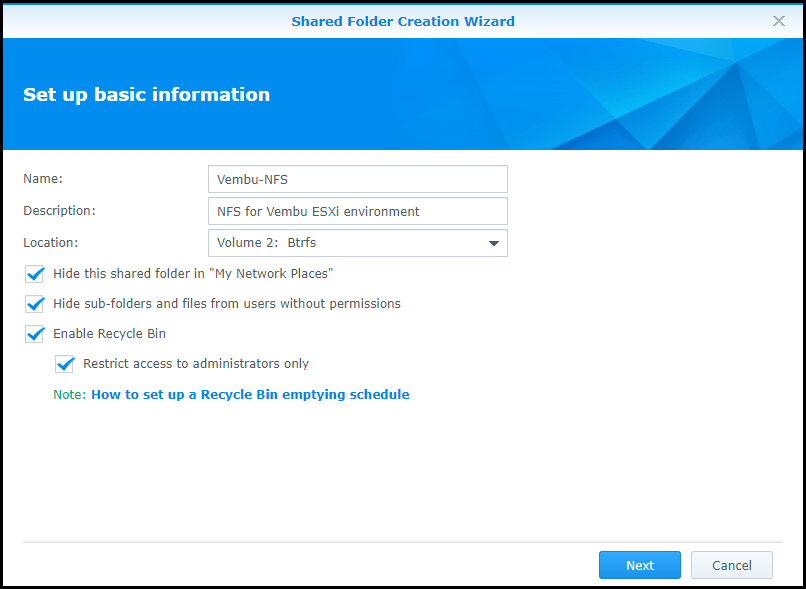
2. After you have the Volume (recently created or used an existing one), create your Share Folder.
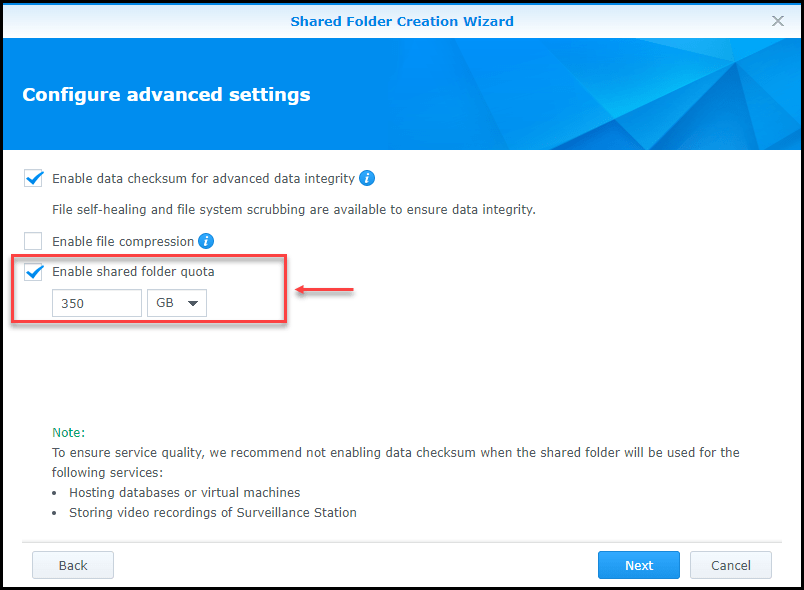
3. Since I am using a Volume that is shared and is used in other Shared Folders, I need to set a quota. If not, NFS could consume the full Volume and have problems with the other shared folders. I set my quota in this NFS for 350Gb.
4. Provide the permissions and which ESXi hosts your NFS will or can connect. Just add the IP/CIDR of your ESXi host(NFS VMkernel created in the next step).
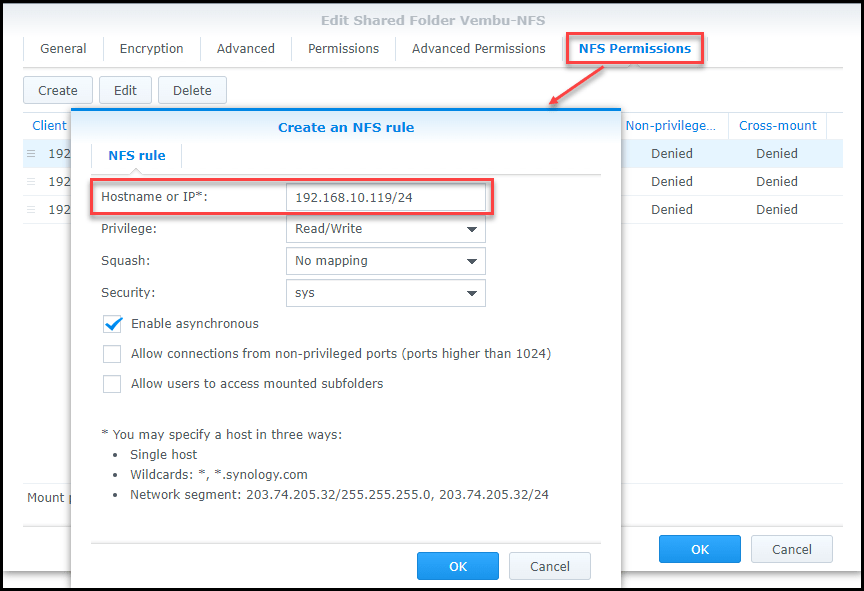
Then you have your ESXi hosts added and the mount path to use when adding the NFS Shared Folder in the ESXi hosts.
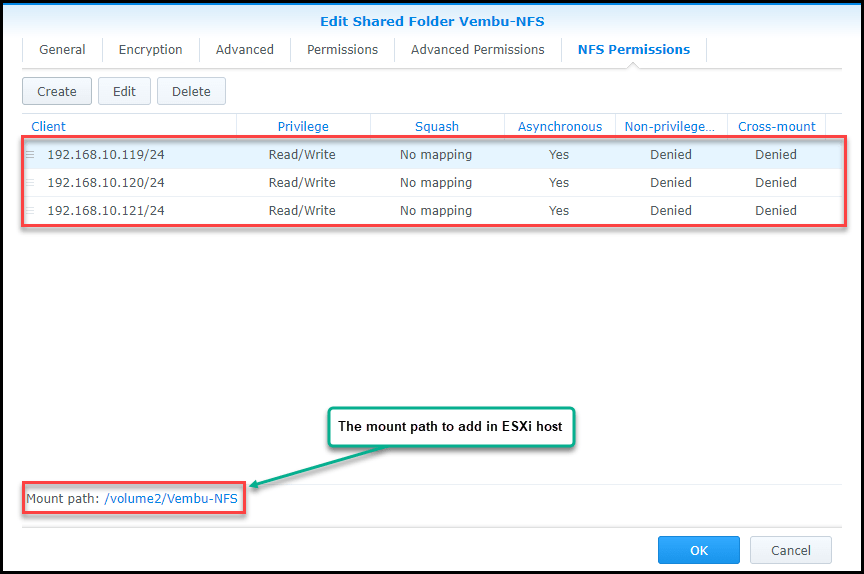
Note: Again, the above example is just for Synology NAS. For other different vendors, you should check your vendor manual.
How to create an ESXi NFS Storage network
We can apply different types of configuration networks to set our NFS network and add NFS Datastores.
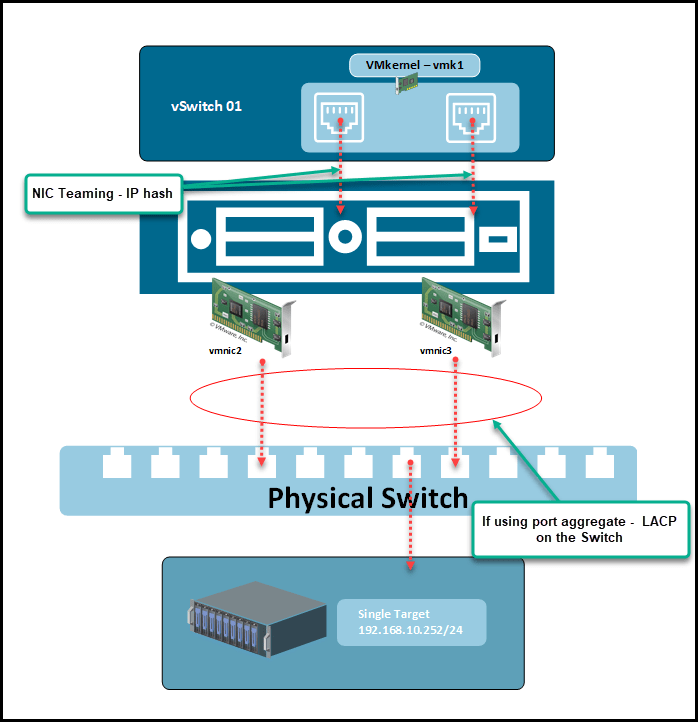
The standard and simple one is when using a Single Target and setting one VMknerl path to your NAS Shared Folder.
The following image shows an example of how the network is set when using a Single Target using a NIC Teaming IP Hash in our Storage Virtual Switch.
This won’t do much to balance the load between NICs, but it will allow you to connect a new NIC when one of your old ones is down.
Note: NIC Teaming fail-back Option should be set to No. The reason for this is that if there are any intermittent issues on the network, you want to be able to replace the NIC that went down, before your network starts failing.
If you set Link Aggregation Control Protocol (LACP) on your Physical Switch and NIC Teaming IP Hash, you provide load balance between vmnics (since NFS v3 doesn’t support multipath, you can only have these performance improvements if you have NFS v4.1)
Note: We will implement this option in our Vembu VMware lab (without LACP).
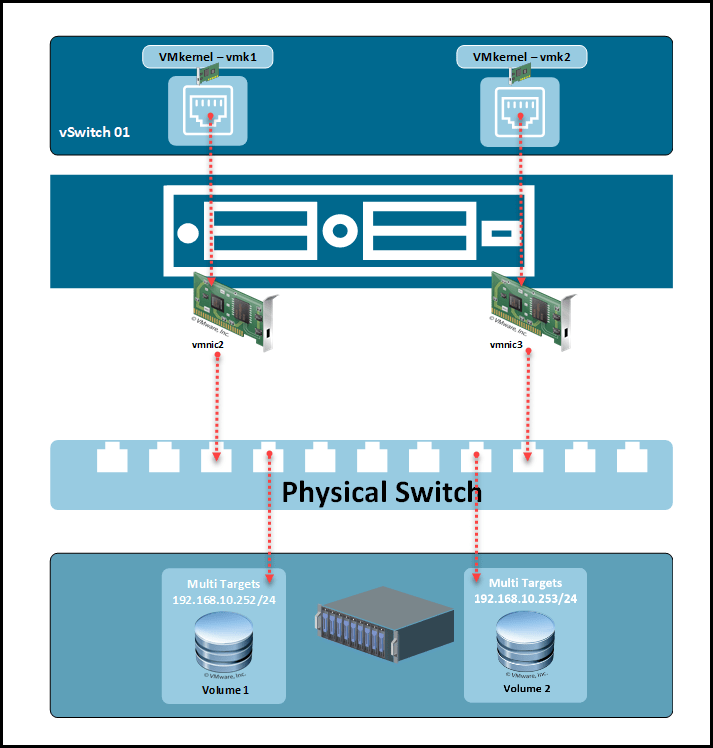
In the next example Multi-Target, the performance balance is distributed between vmnics and connections in your NAS Storage.
One VMkernel will be connected to one Target(where you have some Shared Folders), and the other VMkernel will be connected to another Shared Folder (this needs to be also set in your NAS Storage).
You can find more detailed information about network configurations and other NFS advanced options HERE.
When using a Multi-Target configuration, we can use two or more VMkernel it all depends on the amount of Storage IP addresses we have.
With this explanation about NFS and the type of NFS Network configuration that we can apply in our ESXi host environment, we finish this first part on NFS Datastores.
In the following VMware for Beginners – Install NFS Datastores, part 2, we will learn how to implement the type of NFS Network and create our NFS Datastores.
Follow our Twitter and Facebook feeds for new releases, updates, insightful posts and more.


Leave A Comment