
Proxmox VE 8.1 is an open-source platform for virtualization and containerization that lets you run virtual machines and containers in a safe and adaptable way. But you’ll need to learn how to set up networks in Proxmox VE 8.1 before you can fully use the features of creating and managing virtualized resources.
Broadcom bought VMware, and licensing types, costs, and partner programs have changed. As a result, many people and businesses are looking for reliable, secure, and production-ready VMware alternatives. Proxmox VE 8.1 offers all such features including migration of VMware workloads to Proxmox VE with ease.
You can use this blog post as a guide to finding your way around the Proxmox VE 8.1 network settings. We will look at various aspects of networking in Proxmox VE including naming conventions, physical network interfaces, virtual bridges, and IP address assignments. By the end of this tutorial, you will have a solid understanding of how to configure networks in Proxmox VE 8.1.
So, grab a cup of coffee, let’s dive into the world of Proxmox VE networking and see how it can help you get the most out of your virtualized environment!
Understanding Networking in Proxmox VE 8.1
Proxmox VE 8.1 gives you a strong and adaptable way to connect to your virtualized environment. This section will help you understand the main components of Proxmox VE networking and its naming conventions.

Local Network View
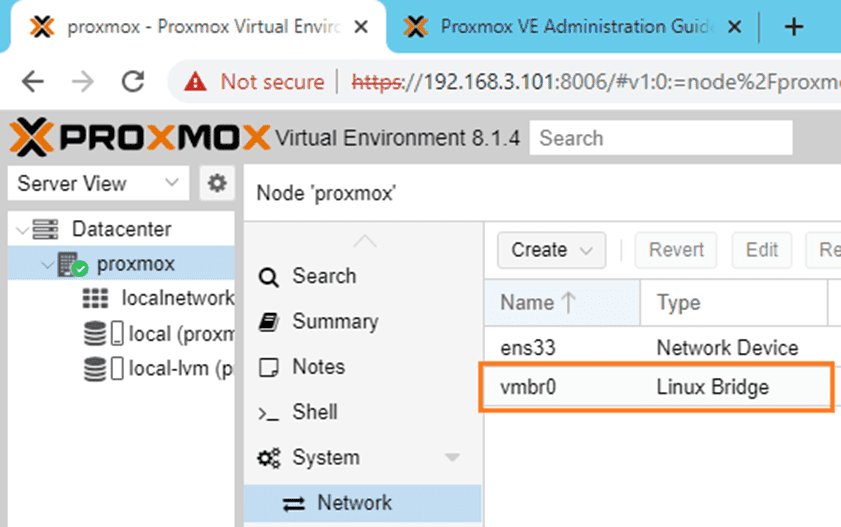
There are two main things you’ll see in the “Network” section of the Proxmox VE web interface: virtual bridges and physical network interfaces.
- Virtual Bridges (vmbrX): These user-created bridges act as virtual switches, allowing VMs and containers on your Proxmox cluster to communicate with each other or external networks
- Physical Network Interfaces (ethX): These represent the actual network cards installed on your Proxmox VE system
Naming Conventions in Proxmox VE
Understanding the naming conventions used in Proxmox VE is crucial for effective network configuration. Here’s a breakdown of the key terms:
- Network Interfaces
- Ethernet Interfaces (enpXsY): These represent physical Ethernet network cards. “en” stands for Ethernet, “p” signifies a PCI slot, “X” denotes the specific slot number (starting from 0), and “Y” indicates the port number on the card (usually 0). For example, “enp3s0” refers to an Ethernet interface on PCI slot 3..
- Onboard Ethernet (ensY): This indicates the built-in Ethernet network interface on your motherboard. “ens” signifies an onboard Ethernet interface, and “Y” represents the port number (typically 0). In our case, it is ens33.
- USB Network Interfaces (uXsY): These represent network adapters connected via USB. “u” denotes a USB interface, and the following characters follow the same pattern as Ethernet interfaces
- Virtual Bridges (vmbrX): These user-created virtual bridges are named sequentially, starting with “vmbr0” and continuing up to “vmbr4093”.
More detailed information on network interface naming conventions can be found in the official Proxmox VE documentation.
Configuring Network Interfaces Proxmox VE 8.1
Proxmox VE 8.1 offers two primary approaches to network configuration: managing virtual bridges and configuring physical network interfaces.
To configure network interfaces in Proxmox VE, follow these steps:
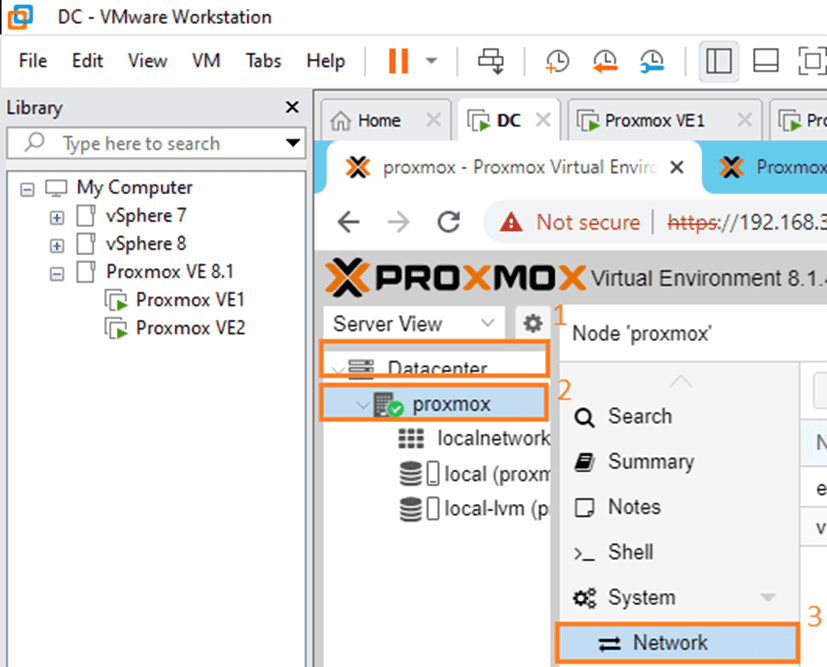
- Navigate to the Network Interface: Access the Proxmox VE web interface and navigate to Datacenter -> Your Proxmox Node -> Network
- Select the Virtual Bridge: From the list of available interfaces, click on the virtual bridge you wish to configure (e.g., vmbr0)
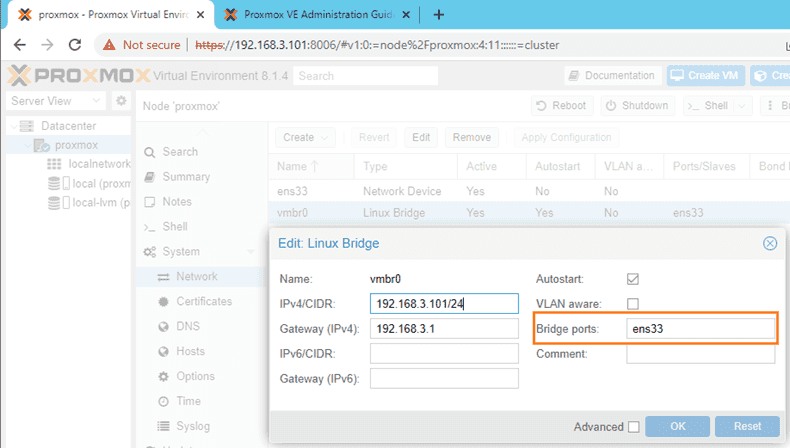
- Assign Network Settings: Within the virtual bridge settings, you can define various network parameters, including:
- Address: Specify the static IP address for the virtual bridge
- Netmask: Define the subnet mask for the virtual bridge network
- Gateway: If the virtual bridge requires accessing an external network, configure the default gateway IP address here
- Bridge Ports: Select the physical network interfaces you want to associate with this virtual bridge. VMs and containers connected to this bridge will be able to communicate through these physical interfaces

- Apply Changes: Once you’ve configured the desired settings, click on “Apply Configuration” to save the changes
Configuring Physical Network Interfaces
While most network configuration revolves around virtual bridges, you may need to adjust settings on the underlying physical network interfaces (ethX). Here’s a basic overview:
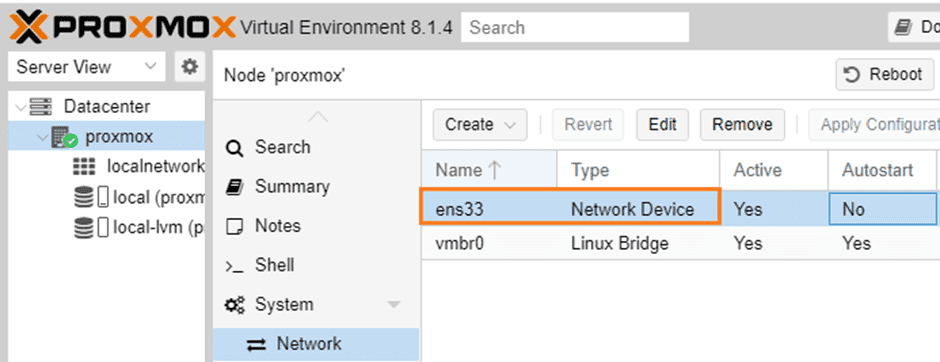
- Access Network Interface: Navigate to the Network section as described previously
- Select Physical Interface: Click on the physical network interface you want to configure (e.g., ensX)
- Limited Configuration Options: The configuration options for physical interfaces are typically limited compared to virtual bridges. You might be able to set the interface to “up” or “down” and potentially adjust link speed or MTU settings depending on your hardware
Bonding Network Interfaces
If you have multiple physical network cards and desire increased redundancy or improved throughput, you can create a network bond (also known as Linux Bond) in Proxmox VE. This bond aggregates the bandwidth of the individual network interfaces, potentially enhancing network performance. Network bonding offers various modes to optimize traffic distribution and fault tolerance, so be sure to explore the available options to best suit your needs.
By following these steps and understanding the distinction between virtual bridges and physical interfaces, you can effectively configure your network environment within Proxmox VE 8.1.
Conclusion
In this tutorial, we explored the network configuration in Proxmox VE 8.1. We learned about naming conventions, physical network interfaces, virtual bridges, IP address assignments, and bonding network interfaces.
By following the steps in this guide, you can set up and improve your Proxmox VE network so that it works better and connects to more devices.
Follow our Twitter and Facebook feeds for new releases, updates, insightful posts and more.

Leave A Comment