
Introduction
As an administrator when you set up Microsoft 365 for your organization while creating a user in the Microsoft admin center, it recommends a strong password. Upon creation, you may share the password to the user for the first sign-in. He should reset the password on his first successful login if you enable the option to change the password when he first signs in.
But as an administrator, to reduce your support costs and help your users be more self-sufficient, you can allow them to register for a self-service password reset known as SSPR. Here, the users no longer need to contact your organization’s IT support to reset their passwords. Instead, Microsoft will send them a code that they can use to reset it themselves.
In this blog, we are providing you the steps in detail that are involved in registering the user account for self-service password reset & providing the authentication methods to choose for the user, when the user requires to reset his password.
Table of Contents
- Basic information required for Microsoft 365 user account
- Enabling self-service password reset SSPR in Microsoft 365 admin center
- Setting up Authentication methods for users in Azure AD
- Available authentication methods
- Providing Authentication contact info for a user in Azure AD
- Conclusion
Basic information required for Microsoft 365 user account
When you add a user account in Microsoft 365 admin center, the basic information such as First Name & Last Name, Display Name, and username should be provided by you. Also, Microsoft automatically enabled the two options “Automatically create a password” and “Require this user to change their password when they first sign-in”. These two options are very much necessary when creating a new user. The below screenshot shows the details shown in the red box.

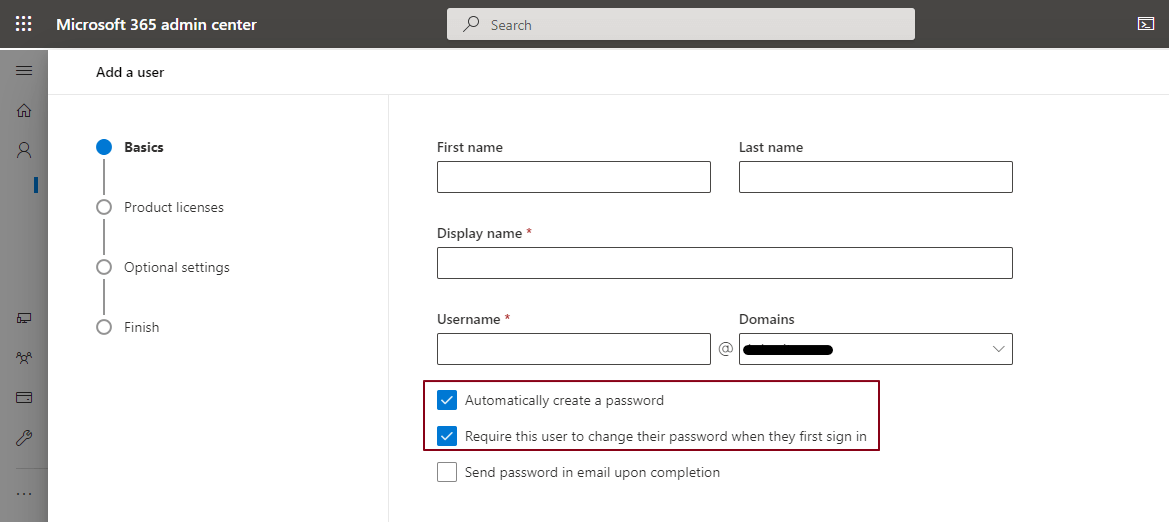
So when you are creating a new user Microsoft automatically generates a strong password and you can share the password with the user for successful login. Similarly, if the user forgets the password, as an administrator you should reset the password and share the new password with the user.
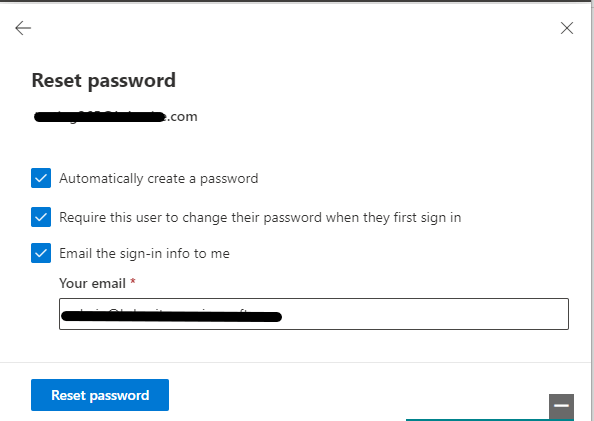
In Microsoft 365 admin center, you can select the particular user, and can click the “Reset password” button for resetting. Here too you have the option to create a password automatically and force the user to change the password when they first sign in after reset. Or you can send the password change instructions to his alternate email address.
The below screenshot shows these details
But for a bigger organization, say managing 500 or 1000 accounts, it is useful to change the user’s password on their own if they want to change or when they forget the password. You are providing the liberty by allowing them to register for a self-service password reset. To do so the Microsoft 365 admin center should allow the users to register for a self-service password reset, they’ll be asked to provide contact information such as their email address or phone number the next time they sign in.
Enabling self-service password reset SSPR in Microsoft 365 admin center
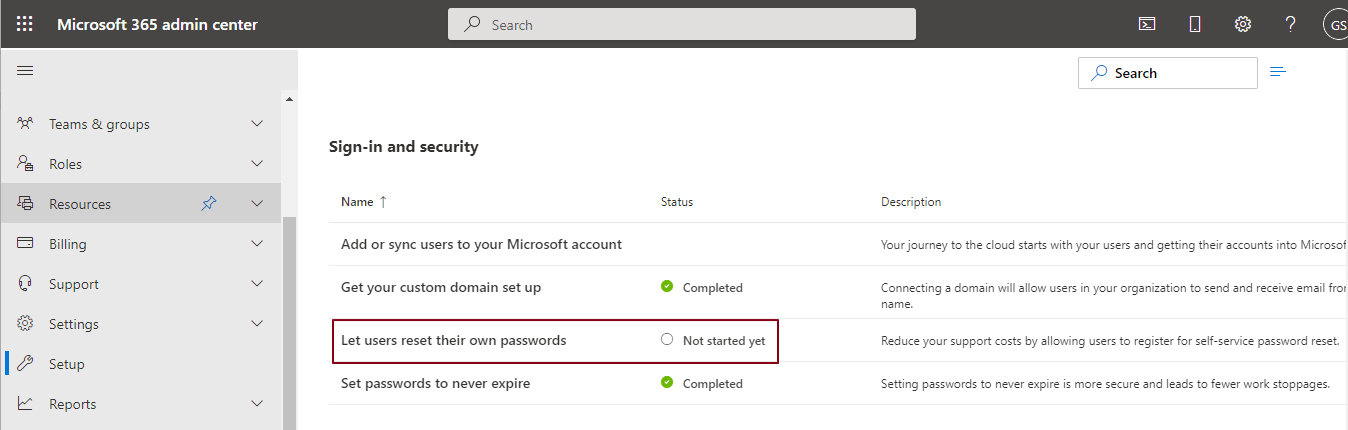
Login to Microsoft 365 admin center with your global administrator account. Choose Setup from the left menu. Under the Sign-in and security section, you can see the name “Let users reset their own passwords” and the status as “ Not started yet”. This will tell you that you have not yet set up the self-service registration. The below screen shows this stage.
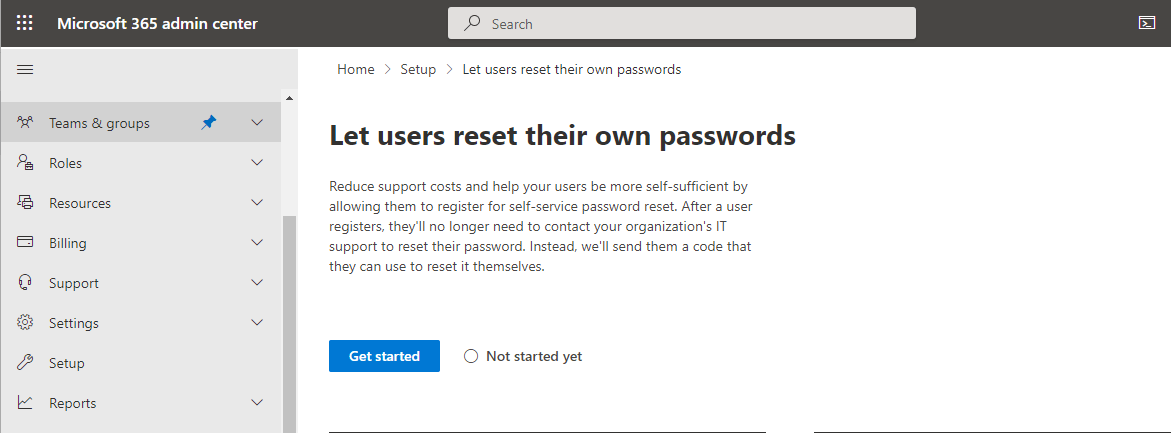
Click the link “ Let users reset their passwords” and it will open a new wizard. Click the Get Started button. The below screen shows this.
- When you select Get started, the Azure portal will open in a new browser tab. Make sure you save your selections for each setting as you go
- In Password reset > Properties, choose All to let everyone reset their own passwords or Selected to choose specific groups
- In Password reset > Authentication methods, choose how many and which methods people can use to identify themselves when they reset their passwords. For example, they can use a mobile authentication app, or get a code sent to their mobile phone, office phone, or email
The Azure Password reset menu blade will be opened, and shows no users are selected for a self-service password reset. Here you need to decide to select all users or particular users.
This designates whether users in this directory can reset their passwords. Choose “Selected” to restrict password reset to a limited group of users or Choose “All” for all the users in the Azure Directory.
Here we are choosing all the users to register for a self-service password reset. So we are choosing the option “All” as shown in the picture below.
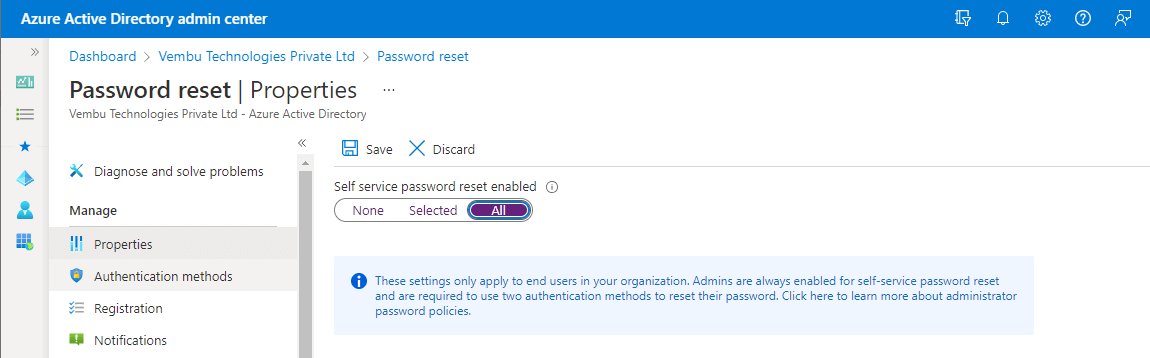
And click Save to save the action, and you will get the notification “ Password reset policy saved”. Now Self service password reset SSPR is enabled for all users.
Setting up Authentication methods for users in Azure AD
Our next step is, how to set up authentication methods, if a user wants to do a password reset self-service. Here we can enable various available methods to use the registered users to reset their passwords without any IT helpdesk help.
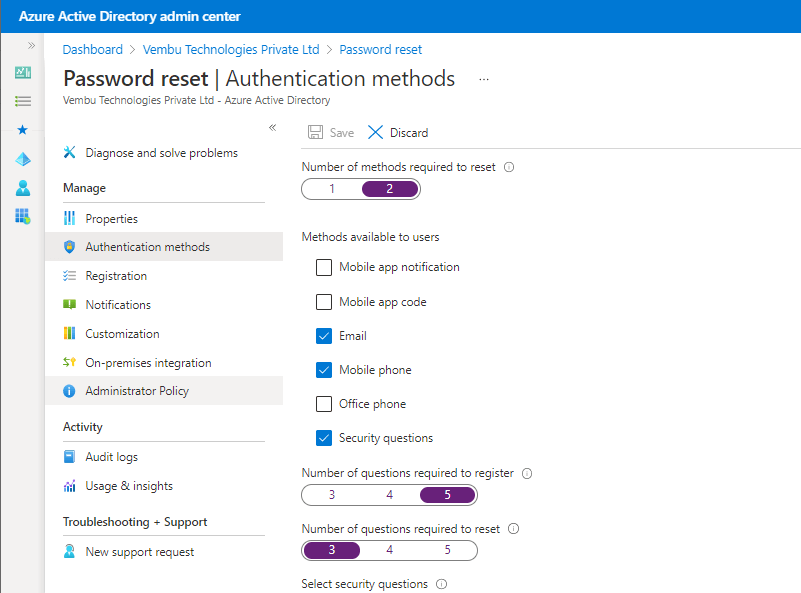
In the same password reset menu blade, choose “Authentication methods” from the left menu in the Azure AD. Here you can define the number of methods required to reset the password. You can configure the number of the available authentication methods a user must provide to reset or unlock their password. This value can be set to either one or two.
Users can, and should, register multiple authentication methods. Again, it’s highly recommended that users register two or more authentication methods so they have more flexibility in case they’re unable to access one method when they need it.
Available authentication methods
Email – Reset instructions are initiated through the SSPR portal to email ( primary and secondary email provided in the Azure AD ), and self-service password reset can be done by SSPR password reset workflow.
Mobile phone – Same process as above with Mobile OTP authentication ( Mobile number should be configured for the user in Azure AD
Office phone – Same process as above with Office Phone no authorization.
The following considerations apply for this authentication contact info:
If the Phone field is populated and the Mobile phone is enabled in the SSPR policy, the user sees that number on the password reset registration page and during the password reset workflow.
If the Email field is populated and Email is enabled in the SSPR policy, the user sees that email on the password reset registration page and during the password reset workflow.
Security questions – Settings for security questions for Registering & resetting
Here an administrator can define the number of questions that must be answered by the user for registering the SSPR. This setting defines the minimum number of security questions a user must select and answer when registering for a password reset. Usually, the number of questions will be 3 or 4 or 5.
Also, the administrator can define the number of questions that must be answered by the user for resetting the password. This setting defines the number of randomly-selected security questions a user must answer when resetting a password.
Note: The number of questions a user must-have for the registration must be greater than or equal to the number of questions a user must have to reset a password.
The below screen shows an example of an authentication page on the AAD.
You could also use Mobile app notification as your authentication method. For that, your mobile device should be registered by downloading Microsoft Authenticator app on your mobile device, and on each authentication time, you should approve on the mobile device.
Providing Authentication contact info for a user in Azure AD
As an administrator, once you set up the Authentication methods to follow for SSPR, you are good to go for providing authentication contact info details for the users. User’s authentication methods are the ways your users sign into Azure AD. Here, you can set the phone numbers and email addresses that users use to perform multi-factor authentication and self-service password reset, and reset a user’s password. This can be done by selecting the individual user’s AAD properties. Click on an individual user in AAD → Click “Authentication methods” under the “Manage” section. Click “Add authentication method” ( in the new authentication method ). Choose the method either a Phone number or email, provide a valid email ID or phone number, and click Add. This will allow the user to receive one-time-use codes via email or phone to use for a self-service password reset. You should also set alternate email on the individual user’s profile section in the same user details menu blade. The below screen shot shows an example of the user’s authentication method menu blade.
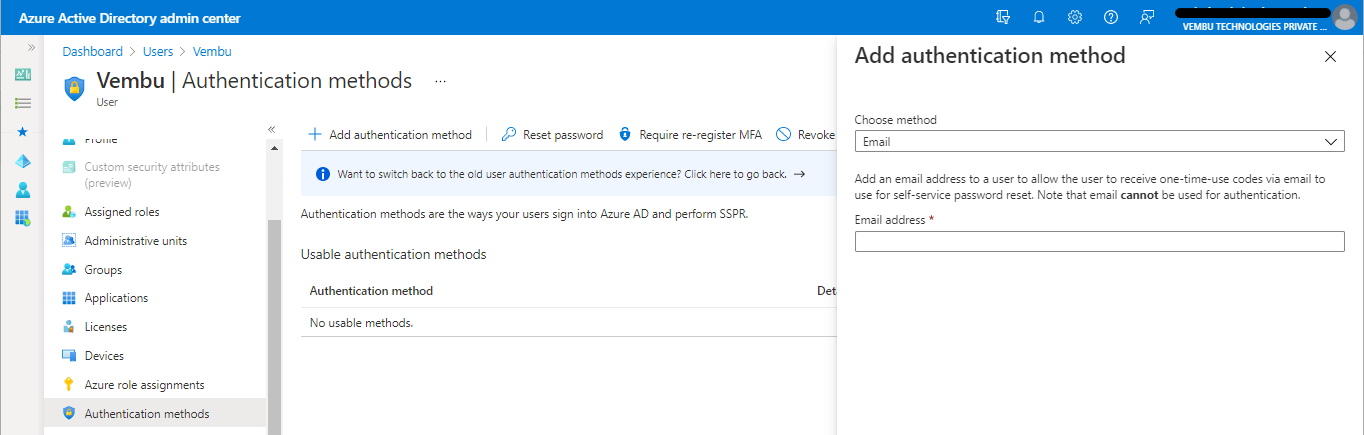
Thus, the user has configured his email id and phone number to get the OTP to initiate the SSPR reset workflow, when he wants to change the password without any IT help.
Update
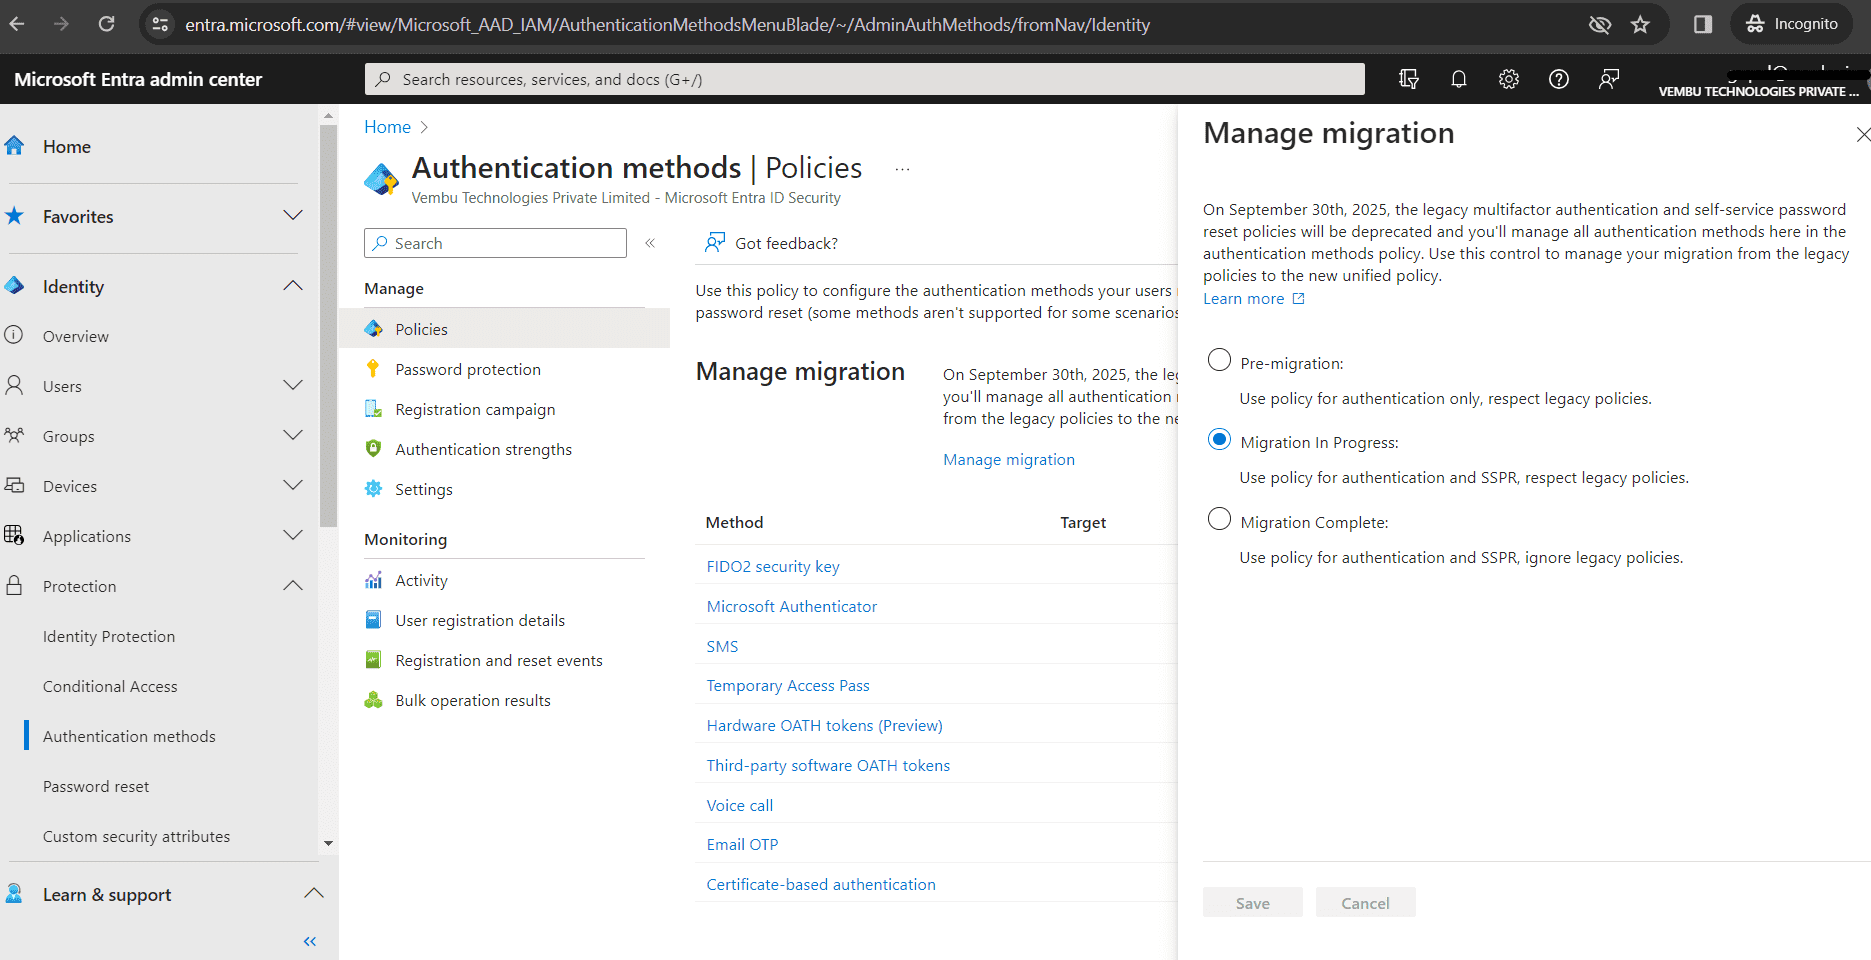
Recently, Microsoft announced the deprecation of managing authentication methods in the legacy multi-factor authentication and self-service password reset (SSPR) policies. Beginning September 30, 2025, authentication methods can’t be managed in these legacy MFA and SSPR policies. Microsoft recommend customers use the manual migration control to migrate to the Authentication methods policy by the deprecation date.
According to Microsoft documentation “The Authentication methods policy provides a migration path toward unified administration of all authentication methods. All desired methods can be enabled in the Authentication methods policy. Methods in the legacy MFA and SSPR policies can be disabled. Migration has three settings to let the Administrator move at their own pace, and avoid problems with sign-in or SSPR during the transition. After migration is complete, the administrator will centralize control over authentication methods for both sign-in and SSPR in a single place, and the legacy MFA and SSPR policies will be disabled. Additionally, I recommend using the latest Microsoft Autheticator App to use after migration. Administrators can choose the migration steps in Azure portal by accessing Microsoft Entra Admin Center (Formerly Azure AD or AAD) by following the below steps.
Access the Microsoft Entra Admin Center entra.microsoft.com by logging in as Global administrator
- Choose Protection → Authentication methods
- Under Policies → Choose “Manage migration”
- Select the option →Migration in progress
Below screenshot shows this step
The below URL shows the steps to follow for a successful migration, again I would recommend to use the latest Microsoft Authenticator App over other methods & depends on your environment: https://learn.microsoft.com/en-us/entra/identity/authentication/how-to-authentication-methods-manage
Conclusion
Self-Service Password Reset (SSPR) is an Azure Active Directory (AD) feature that enables users to reset their passwords without contacting IT staff for help. The users can quickly unblock themselves and continue working no matter where they are or the time of day. By allowing the employees to unblock themselves, the organization can reduce the non-productive time and high support costs for most common password-related issues. Self-service allows end-users to reset their expired or non-expired passwords without contacting an administrator or helpdesk for support. Also, it is very easy to set up the SSPR in a few minutes and enforce it in the portal immediately.
Follow our Twitter and Facebook feeds for new releases, updates, insightful posts and more.