
Table of Contents
- What is Azure Virtual Desktop ( AVD )?
- User requirements to connect to Azure Virtual Desktop
- Supported virtual machine operating systems images
- Creating a host pool
- Managing application groups
- Managing session hosts
- Creating workspace
- Conclusion
Introduction
What is Azure Virtual Desktop ( AVD )?
Azure Virtual Desktop is a desktop and app virtualization service that runs on the Azure Cloud. When you run a Virtual Desktop service on Azure Cloud, you can do the following capabilities :
- Set up a multi-session Windows 10 deployment that delivers a full Windows 10 with scalability
- Virtualize Microsoft 365 Apps for enterprise and optimize it to run in multi-user virtual scenarios
- Provide Windows 7 virtual desktops with free Extended Security Updates
- Bring your existing Remote Desktop Services (RDS) and Windows Server desktops and apps to any computer
- Virtualize both desktops and apps
- Manage Windows 10, Windows Server, and Windows 7 desktops and apps with a unified management experience
Requirements to set up Azure Virtual Desktop and successfully connect users to their Windows desktops and applications ( based on Azure documentation )
Infrastructure requirements to support Azure Virtual Desktop in your work environment :

- An Azure Active Directory
- A Windows Server Active Directory in sync with Azure Active Directory. You can configure this using Azure AD Connect (for hybrid organizations) or Azure AD Domain Services (for hybrid or cloud organizations)
- A Windows Server AD in sync with Azure Active Directory. User is sourced from Windows Server AD and the Azure Virtual Desktop VM is joined to the Windows Server AD domain
- A Windows Server AD in sync with Azure Active Directory. User is sourced from Windows Server AD and the Azure Virtual Desktop VM is joined to Azure AD Domain Services domain
- An Azure AD Domain Services domain. User is sourced from Azure Active Directory, and the Azure Virtual Desktop VM is joined to Azure AD Domain Services domain
- An Azure subscription parented to the same Azure AD tenant, that contains a virtual network that either contains or is connected to the Windows Server Active Directory or Azure AD DS instance
User requirements to connect to Azure Virtual Desktop:
- The user must be sourced from the same Active Directory that’s connected to Azure AD. Azure Virtual Desktop does not support B2B or MSA accounts
- The UPN you use to subscribe to Azure Virtual Desktop must exist in the Active Directory domain the VM is joined to
Supported virtual machine operating systems images :
- Windows 11 Enterprise multi-session (Preview)
- Windows 11 Enterprise (Preview)
- Windows 10 Enterprise multi-session
- Windows 10 Enterprise
- Windows 7 Enterprise
- Windows Server 2022
- Windows Server 2019
- Windows Server 2016
- Windows Server 2012 R2
Azure Virtual Desktop doesn’t support x86 (32-bit), Windows 10 Enterprise N, Windows 10 LTSB, Windows 10 LTSC, Windows 10 Pro, or Windows 10 Enterprise KN operating system images. Windows 7 also doesn’t support any VHD or VHDX-based profile solutions hosted on managed Azure Storage due to a sector size limitation.
In this blog, we are detailing the steps involved in deploying an Azure Virtual Desktop environment by creating a host pool and an application group.
Creating a host pool
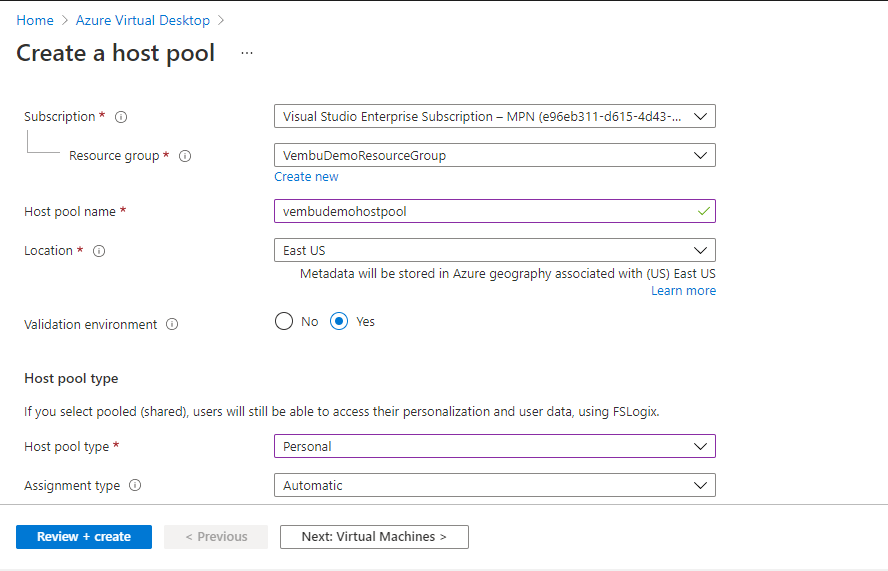
Log in to the Azure portal with a valid account credential. Choose the options Home → Azure Virtual Desktop → Host pools → Create host pool
Under Basic → Project details, users need to choose the subscription and resource group details. Provide a unique name for the host pool. Then, select the region where the Azure Virtual Desktop object will be created. The metadata for the object will be stored in the geography associated with the region.
Choose the Host pool type as Personal
Choose the assignment type from the list. Available options are:
- Automatic assignment – The service will select an available host and assign it to a user
- Direct assignment – Admin selects a specific host to assign to a user
The below screenshot shows these details.
Click Next Virtual Machines
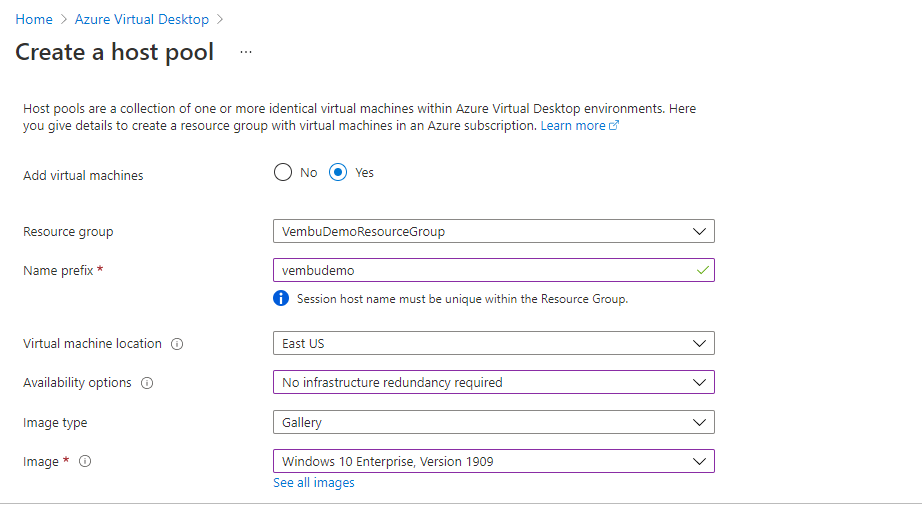
In this configuration, users need to provide the details of the Azure Virtual Desktop VM image. Here choose the resource group and provide a name prefix for the session host.
Choose the virtual machine location. You can choose a different region for virtual machines than the host pool, especially if you want metadata to be stored in particular geography but you want the virtual machines closer to the user.
In availability options, we have chosen “ No infrastructure redundancy required “. You can also choose the availability zone or availability set if you require redundancy at the VDI level.
In Image type, you can choose the Image from Gallery or the Storage blob. If you already have a VM image stored in your storage blob you can use it here. Here we have chosen a Windows 10 Enterprise image from the Gallery. The below screenshot shows these details.
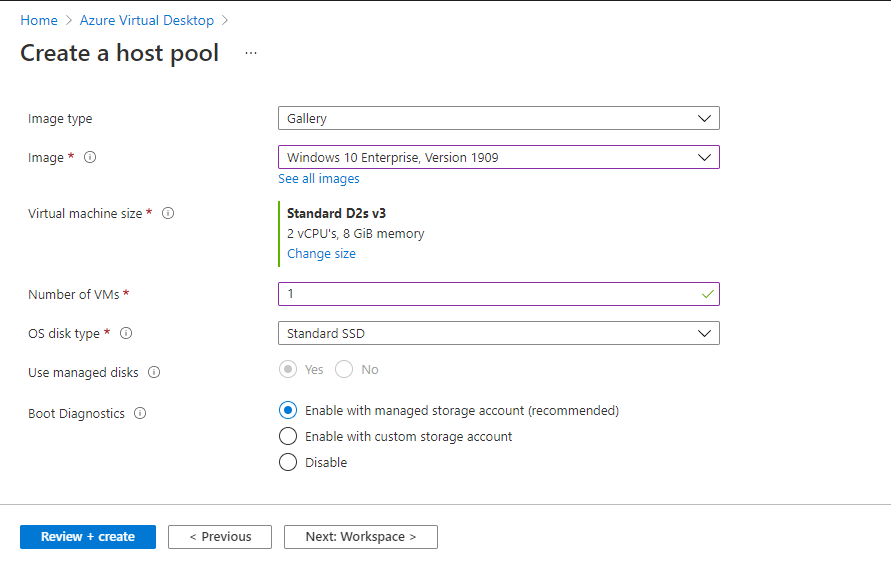
In Virtual machine size, you can choose the machine size by clicking the change size button. This will open a list of virtual machines, and one can choose the image depending on the no of vCPUs and total memory.
In the number of VMs, you can choose the value, depending on the number of VMS created.
In OS disk type, you can choose Standard HDD/SSD or Premium SSD
In Boot diagnostics, you can choose the option “ Enable with managed storage account “
Under Network and Security section,
Choose the Virtual Network you already configured ( Create a new one if you don’t have a Virtual Network ) with the subnet.
In the Network security group, choose basic or advanced, and choose No for public inbound ports. The below screenshot shows these details
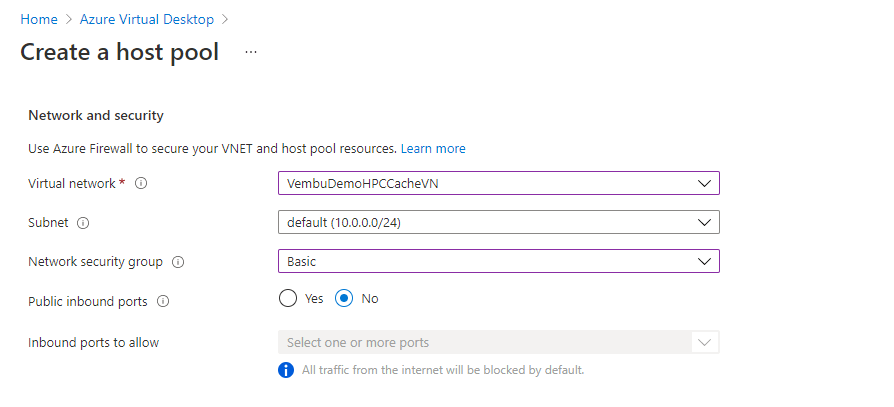
Note: You can also enable inbound ports to allow depending on your access requirements.
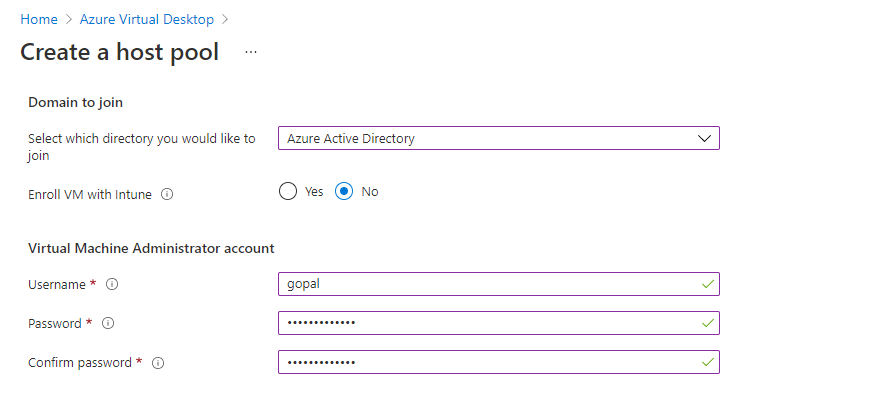
In Domain to join, choose Azure Active Directory, and No for Enroll Intune for the new VM. You could also use Active Directory if you have an OnPremise AD setup.
In the Virtual machine Administrator account, provide a new user account with a password. This user administrator account has the privilege to grant permission to join machines to your new domain. The below screenshot shows these details
Click Next Workspace
In this tab, you can register a desktop app group. Click No to proceed next step
Click Next Advanced, here you can enable diagnostic settings. Diagnostic settings are used to configure streaming export of platform logs and metrics for a resource to the destination of your choice
Click Next Tags, this step is also optional, Click Next Review & Create button
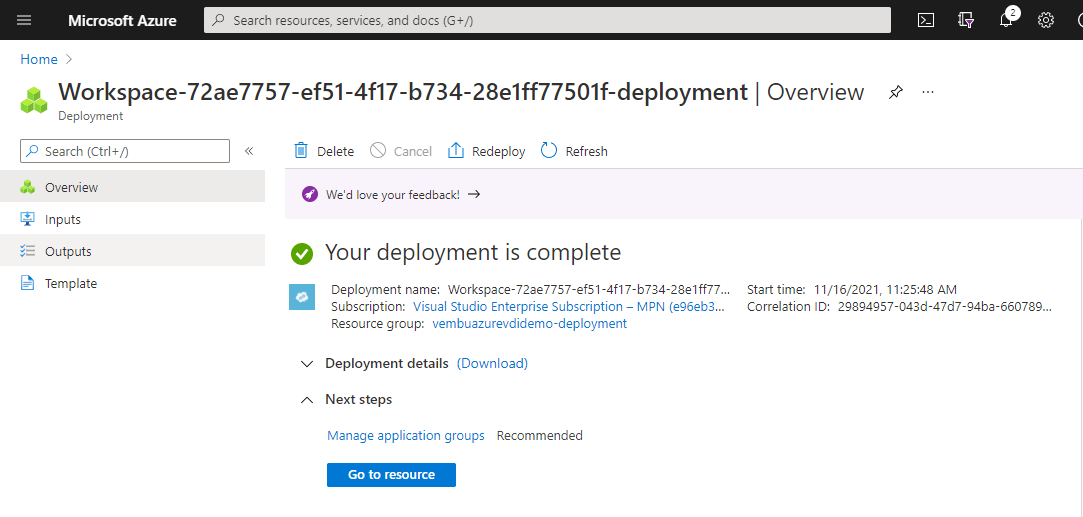
Review & Create validate your inputs and shows validation passed if all the parameters are correct. Click Create to start the process of creating a host pool. You will see a deployment is in process message on the screen, Later you will get a deployment is completed message as shown in the below screenshot.
Once the host pool is created, our next steps will be
- Managing application groups
- Managing session hosts
- Managing user assignments and
- Creating a workspace
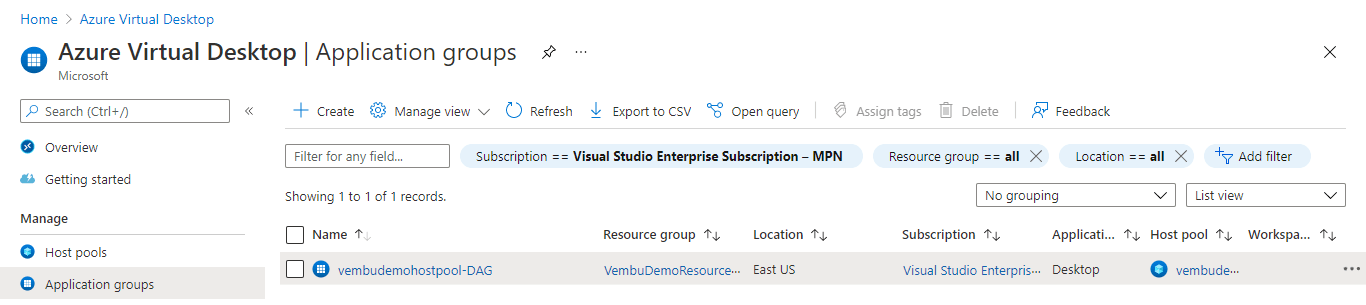
Here one application group called “vembudemohostpool-DAG” is added, and you can verify under Home → Azure Virtual Desktop → Application Groups. The below screenshot shows this step.
Managing session hosts
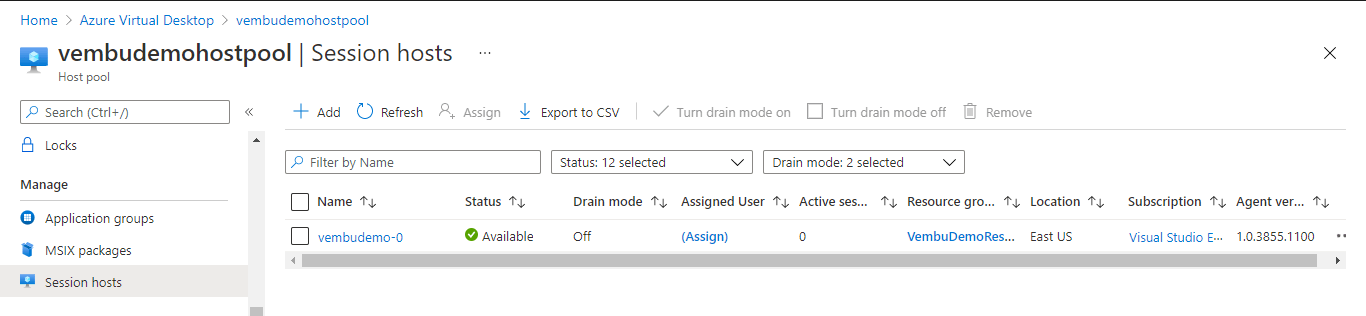
In the next step, the user has to add session hosts under the created host pool. When you create a host pool a session host can be added, and you can add more session hosts for the host pool under the Azure portal Home → Azure virtual Desktop → Name of the host pool → Session hosts. Here we have already created the host pool “vembudemohostpool” and so a new session host “vembudemo-0” is listed. The below screenshot shows these details. You can add multiple session hosts by clicking the Add button on the session hosts page.
Creating workspace
Workspace is a logical grouping of application groups. In this final step, users will only be able to access an application group published to them if it is registered to a workspace. In the Azure portal go to Home → Azure Virtual Desktop → Workspaces → Create workspace. This configuration wizard will create a new workspace. The below screenshot shows this step and is marked in Redbox.
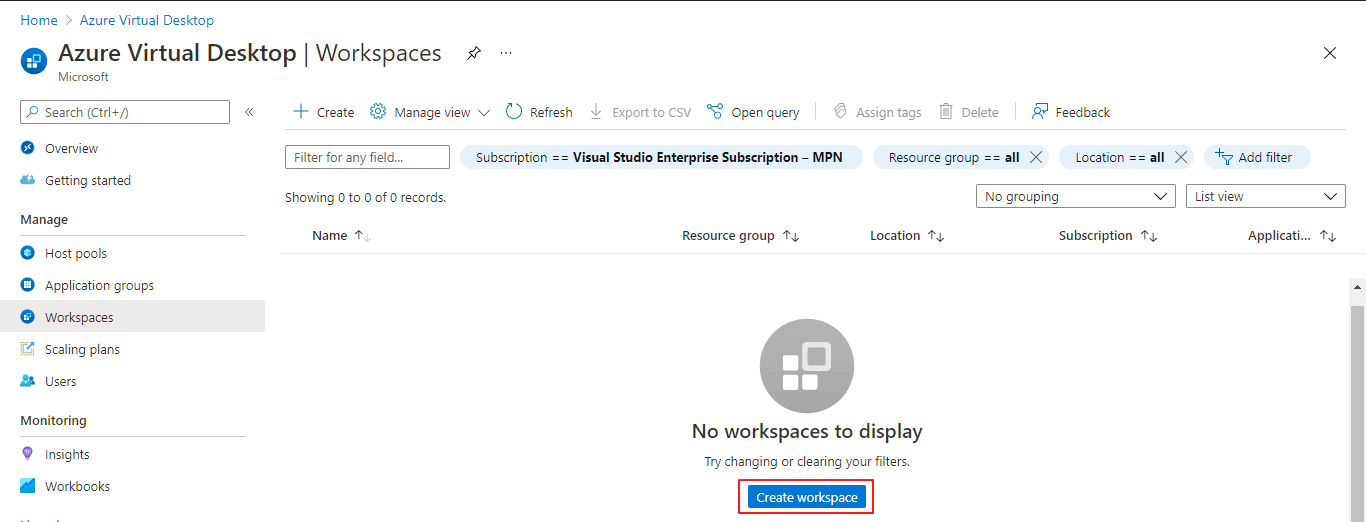
Click Create workspace
In the “Basics” configuration pane, under Project details choose the Azure subscription and the resource group. For instance, details provide a workspace name. In Location, details select the region where the workspace object will be created. Metadata for the workspace will be stored in the geography associated with the region. Only application groups available in this region can be registered to this workspace.
Note: While selecting the resource group note that a new resource group will be created during the creation of the host pool. You could use that resource group. The below screen shot shows this detail.

Click Next Application groups
In this step, the user has to register the application group created when creating the host pool. Here the application group name “vembudemohostpool-DAG” is created and is registered to this new workspace. Click “Yes” for the Register application group, and select the application group to be added. The below screenshot shows these details.
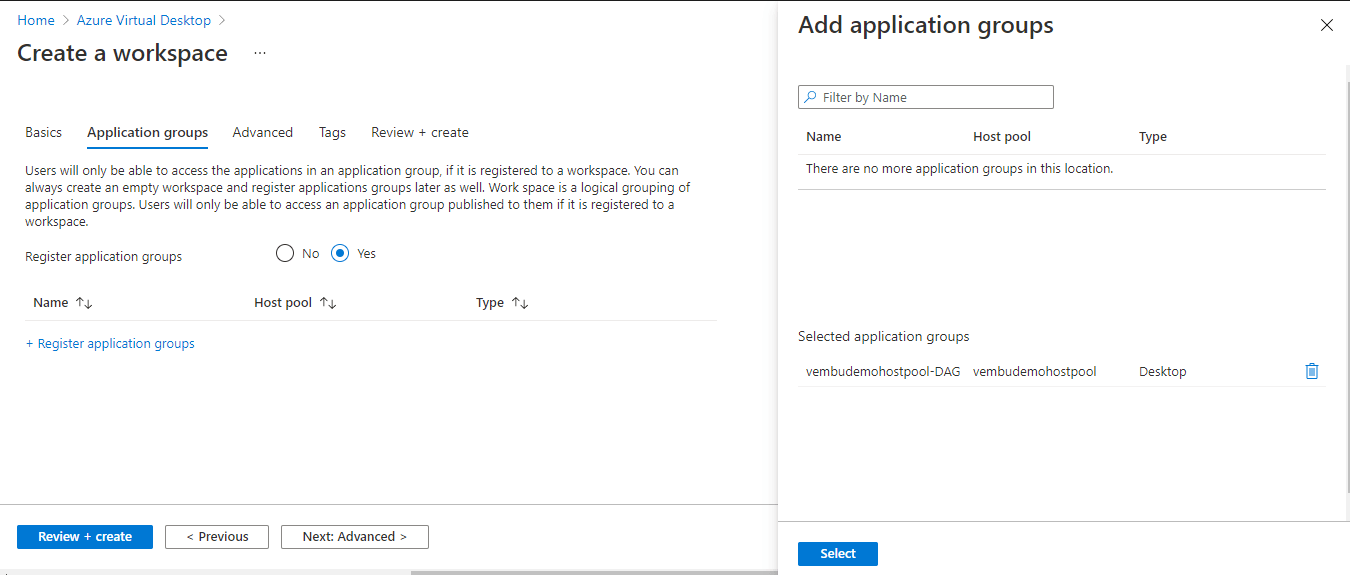
Click Select the application group to be registered under this workspace.
Click Advanced to proceed to the next step. Here you can configure diagnostic settings are used to configure streaming export of platform logs and metrics for a resource to the destination of your choice
Click Tags to proceed to the next step, and this step is optional and you can input the tag name values. Tags are name/value pairs that enable you to categorize resources and view consolidated billing by applying the same tag to multiple resources and resource group
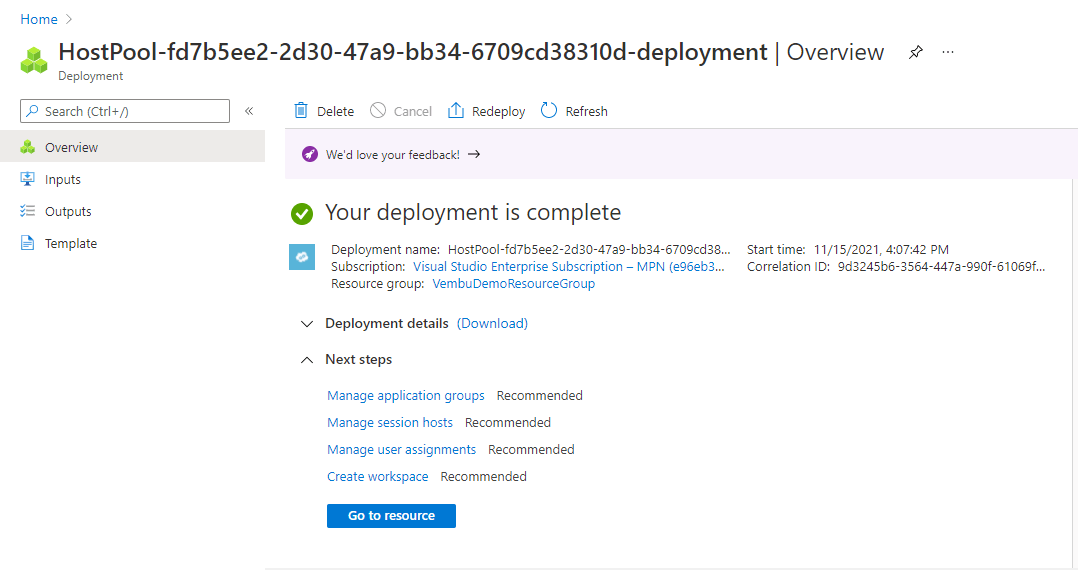
Click Next: Review + Create button. On this final step, validation check runs, and you will get a validation passed message. Click Create to start the deployment process, and you will get a deployment complete message as shown below.
Other resources :
In this blog, we have provided the steps to create an Azure Virtual Desktop environment in the Azure portal only. There are other steps such as creating users, user assignments, Logging in, and connecting with the Windows Desktop client that is not covered in this blog. Here are some useful links that can be used to achieve these requirements.
https://docs.microsoft.com/en-us/azure/virtual-desktop/user-documentation/
https://azure.microsoft.com/en-in/services/virtual-desktop/#overview
Conclusion
Setting Up Azure Virtual Desktop (formerly Windows Virtual Desktop) in minutes to enable secure remote work. Provide the familiarity and compatibility of supported Windows Os with the new scalable multi-session experience for your end-users and save costs by using existing eligible Windows licenses. Manage your end-to-end Azure Virtual Desktop deployment alongside other Azure services within the Azure portal. Simplify deployment and management of the existing infrastructure and scale quickly based on the business needs.
Use existing eligible licenses to reduce costs with a modern cloud-based virtual desktop infrastructure (VDI) and pay only for what you use.
Discover the strength of BDRSuite, our resilient backup solution designed to safeguard your Azure VMs. Don’t miss out on the opportunity to try a free 30-day trial download today.
Follow our Twitter and Facebook feeds for new releases, updates, insightful posts and more.