
Introduction
What is a VPC network in Google Cloud Platform (GCP)?
A Virtual Private Cloud (VPC) network is a virtual version of a physical network, implemented inside of Google’s production network. Virtual Private Cloud (VPC) provides networking functionality to Compute Engine virtual machine (VM) instances, Google Kubernetes Engine (GKE) clusters, and the App Engine flexible environment. VPC provides networking for your cloud-based resources and services.
Table of Contents
- A VPC network provides the following:
- Important properties of the GCP VPC
- Creating a VPC network in the GCP console
- Provisioning a new firewall rule for the newly created VPC network
- Conclusion
A VPC network provides the following:
- Provides connectivity for your Compute Engine virtual machine (VM) instances, including Google Kubernetes Engine (GKE) clusters, App Engine flexible environment instances, and other Google Cloud products built on Compute Engine VMs
- Offers native Internal TCP/UDP Load Balancing and proxy systems for Internal HTTP(S) Load Balancing
- Connects to on-premises networks using Cloud VPN tunnels and Cloud Interconnect attachments
- Distributes traffic from Google Cloud external load balancers to backends
Important properties of the GCP VPC
Some important properties of the GCP VPC as per the Google documentation are given below, these are the important considerations for a Google cloud Administrator who is managing the VPC network part.
- VPC networks, including their associated routes and firewall rules, are global resources. They are not associated with any particular region or zone
- Subnets are regional resources. Each subnet defines a range of IP addresses
- Traffic to and from instances can be controlled with network firewall rules. Rules are implemented on the VMs themselves, so traffic can only be controlled and logged as it leaves or arrives at a VM
- Resources within a VPC network can communicate with one another by using internal IPv4 addresses, subject to applicable network firewall rules
- Instances with internal IP addresses can communicate with Google APIs and services
- Network administration can be secured by using Identity and Access Management (IAM) roles
- An organization can use Shared VPC to keep a VPC network in a common host project. Authorized IAM members from other projects in the same organization can create resources that use subnets of the Shared VPC network
- VPC networks can be connected to other VPC networks in different projects or organizations by using VPC Network Peering
- VPC networks can be securely connected in hybrid environments by using Cloud VPN or Cloud Interconnect
- VPC networks support GRE traffic, including traffic on Cloud VPN and Cloud Interconnect. VPC networks do not support GRE for Cloud NAT or for forwarding rules for load balancing and protocol forwarding. Support for GRE allows you to terminate GRE traffic on a VM from the internet (external IP address) and Cloud VPN or Cloud
- Interconnect (internal IP address). The decapsulated traffic can then be forwarded to a reachable destination. GRE enables you to use services such as Secure Access Service Edge (SASE) and SD-WAN
- VPC networks support IPv4 unicast addresses. VPC networks also support external IPv6 unicast addresses in some regions. VPC networks do not support broadcast or multicast addresses within the network
In this blog, we are going to describe the steps involved in creating a VPC in the GCP console.

Creating a VPC network in the GCP console
Login to GCP console using a valid credential using the URL https://console.cloud.google.com/
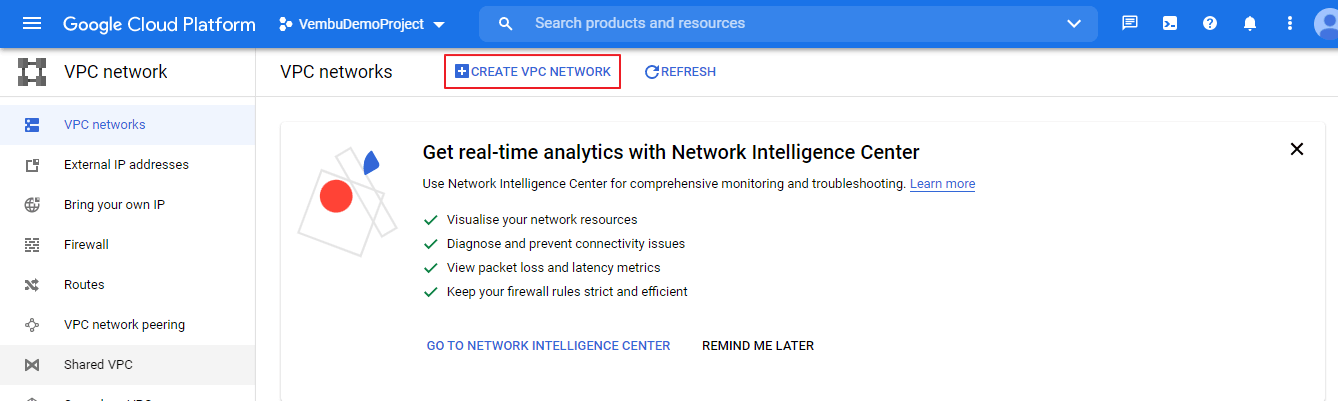
Choose the desired project you created under your account. Choose “VPC Network” from the left side available menu, and click “CREATE VPC NETWORK” at the top of the page. The below screenshot shows this step.
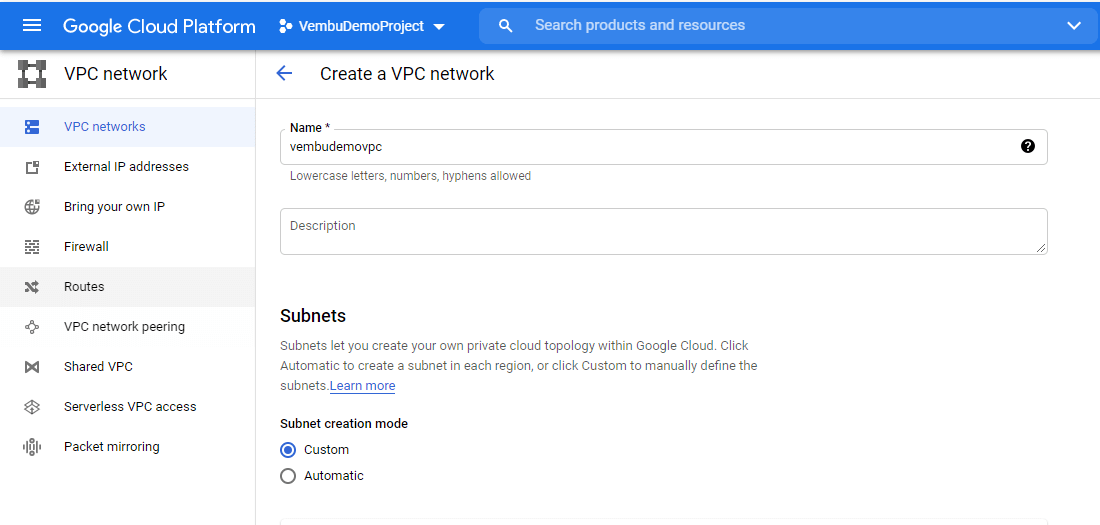
After clicking the button “Create VPC Network”, a new window opens, there is the first step, the user should provide a name for the vpc. Then choose the subnet creation mode Custom or Automatic. Subnets let you create your own private cloud topology within Google Cloud. Click Automatic to create a subnet in each region, or click Custom to manually define the subnets. Here we are choosing the option “Custom”, and hence a new Edit subnet option to open to provide the details manually. The below screenshot shows this step.
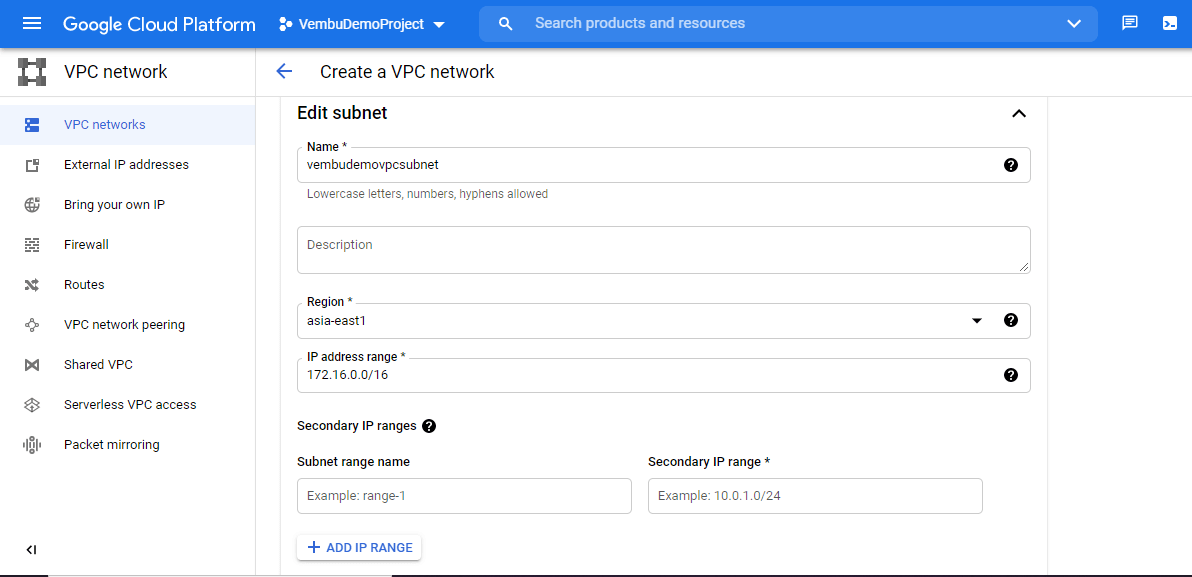
On Editing the subnet section,
Provide a name for the subnet, choose the region where you want to use this VPC. You can choose the region from the available list. Finally provide the IP network range for the subnet. You could also provide a secondary IP range if required. A subnet may have a secondary CIDR range, from which secondary IP ranges of a VM may be allocated. To provide a subnet range name and CIDR range for the secondary subnet. Click Add “IP range” to include these CIDR IP addresses ranges. In our example, we have chosen the “asia-east1” region and the IP Address range “172.16.0.0/16” as shown in the below image.
Additional settings
Private Google Access – Set whether VMs in this subnet can access Google services without assigning external IP addresses. You can set ON / OFF, the default option is OFF
Flow logs – Turning on VPC flow logs doesn’t affect performance, but some systems generate a large number of logs, which can increase costs in Cloud Logging. You can set ON / OFF, the default option is OFF
Click Done to finish this subnet adding settings.
Dynamic routing mode – Global dynamic routing allows all subnetworks regardless of the region to be advertised to your on-premise router and region when using Cloud Router. With global routing, you just need a single VPN with Cloud Router to dynamically learn routes to and from all GCP regions on a network. It has two options Regional and Global
Regional – Cloud routers will learn routes only in the region in which they were created
Global – Global routers let you learn dynamically to and from all regions with a single VPN or interconnect and Cloud Router. By default Regional option will be selected.
Maximum Transmission Unit – A maximum transmission unit (MTU) is the largest packet or frame size, specified in octets (eight-bit bytes) that can be sent in a packet- or frame-based network such as the internet. Available options include 1460 or 1500 MTU. Here 1460 MTU is selected. The below screenshot shows these settings.
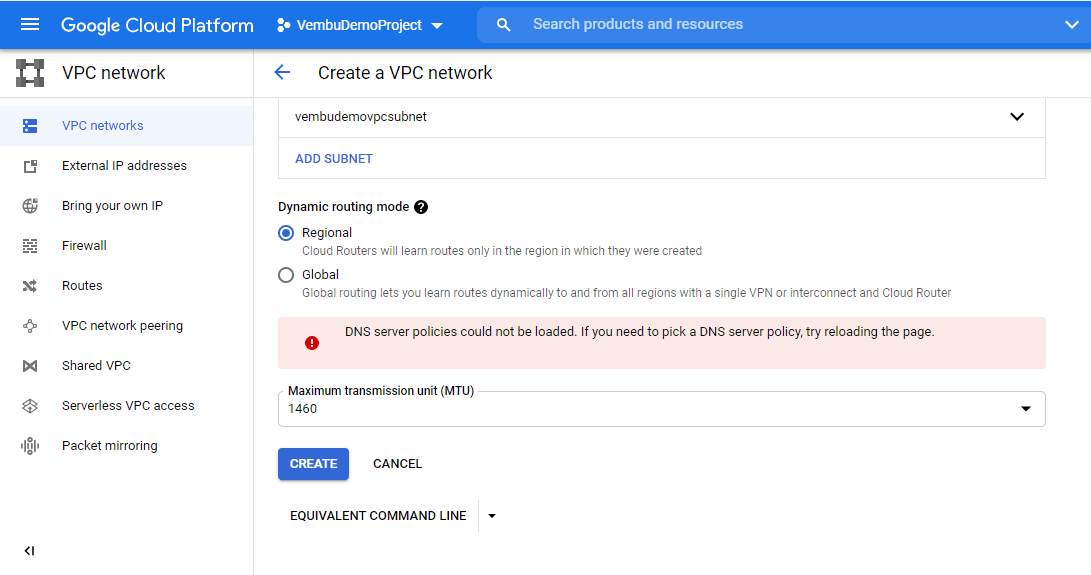
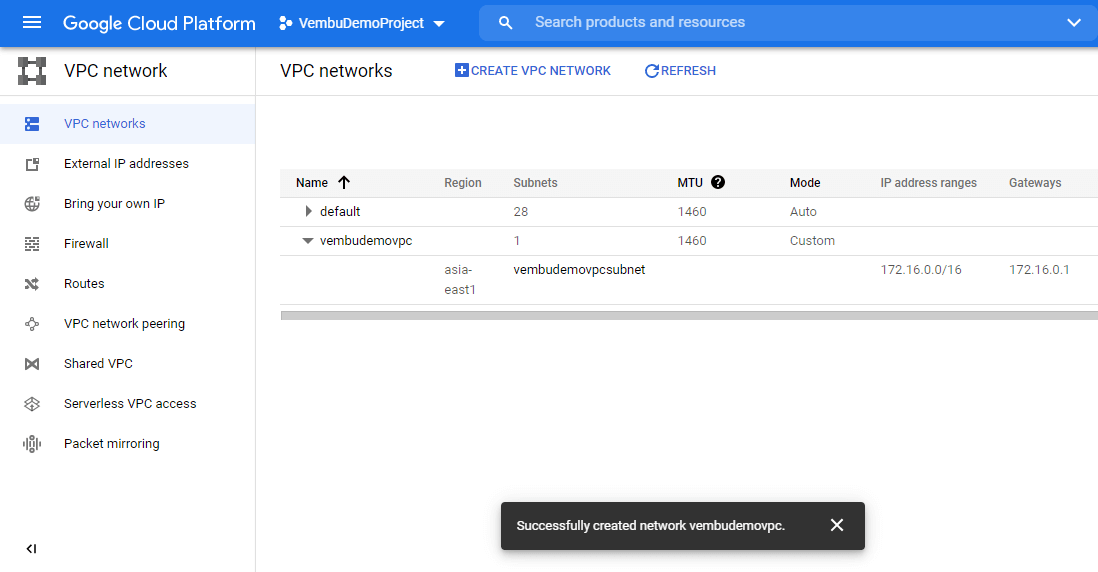
Click the Create button, to finish the settings and can proceed to create a new VPC in the said region. After a brief period of time, the specified VPC will be created and can be used for operation. The below picture shows the newly created VPC in the VPC networks list.
Provisioning a new firewall rule for the newly created VPC network
Generally, a newly created VPC network uses default firewall rules provided by the GCP firewall service. But you can design your own firewall rule as per your requirements and can associate those rules with the VPC. During the firewall creation process, you can choose the newly created VPC, so that any resources using the VPC are monitored and controlled for incoming and outgoing traffic.
Login to the GCP console with valid credentials, and choose the project under which you created the VPC network.
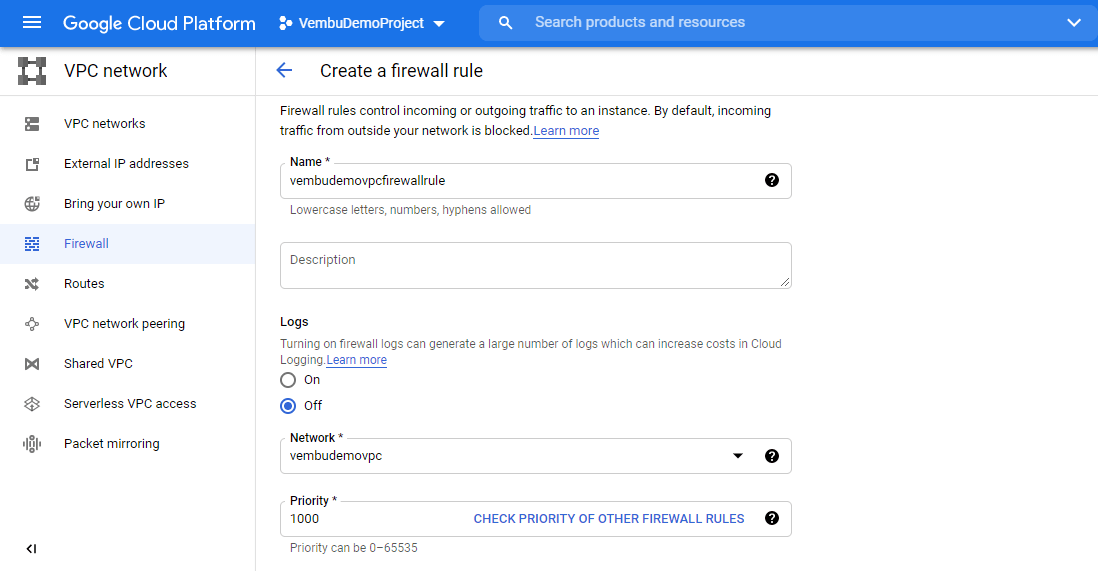
Click Firewall on the left side main menu → Click “create firewall rule” on top of the page, and this will open a new tab wizard for creating a new firewall rule configuration.
In this configuration section you will be asked to provide a name for the firewall rule ( in our case the name is vembudemovpcfirewallrule.
Next, you can turn ON or off the firewall logs for the newly created rule. By default, it will be OFF. Turning ON firewall logs can generate a large number of logs which can increase costs in Cloud Logging.
Next, under Network, choose the VPC network you newly created ( in our case the newly created VPC name is vembudemovpc
Next, Priority provides a value between 0 and 65535. The default value is 1000. The below screenshot shows these details.
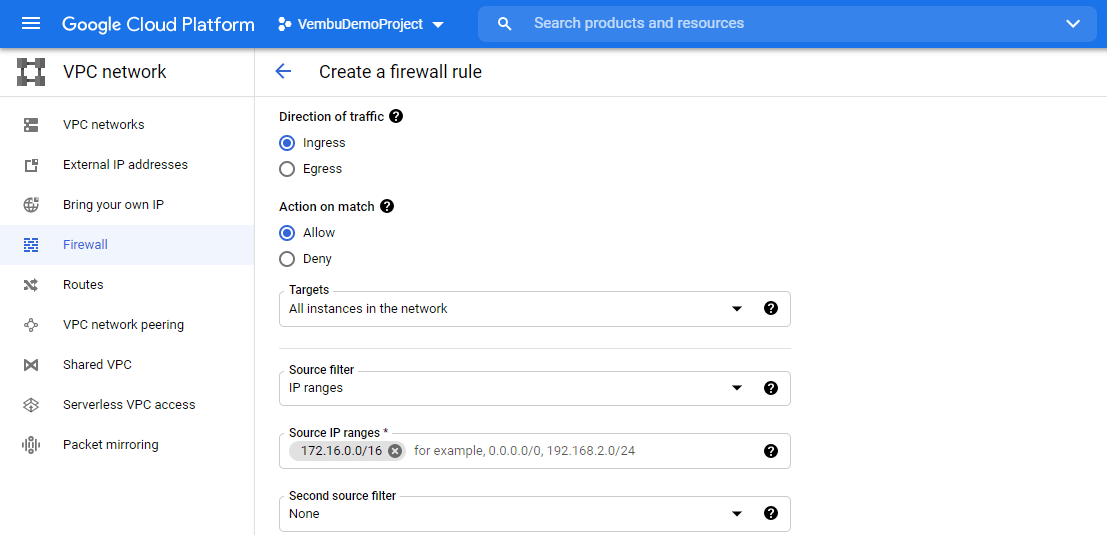
Next, choosing the direction of the firewall traffic, Ingress or Egress. Ingress applies to incoming traffic, and Egress applies to outgoing traffic. Here we are defining a rule for the incoming traffic, so the Ingress option is chosen.
Action on matching – Here you can choose the action Allow or Deny depending on the target option you chose from the list. The option “All instances in the network” affects all Firewall rules and applies only to these instances within the virtual network.
Source filter – Set filters to apply your rule to specific sources of traffic. You can choose IP ranges, Source tags, or Service accounts. Here we have chosen IP ranges and can provide the IP range in CIDR notation
Second source filter – This setting is optional, if required you can set additional filters. The below screenshot shows these details.
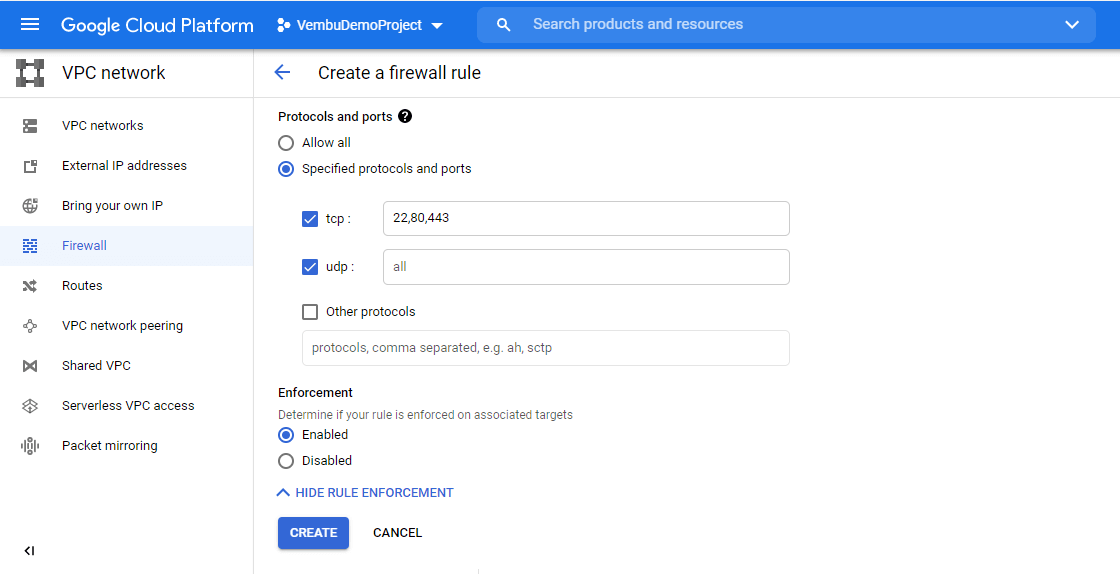
Protocol and ports – The traffic rule applies only to these protocols and ports. You can choose to Allow all or specified protocols and ports. If you choose specified protocols and ports, you can specify the port number port name such as ssh, HTTPS, etc.
Enforcement – Determine if your rule is enforced on associated targets. You can Enable or Disable this option. By default, the enforcement option is enabled, and hence after creating the rule, the enforcement has taken place immediately.
Finally, all the settings are configured, and click the Create button to create the rule. The below screenshot shows these settings.
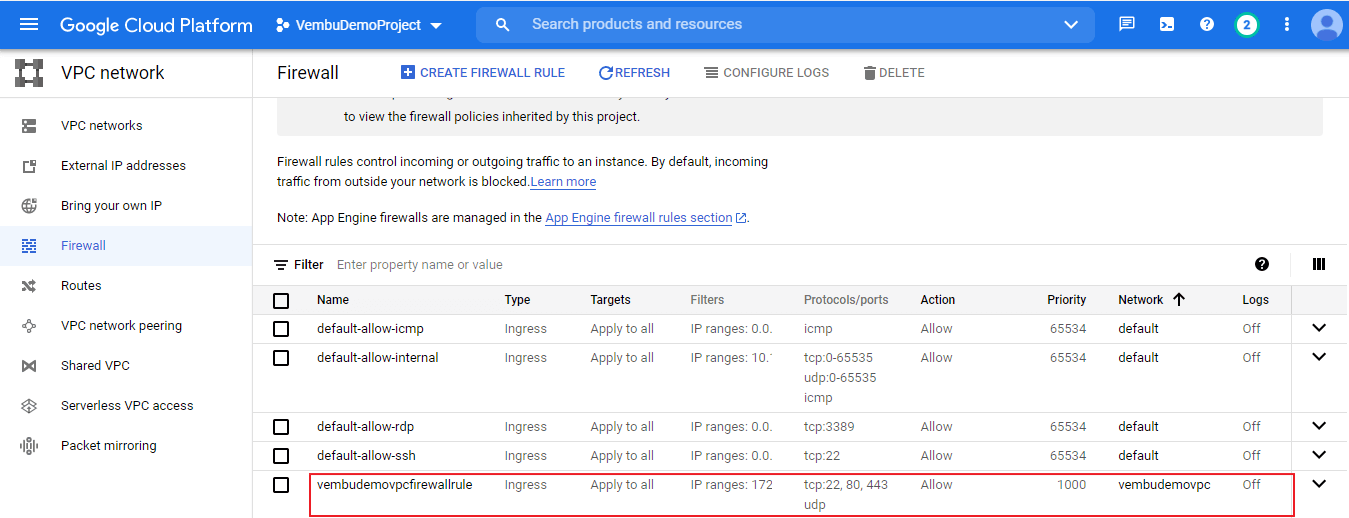
Now a new firewall rule is created and is available for selection to use on any resources in the specified region. The new rule created is shown in the red box in the below screenshot.
Conclusion
GCP VCP provides a major role in communicating between the resources and to the internet. You can list any resources on GCP, a good configuration of VCP is a vital part and it is the first step during the creation of any VMs on GCP. Using VPN you can securely connect your existing network to a VPC network over IPsec. Using the VPC peering concept, you can configure private communication across the same or different organizations without bandwidth bottlenecks or single points of failure. Using Shared VPC, you can configure a VPC network to be shared across several projects in your organization. Connectivity routes and firewalls associated are managed centrally. Your developers have their own projects with separate billing and quota, while they simply connect to a shared private network, where they can communicate.
Follow our Twitter and Facebook feeds for new releases, updates, insightful posts and more.