
Most businesses are using virtualized workloads and are also moving to Cloud steadily. Virtual Machines hold business-critical data and so it becomes a necessity to backup VMs frequently to prevent data loss and to resume essential business operations in case of unexpected events.
Despite increased data threats & data loss, most small/medium businesses still don’t backup their data as they are more concerned with money and manpower associated with backup software implementation. Businesses that could not spend on backup expenses because of their tight IT budget are always on the lookout for free backup software that is efficient and easy to use. Considering this, Vembu offers a free edition of our flagship product – BDRSuite.
“BDRSuite is a Comprehensive and Cost-Effective Backup & Disaster Recovery Solution designed to protect data that span across Data Centers/Private Cloud (VMware, Hyper-V, Windows, Linux, Applications & Databases), Public Cloud (AWS), SaaS (Microsoft 365, Google Workspace), and Endpoints (Windows, Mac).”
In this post, we will discuss what BDRSuite Free Edition offers for Hyper-V environments. Then, we will look into the step-by-step instructions on how to Backup and Recover Hyper-V Workloads with BDRSuite.
What does BDRSuite Free Edition for Hyper-V Offer?
- Free Backup & Recovery for up to 10 Hyper-V VMs
- Agentless VM Backup – Agentless image level backup for Hyper-V VMs running on Hyper-V Standalone and Cluster Hosts
- Near Continuous Data Protection – Automatically schedule Incremental Backups as often as every 15 mins or on an hourly/daily/weekly/monthly basis
- Application-aware Backup – Create a consistent backup of VMs that runs applications like Microsft Exchange, SQL, SharePoint, and Active Directory
- Instant VM Recovery in less than 15 mins – Instantly restore backed up Hyper-V VM on any hypervisor: Hyper -V or VMware or KVM and ensure RTO of less than 15 minutes
- Granular Recovery for Files & Applications – Granular level recovery allows recovering data at the file/folder level instead of recovering the entire VM. It also allows application item-level recovery of Microsoft Exchange, SQL, Sharepoint, and Active Directory
- Cross-Platform Migration – Download Hyper-V VMs in various virtual formats (VHD, VHDX, VMDK, Flat.VMDK, RAW) and migrate your VMs to any hypervisors (V2V)
- And more
Hyper-V Backup Configuration – Step by Step
Step 1: Download and Install BDRSuite Backup Server. Refer to the installation instructions here.

Step 2: Log in to the BDRSuite Backup Server and navigate to the Tab: VMware/Hyper-V/Windows/Linux
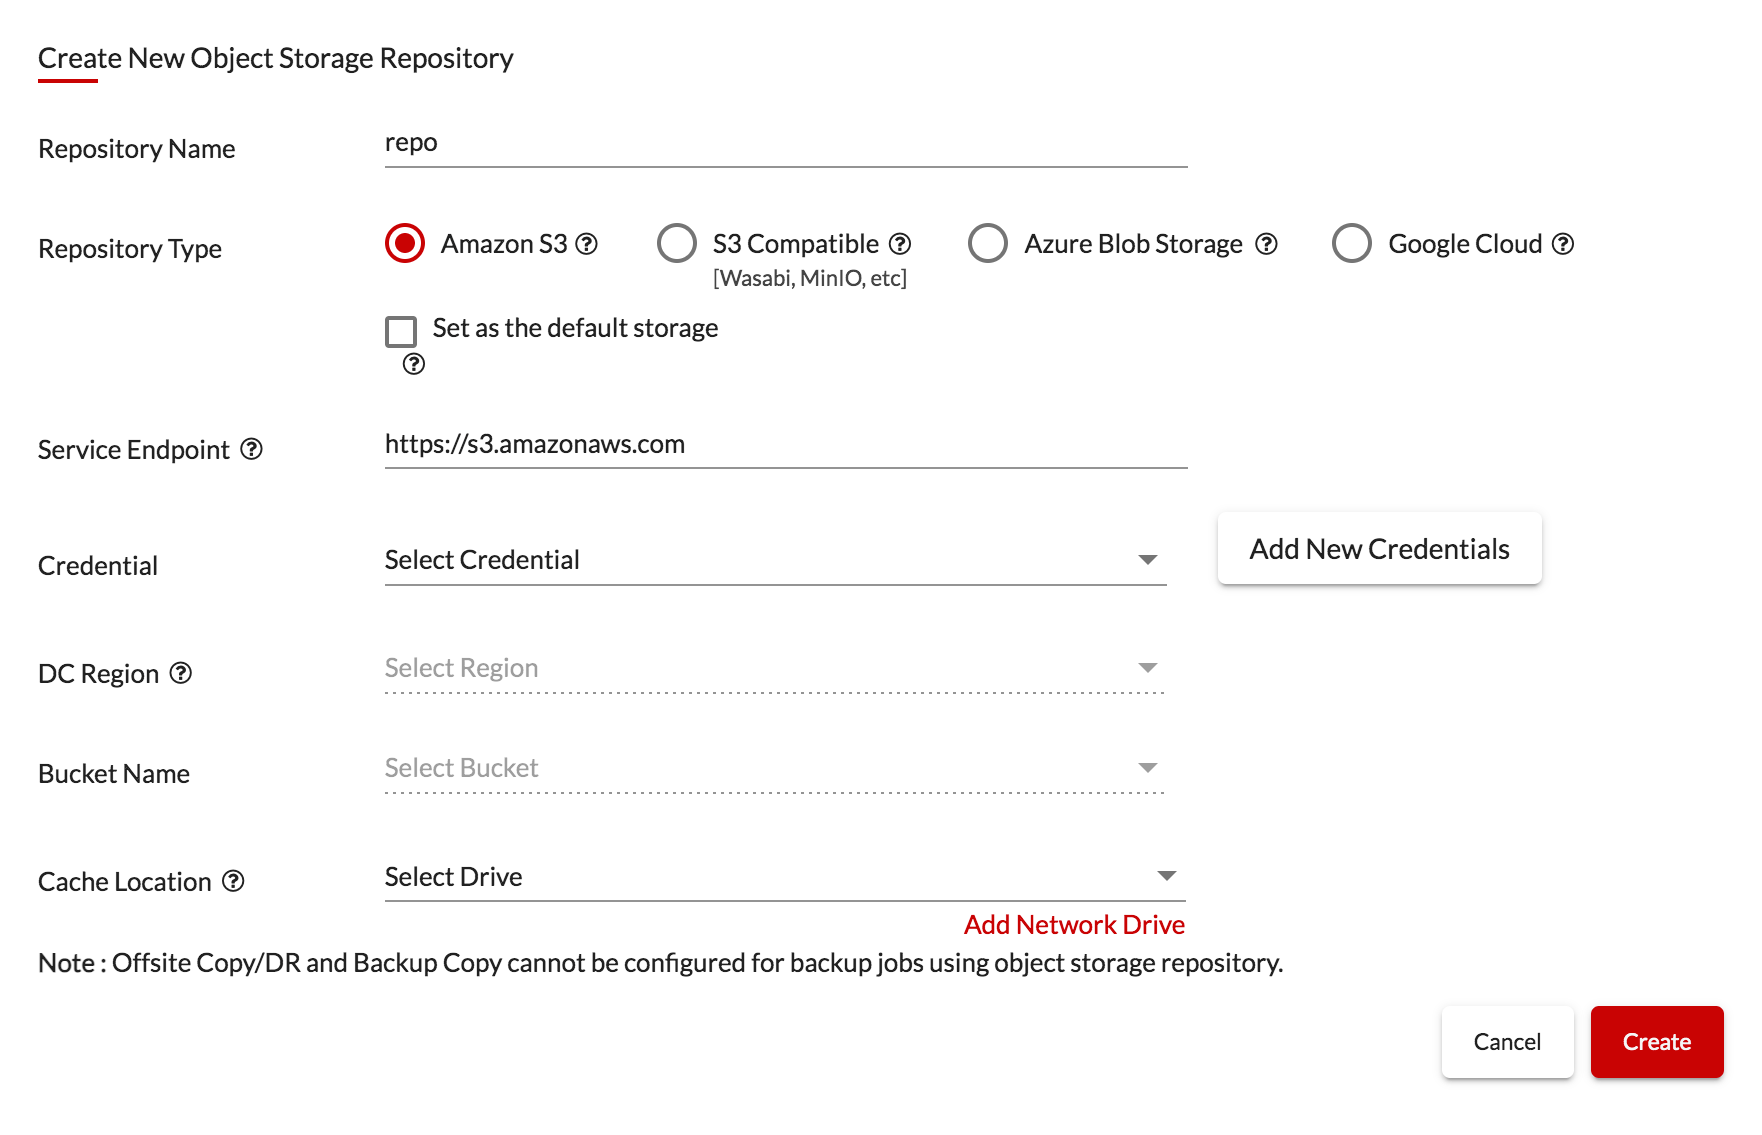
Step 3: Configure Backup Repository: Backup repository is where the backup data is stored. Navigate to Backup Server Tile -> Backup Repository. You can choose to store backup data on Block Storage – NAS, SAN, DAS, etc or on Object storage – S3, Azure Blob, S3 Compatible Storages such as Wasabi, MinIO, etc.
Step 4: Add Hyper-V Host: Navigate to Data Sources -> Add Microsoft Hyper-V. Select one of three options: Hyper-V Clusters, Hyper-V Servers (Standalone), and SMB Servers. Provide the Hyper-V host details that you want to backup and save them to the backup server.

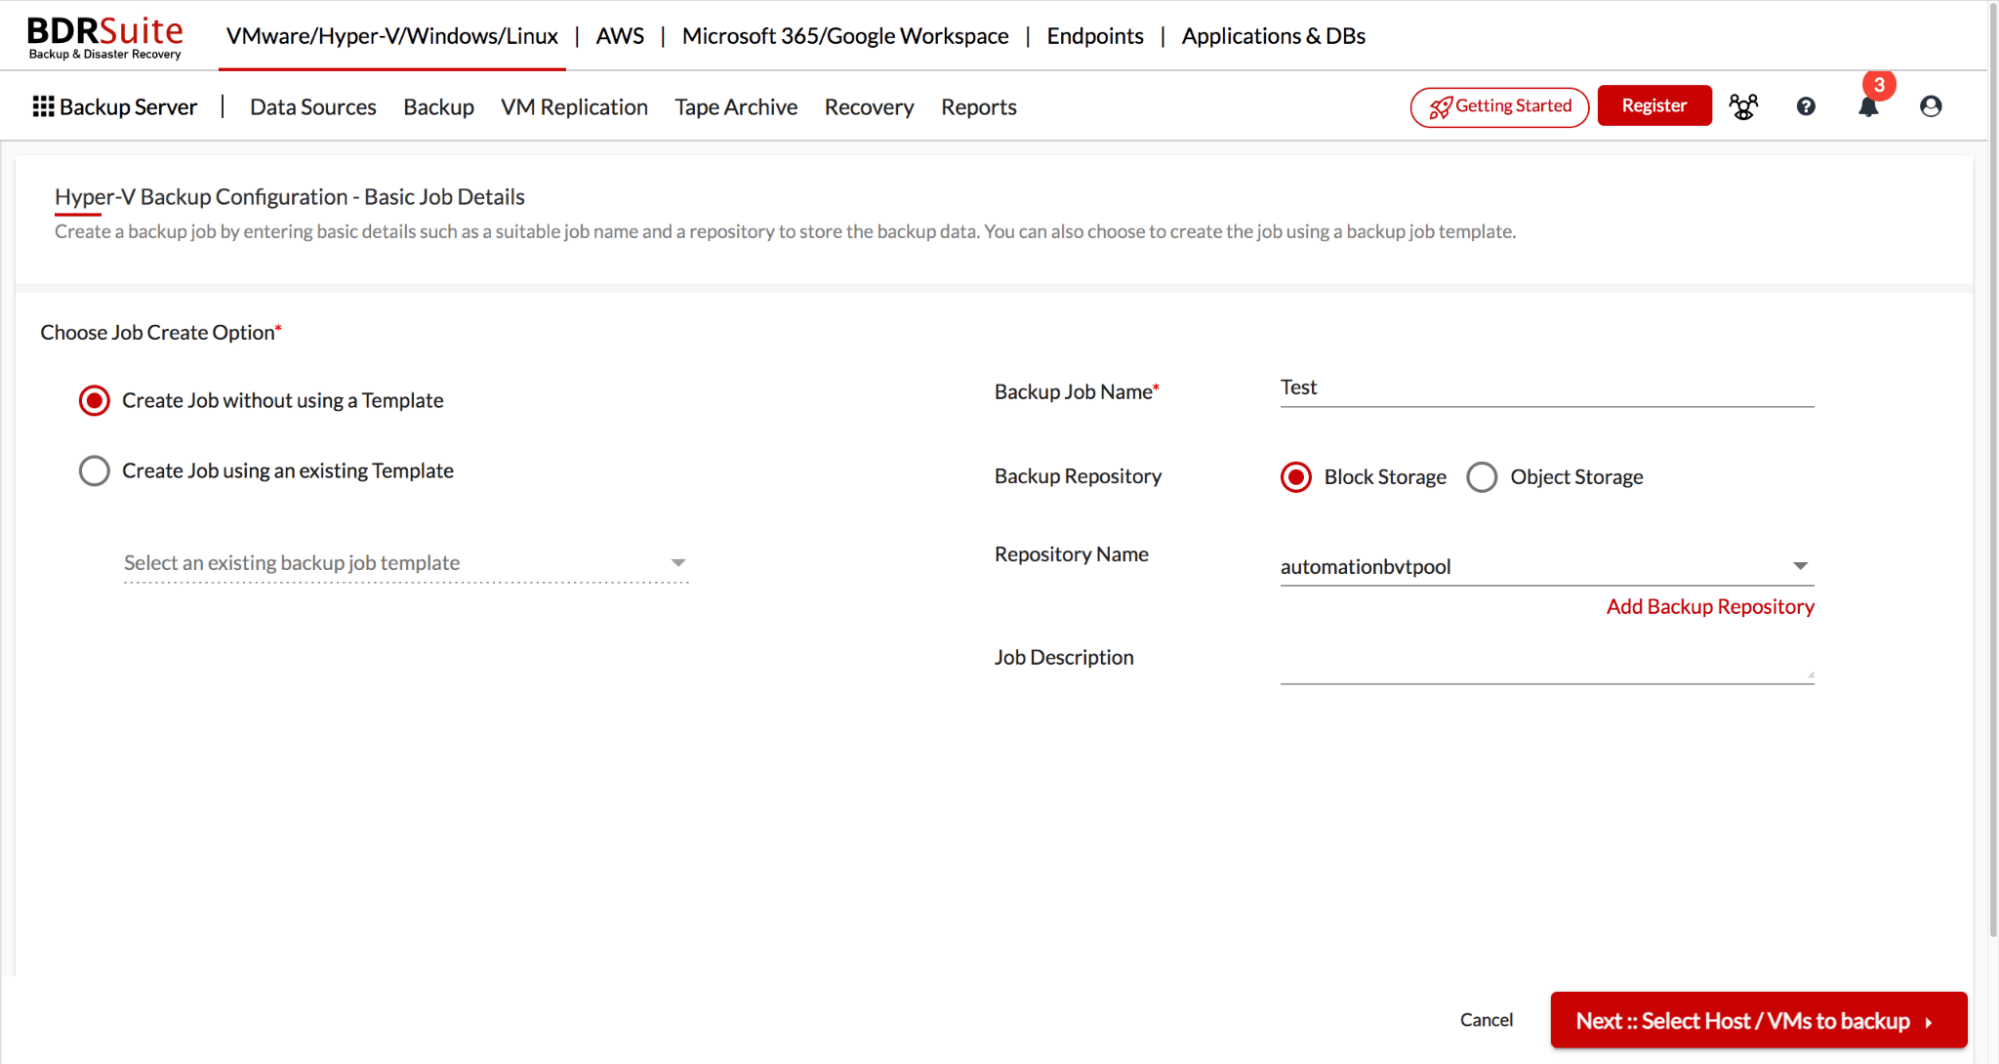
Step 5: Backup Configuration: Navigate to Backup -> Microsoft Hyper-V page.
1. Firstly you have to select the type of job creation: without using a template or using an existing template. In this post, we will look into configuring backup without using the template.
2. Basic Job Details: Type in the backup job name. Select the type of backup repository you want to choose: Block or Object storage. Select the name of the Block Storage or Object Storage repository to store the backup data.
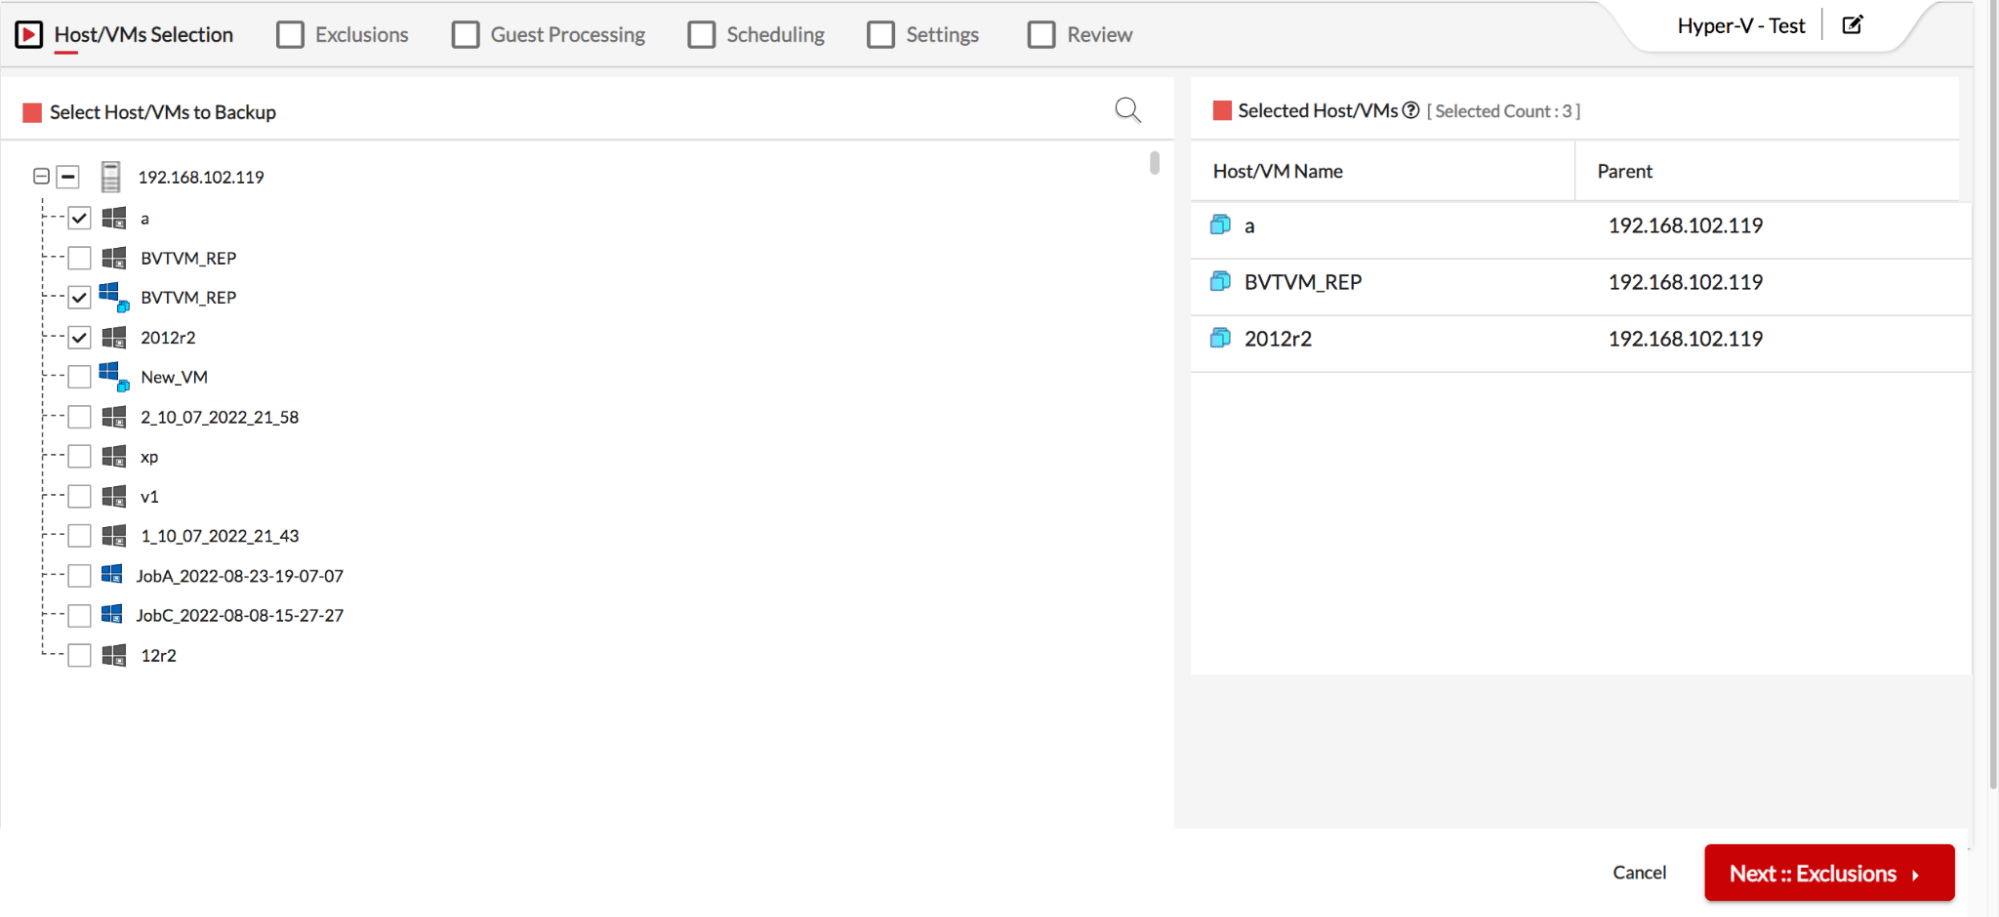
3. VM Selection: Select the list of virtual machines for the backup from the list of VMs available in the Hyper-V host. You can also select individual Hyper-V VMs or entire Hyper-V hosts.
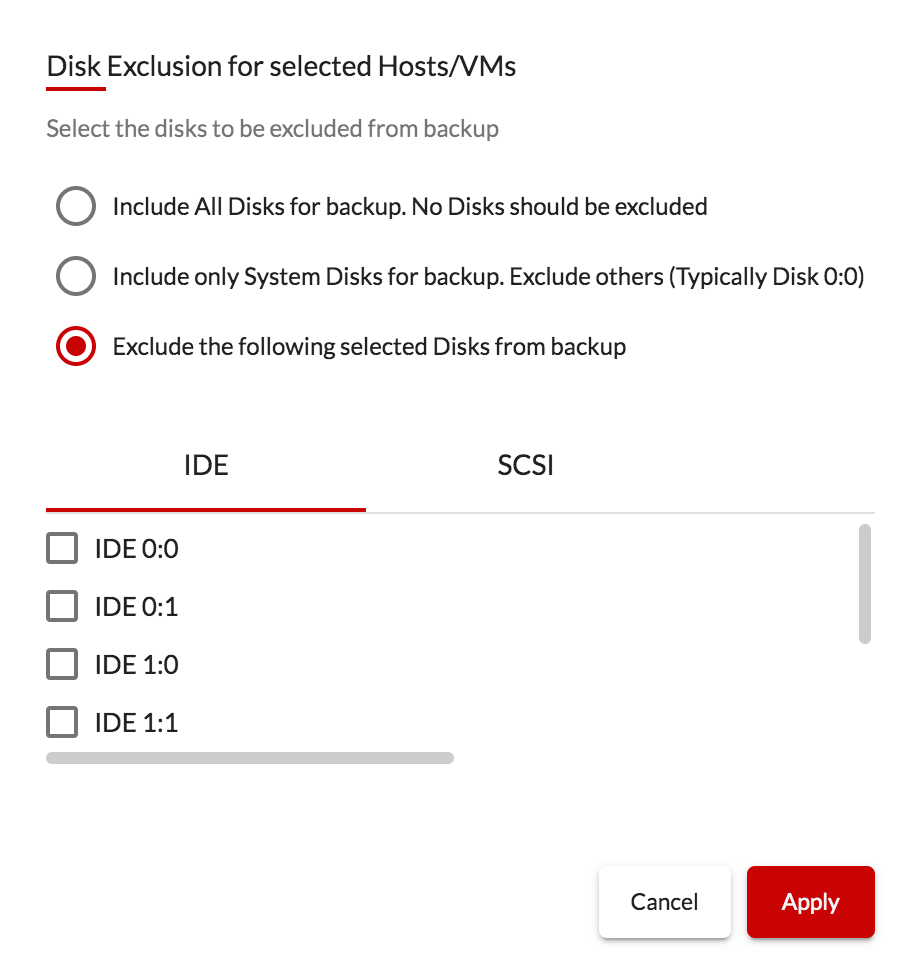
4. VM/Disk Exclusion: Moving onto the next section you can exclude a particular VM at the host level or particular Disks at VMs or host level from being backed up.
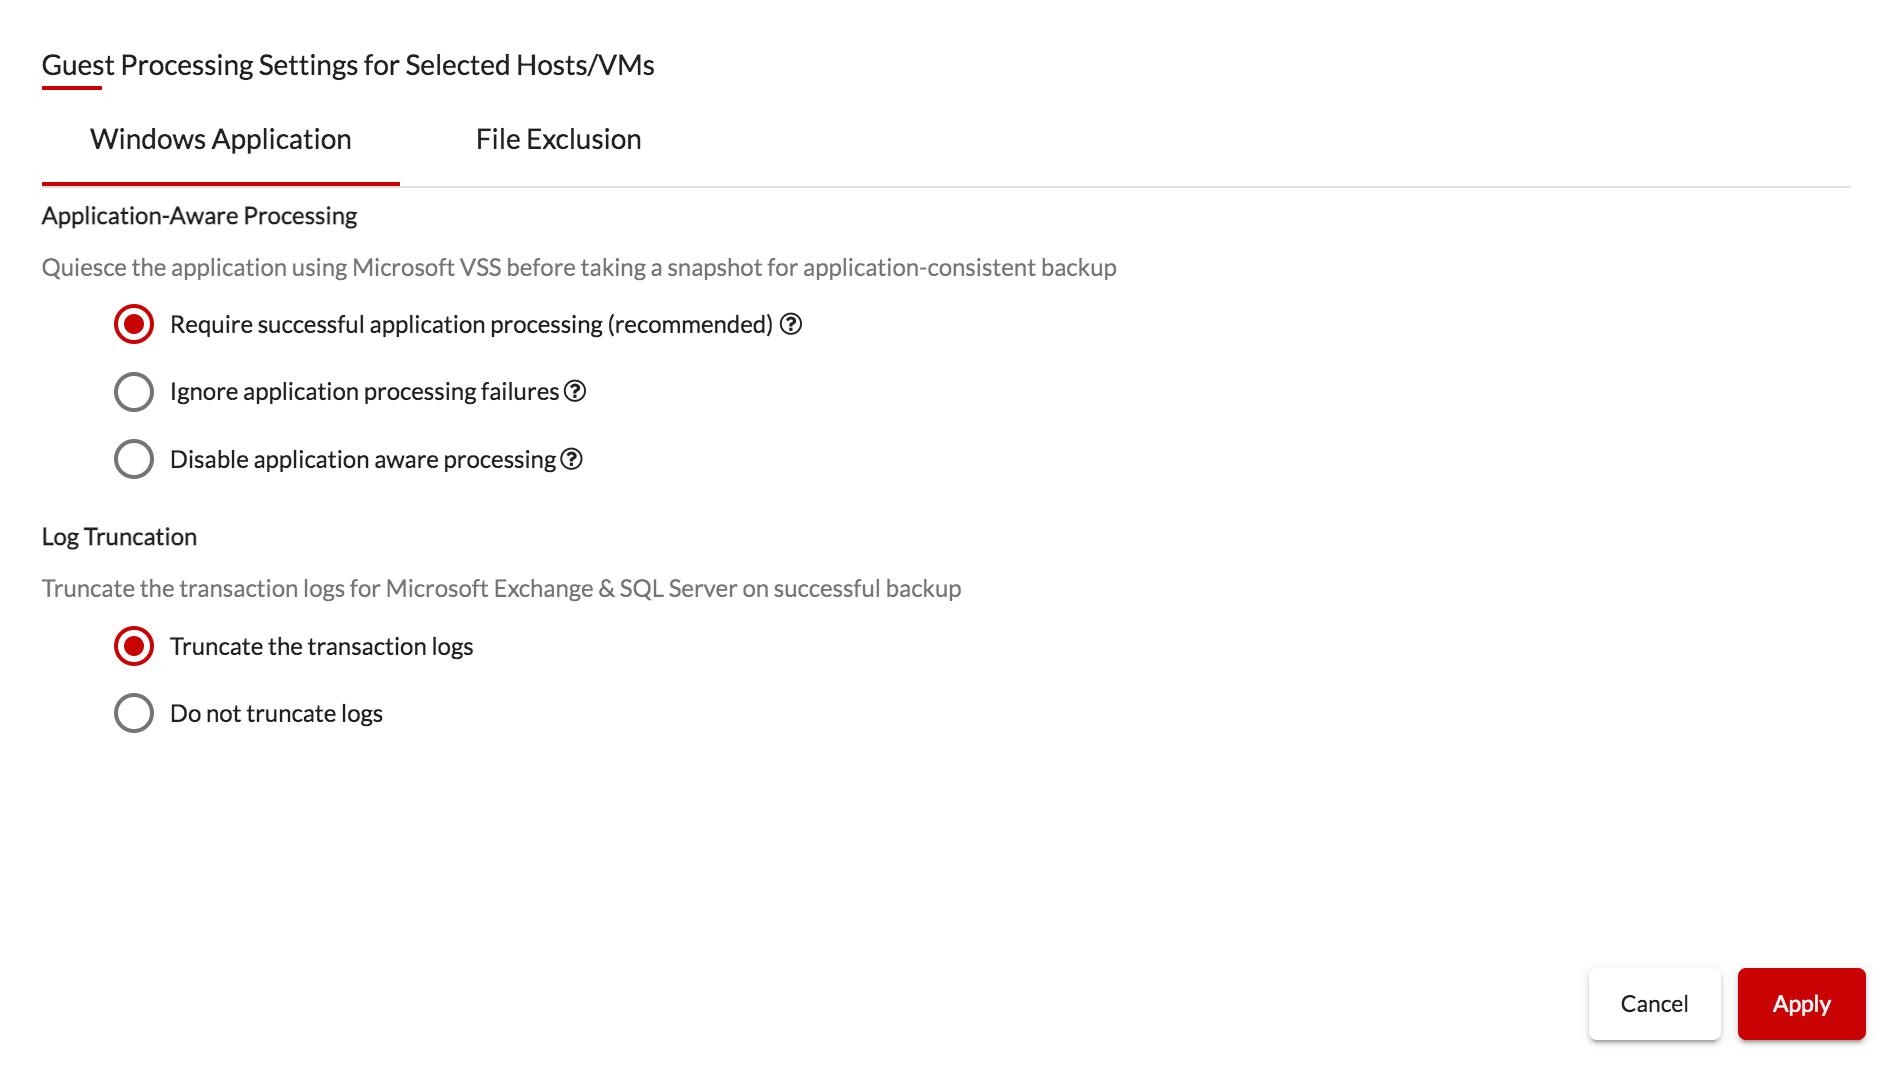
5. Guest Processing: Enable Application-aware processing and Log Truncation for VMs with Microsoft Applications to create a consistent backup.
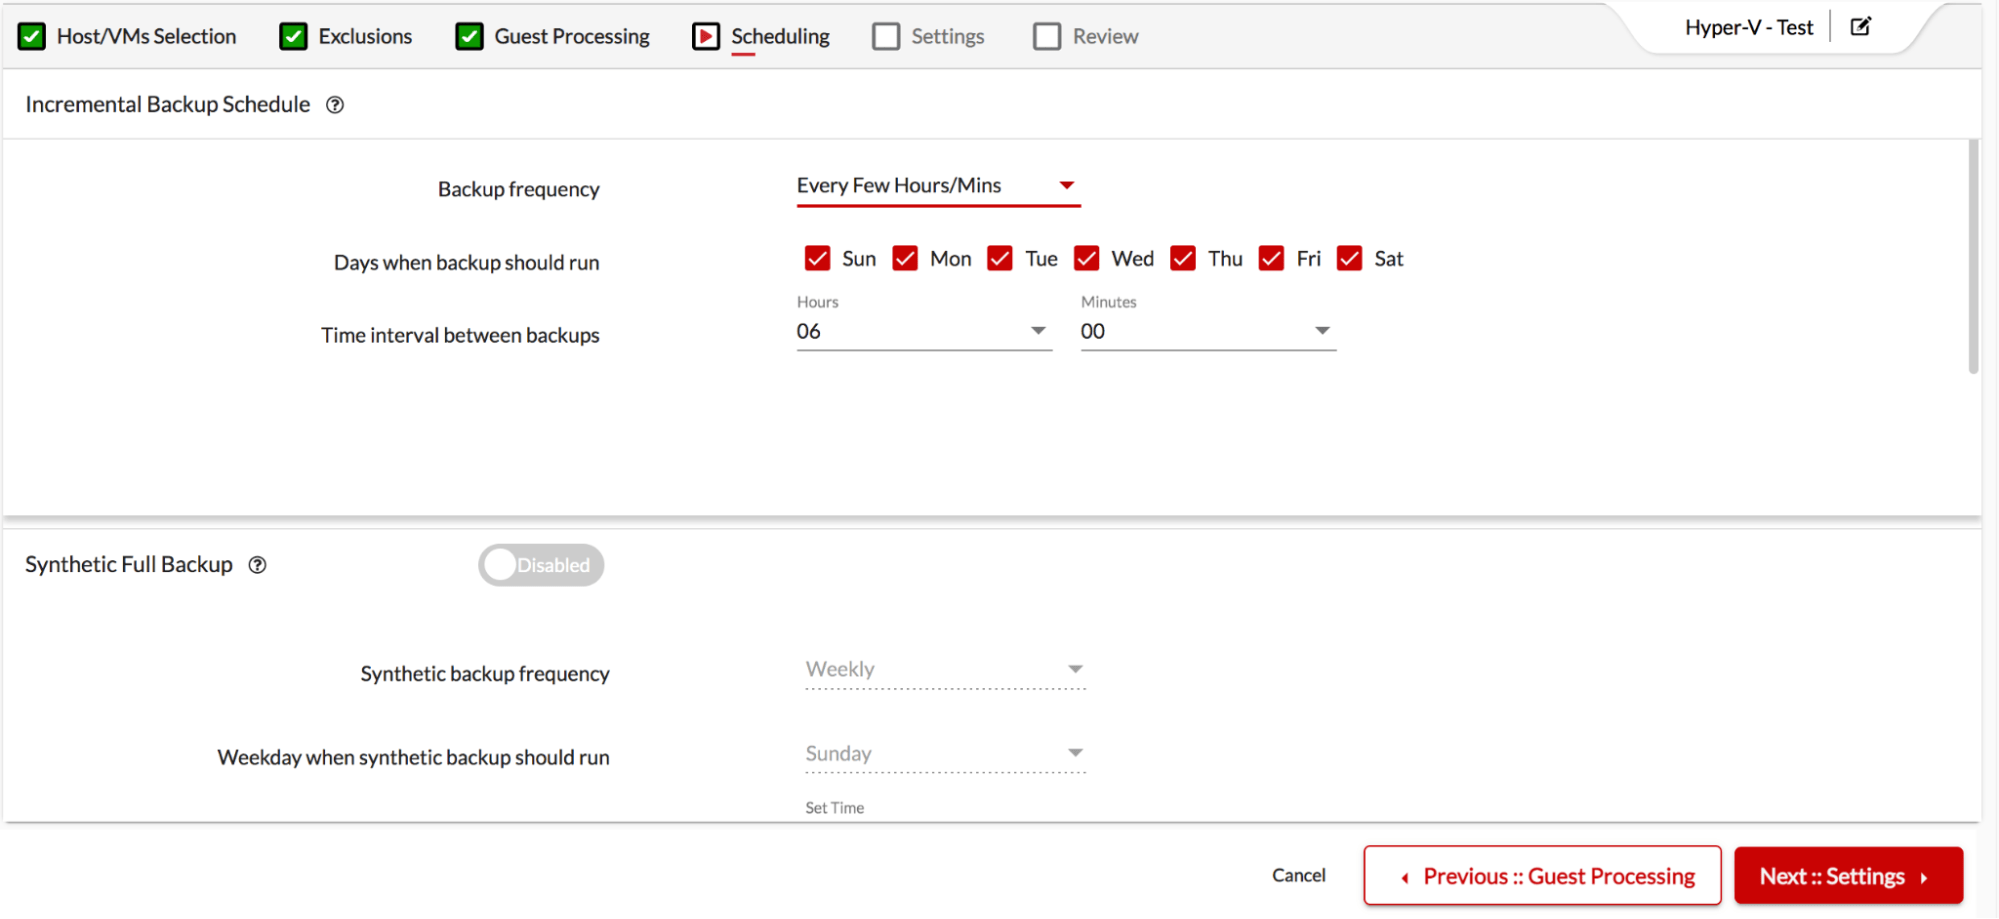
6. Scheduling: In the Scheduling section, you have the option to choose how often you want to backup data Every 15 mins or on an hourly, daily, weekly, or monthly basis. You can configure the scheduling for Incremental, Synthetic full backup, and Additional Full backup.
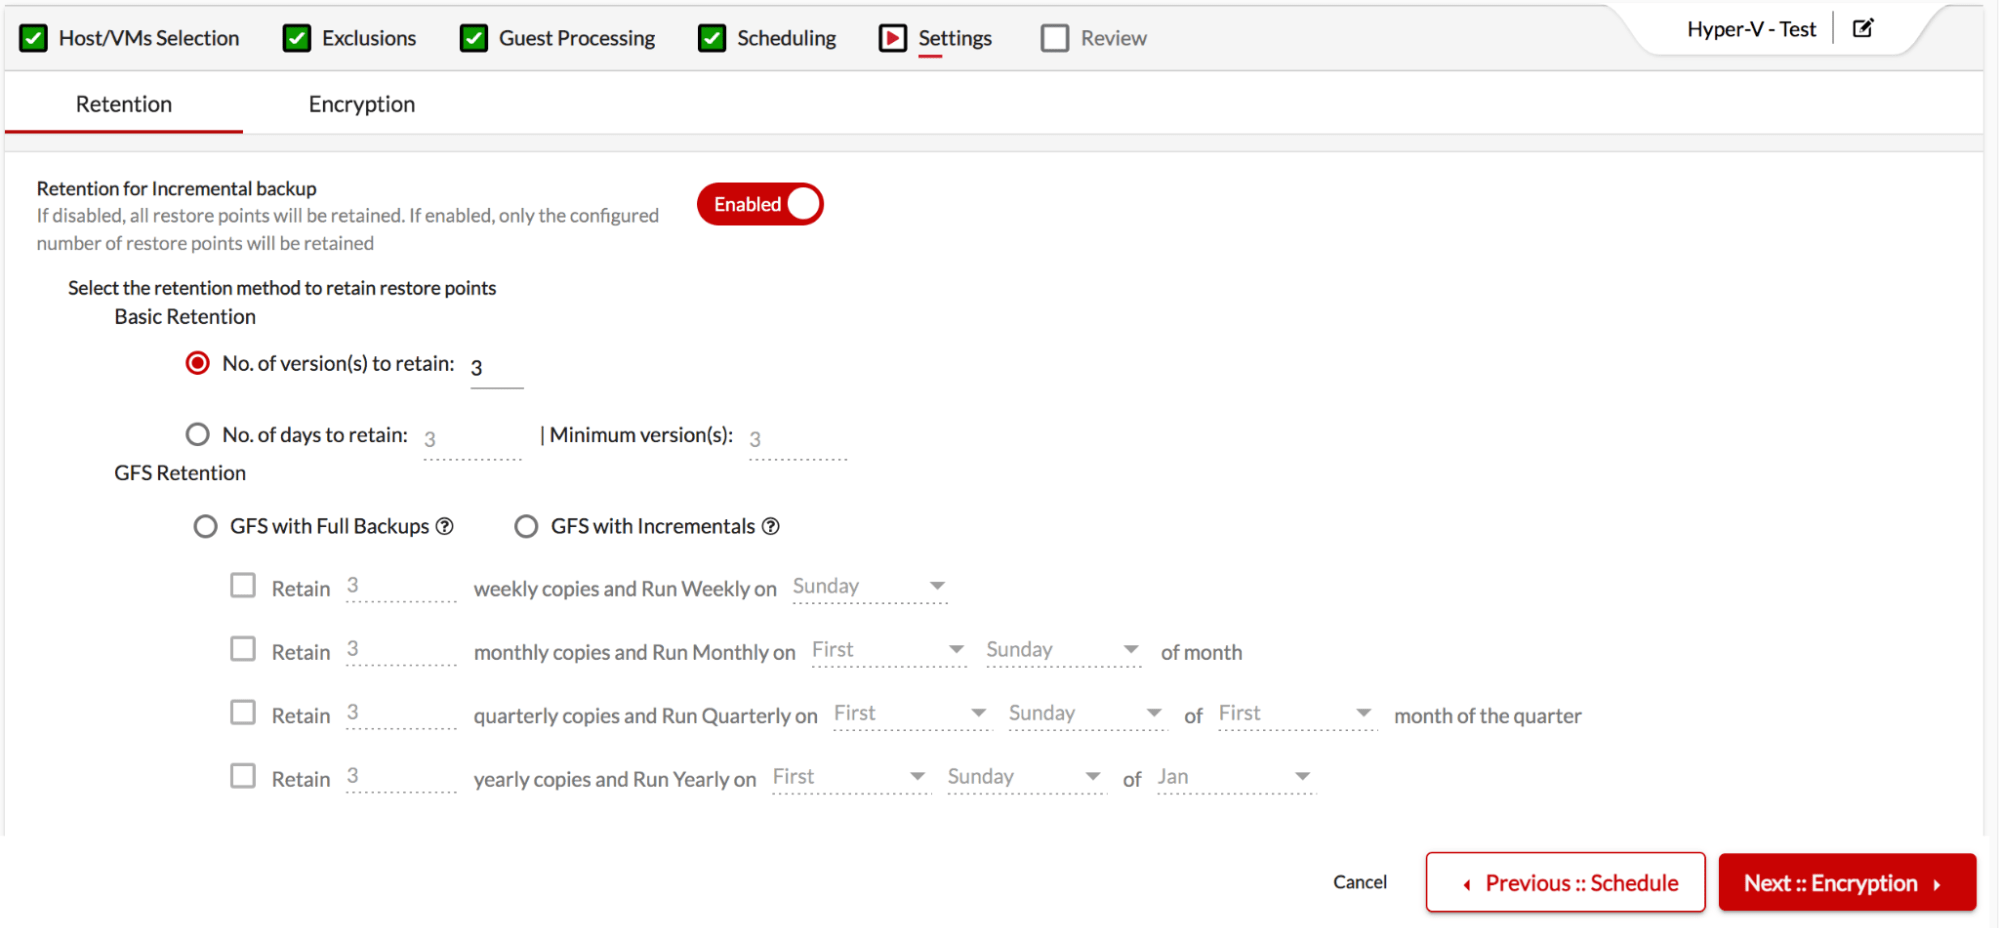
7. Retention: You can enable retention to specify the number of versions to be retained or no of days to retain the backup data. If retention is disabled, all data will be retained.
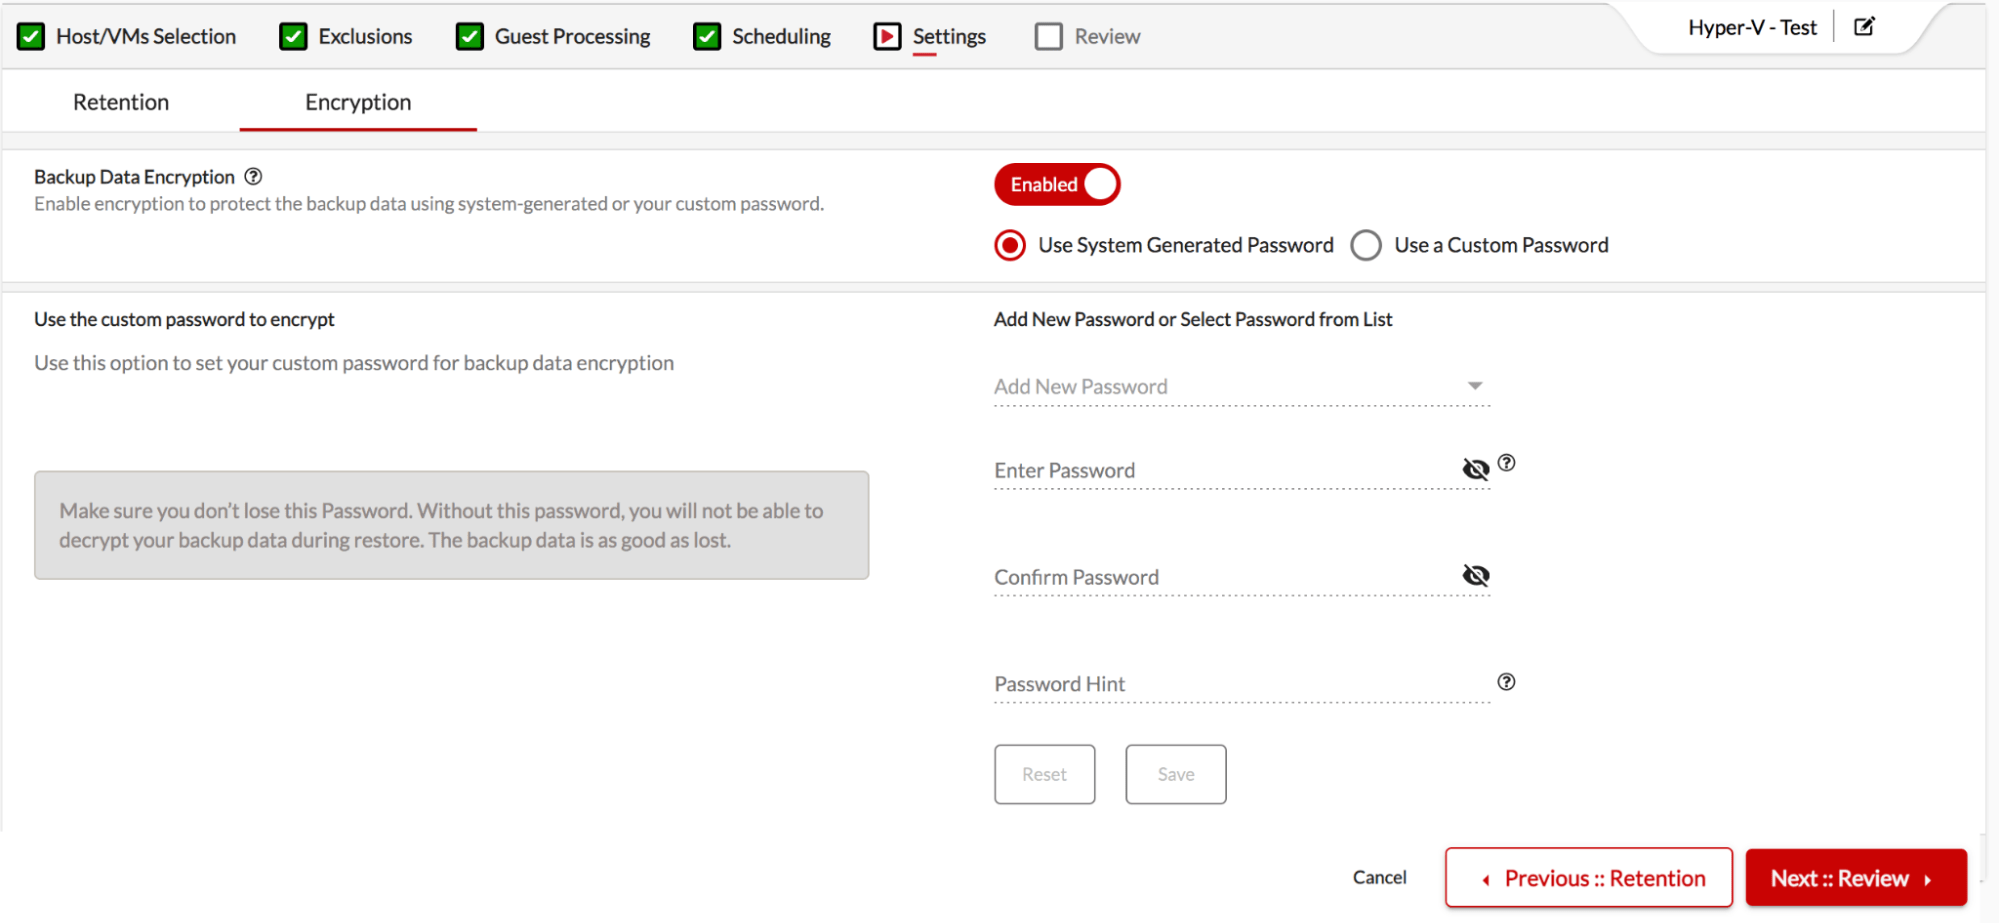
8. Encryption: In the Encryption section, you have to option to set up custom passwords or system-generated passwords to encrypt backup data.
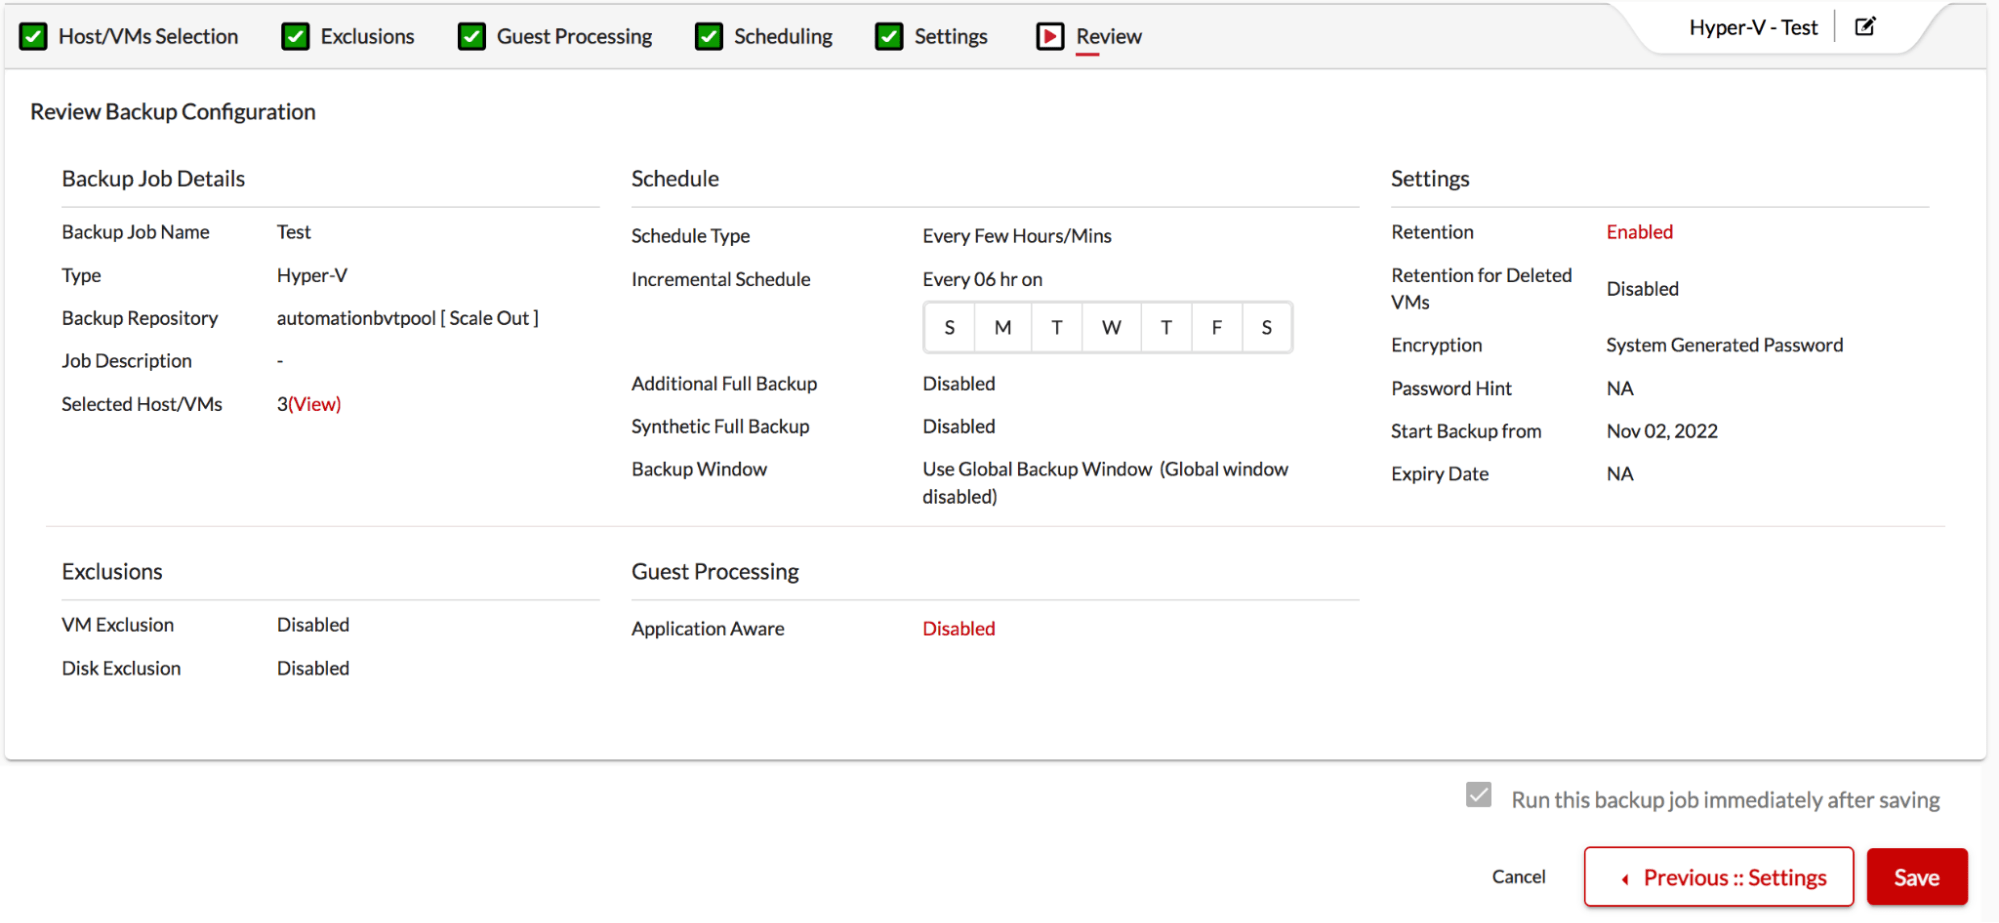
9. Review: Finally, review the backup configuration and save the job. The job will start to run as per the backup schedule.
How to Recover the Backed-up Hyper-V VMs
Backed-up Hyper-V VMs can be restored from the Backup Server using multiple recovery options.
Different recovery options available to restore Hyper-V VMs with BDRSuite are listed below:
- Instant Boot VM – Quickly restore the backed-up Hyper-V VMs on any hypervisor (hyper-V/VMware/KVM) in less than 15 minutes
- Full VM Recovery – Restore the entire backed-up VM to the same or different host
- Disk Mount – Instantly attach the disks of backed-up Hyper-V VMs on the backup server machine and browse the files locally
- Download VMs & Disk(s) – Backed-up VMs can be downloaded into multiple virtual formats such as VMDK, VHD, VHDX, and Flat.VMDK, & RAW and can be used later for cross-hypervisor migration (V2V)
- Recovery to Microsoft Azure – Restore the Hyper-V VMs as an Azure VM
- File Level Recovery – Restore specific files/folders from the backed-up VM without restoring the entire machine
- Application Recovery – Restore Individual Application items of Microsoft Exchange Server, SQL Server, Active Directory, and SharePoint
Steps to Perform Hyper-V VM Recovery:
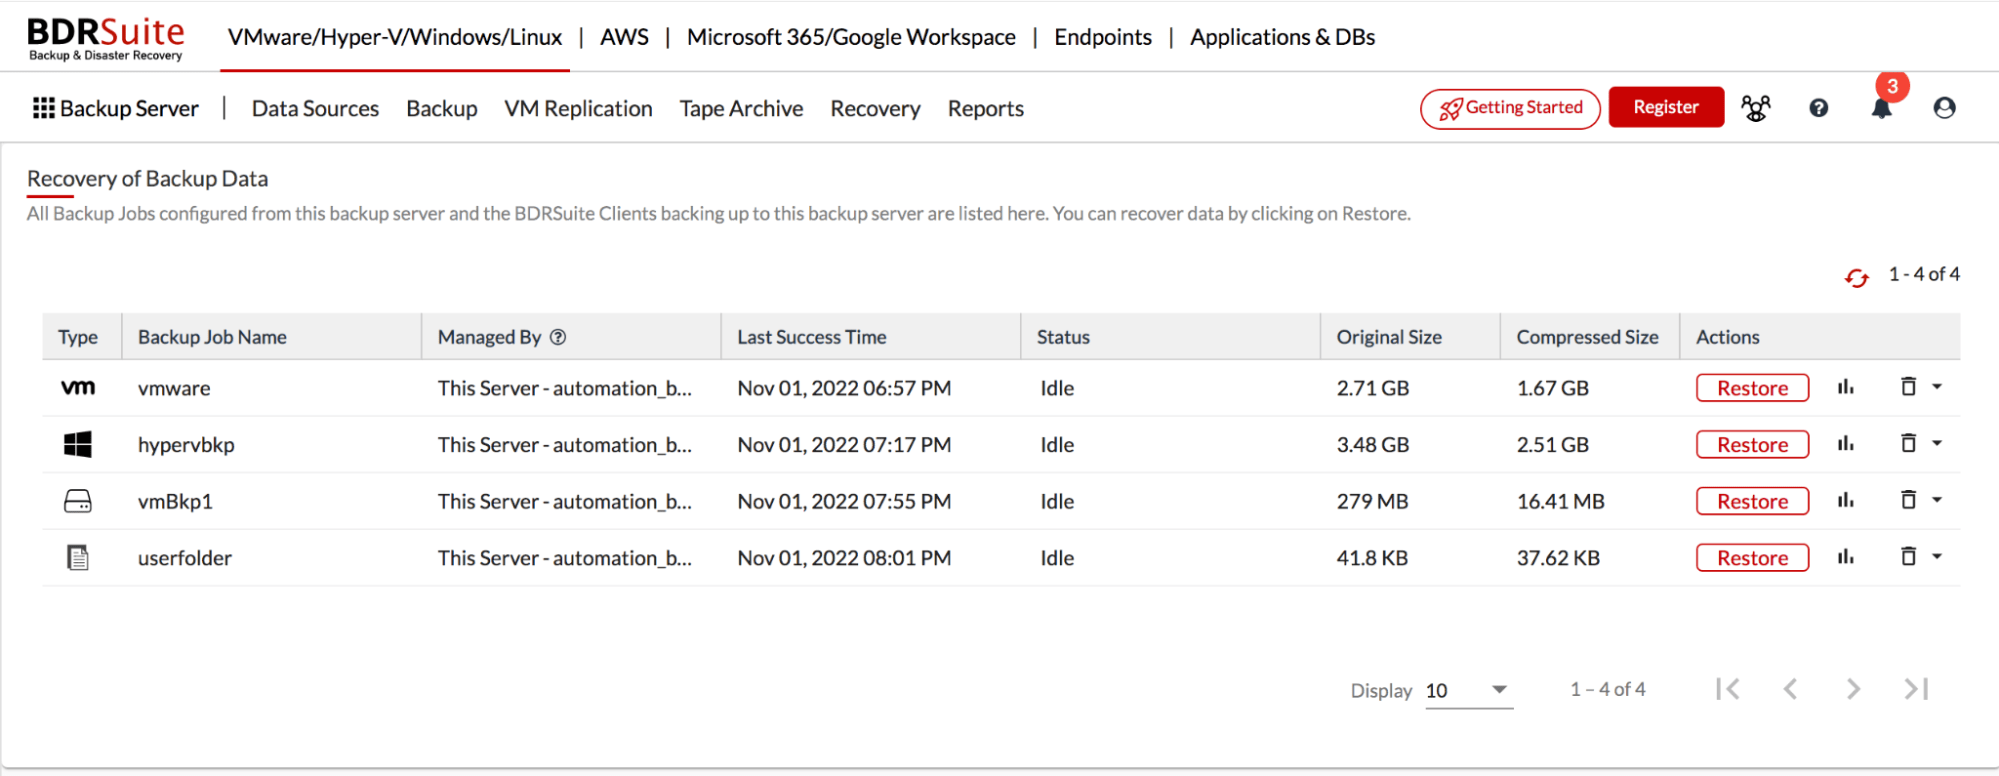
1. Navigate to Recovery -> Restore Backup Data page. Click the ‘Restore’ button alongside the backup job from which you want to restore the backed-up Hyper-V VMs.
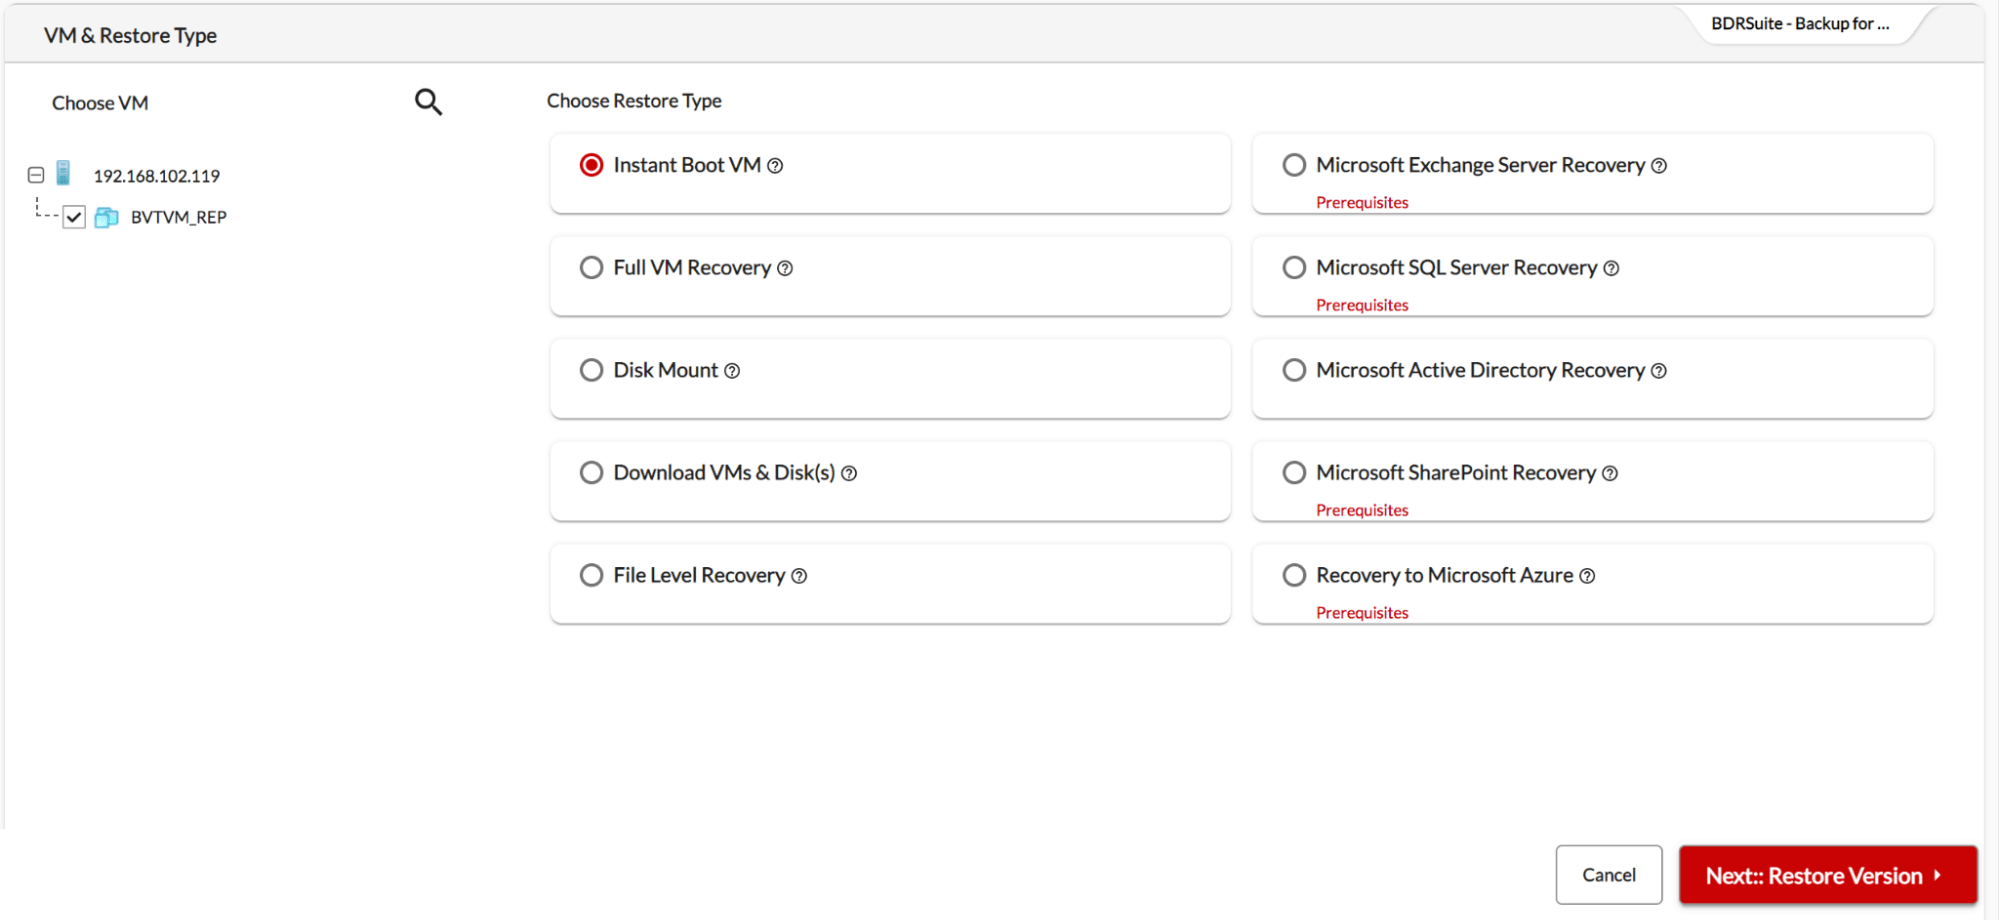
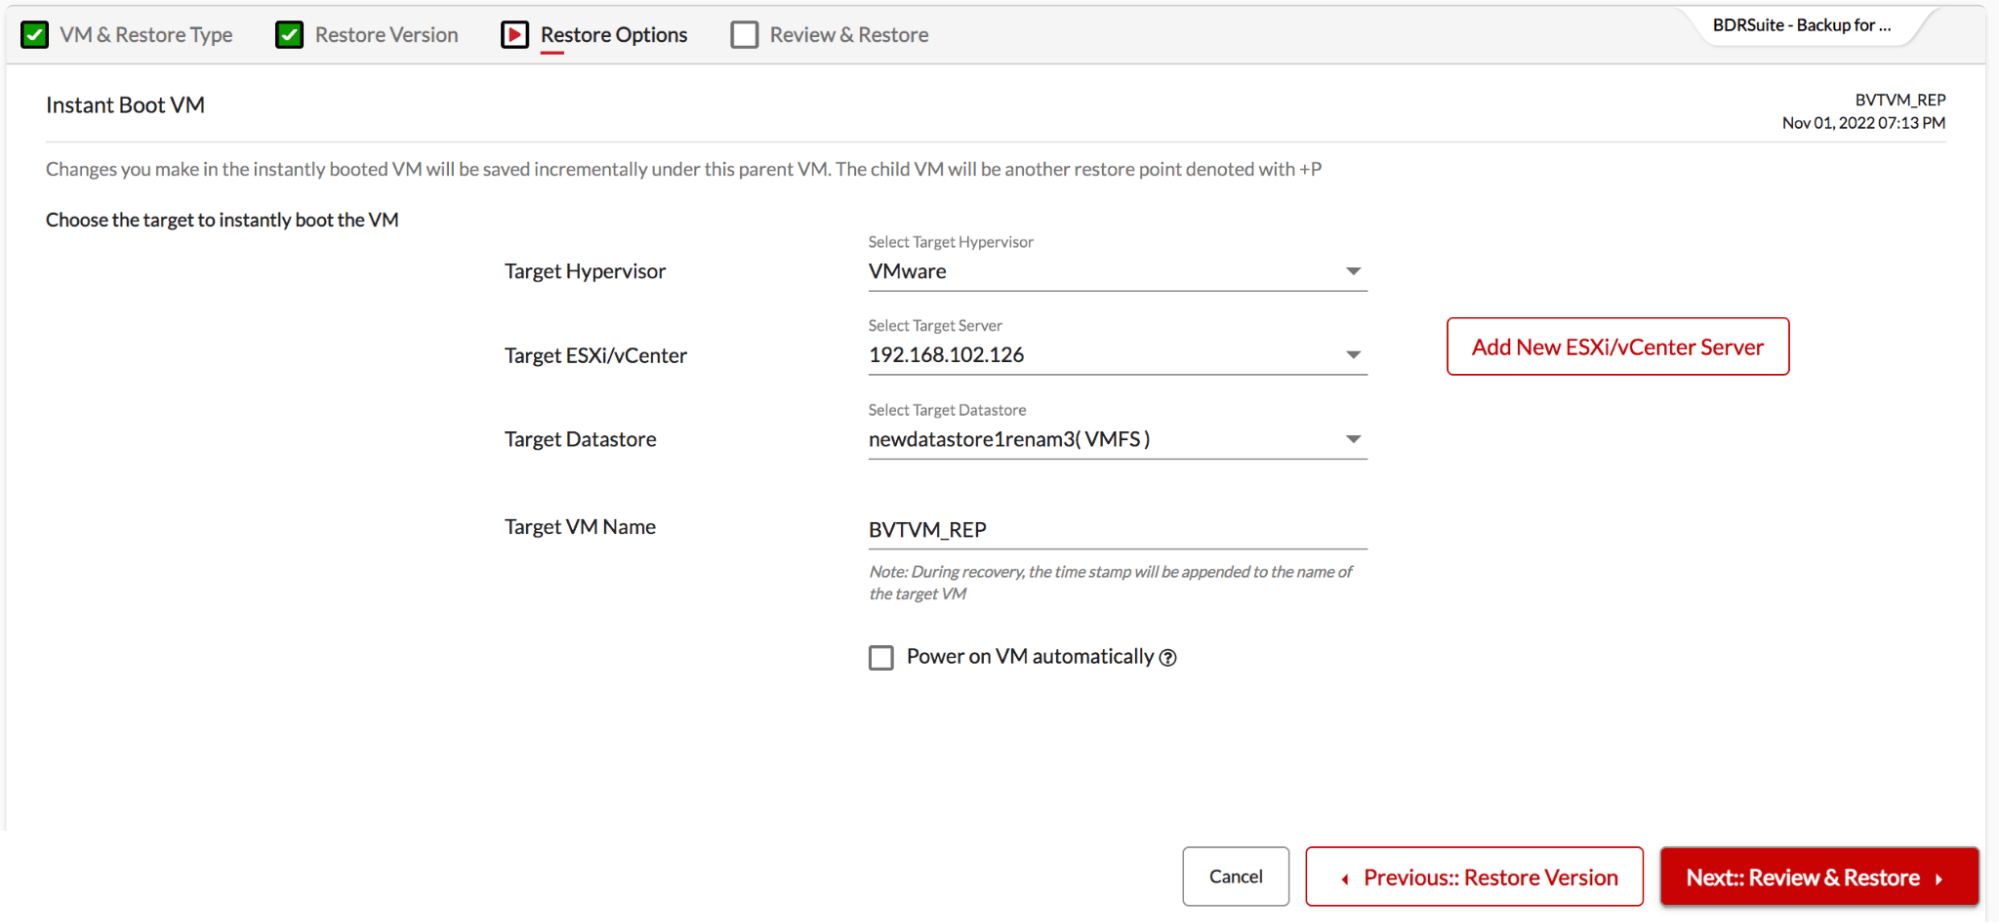
2. Select one or more VMs that you want to restore. Then, Choose one of the restore options (above-mentioned) based on how you want to restore the backed-up VMs. Here we are proceeding with the Instant Boot VM option.
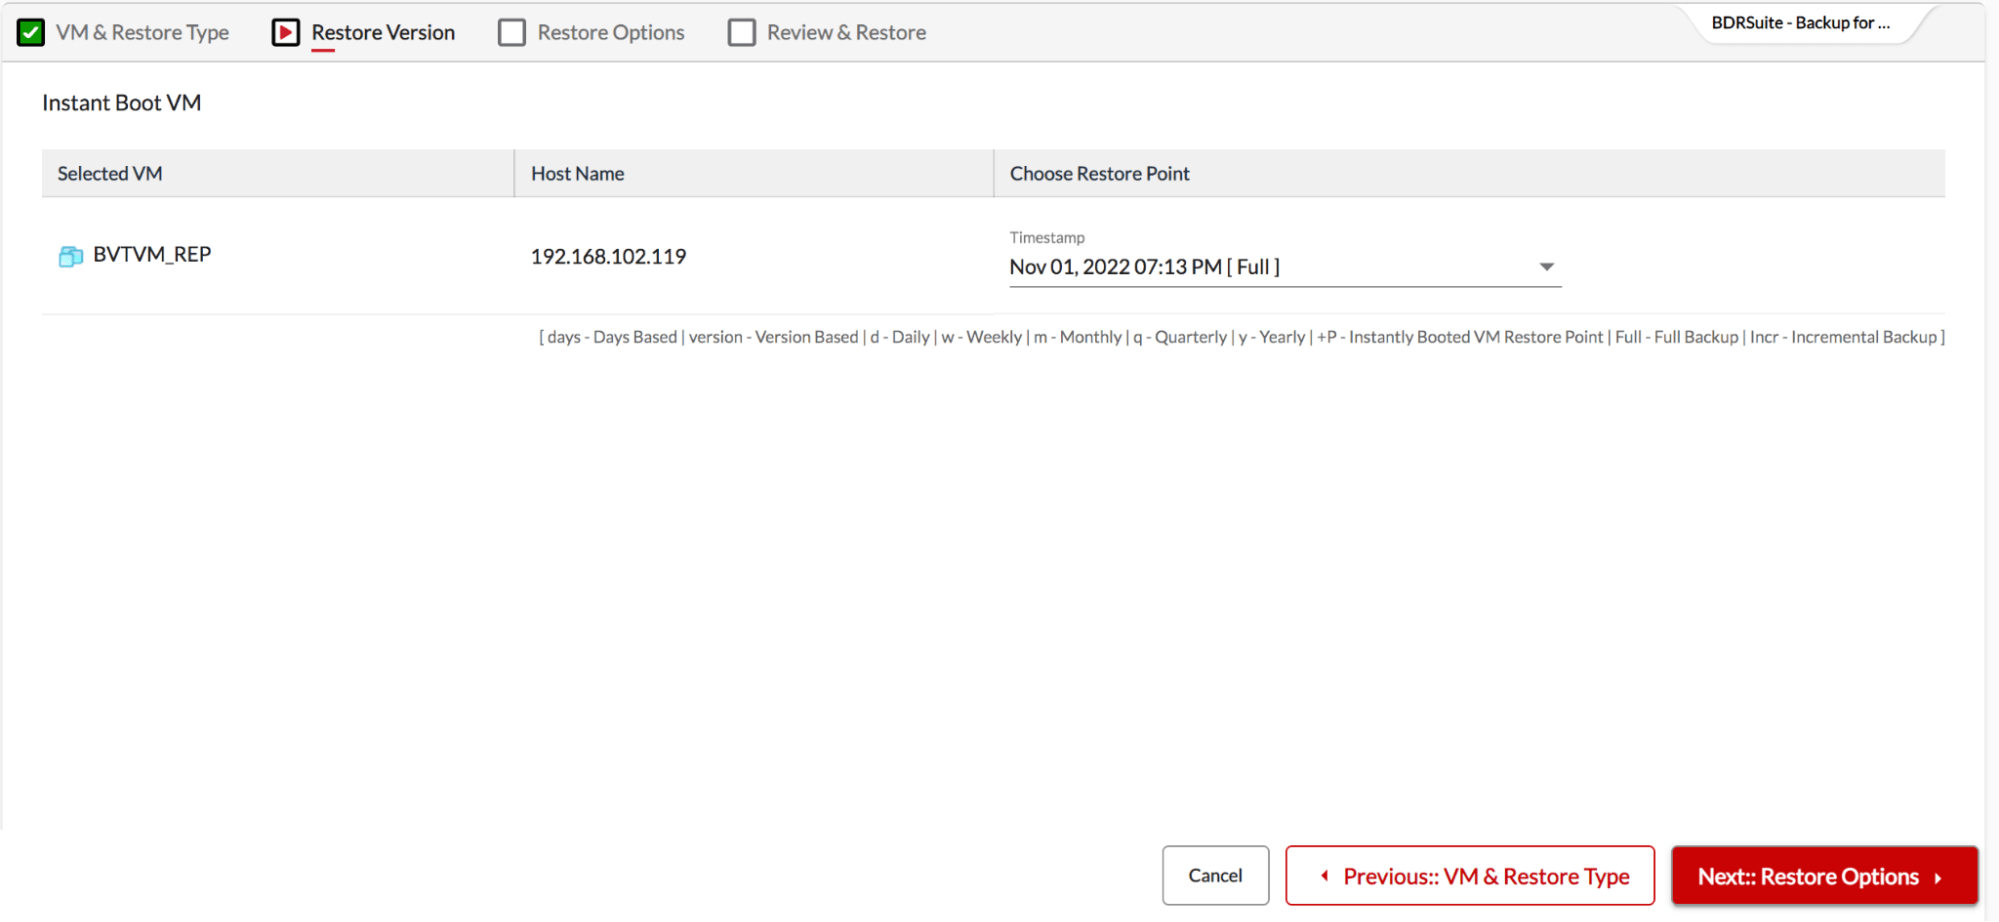
3. Select the restore version.
4. Based on the selected restore option, choose the recovery configuration.
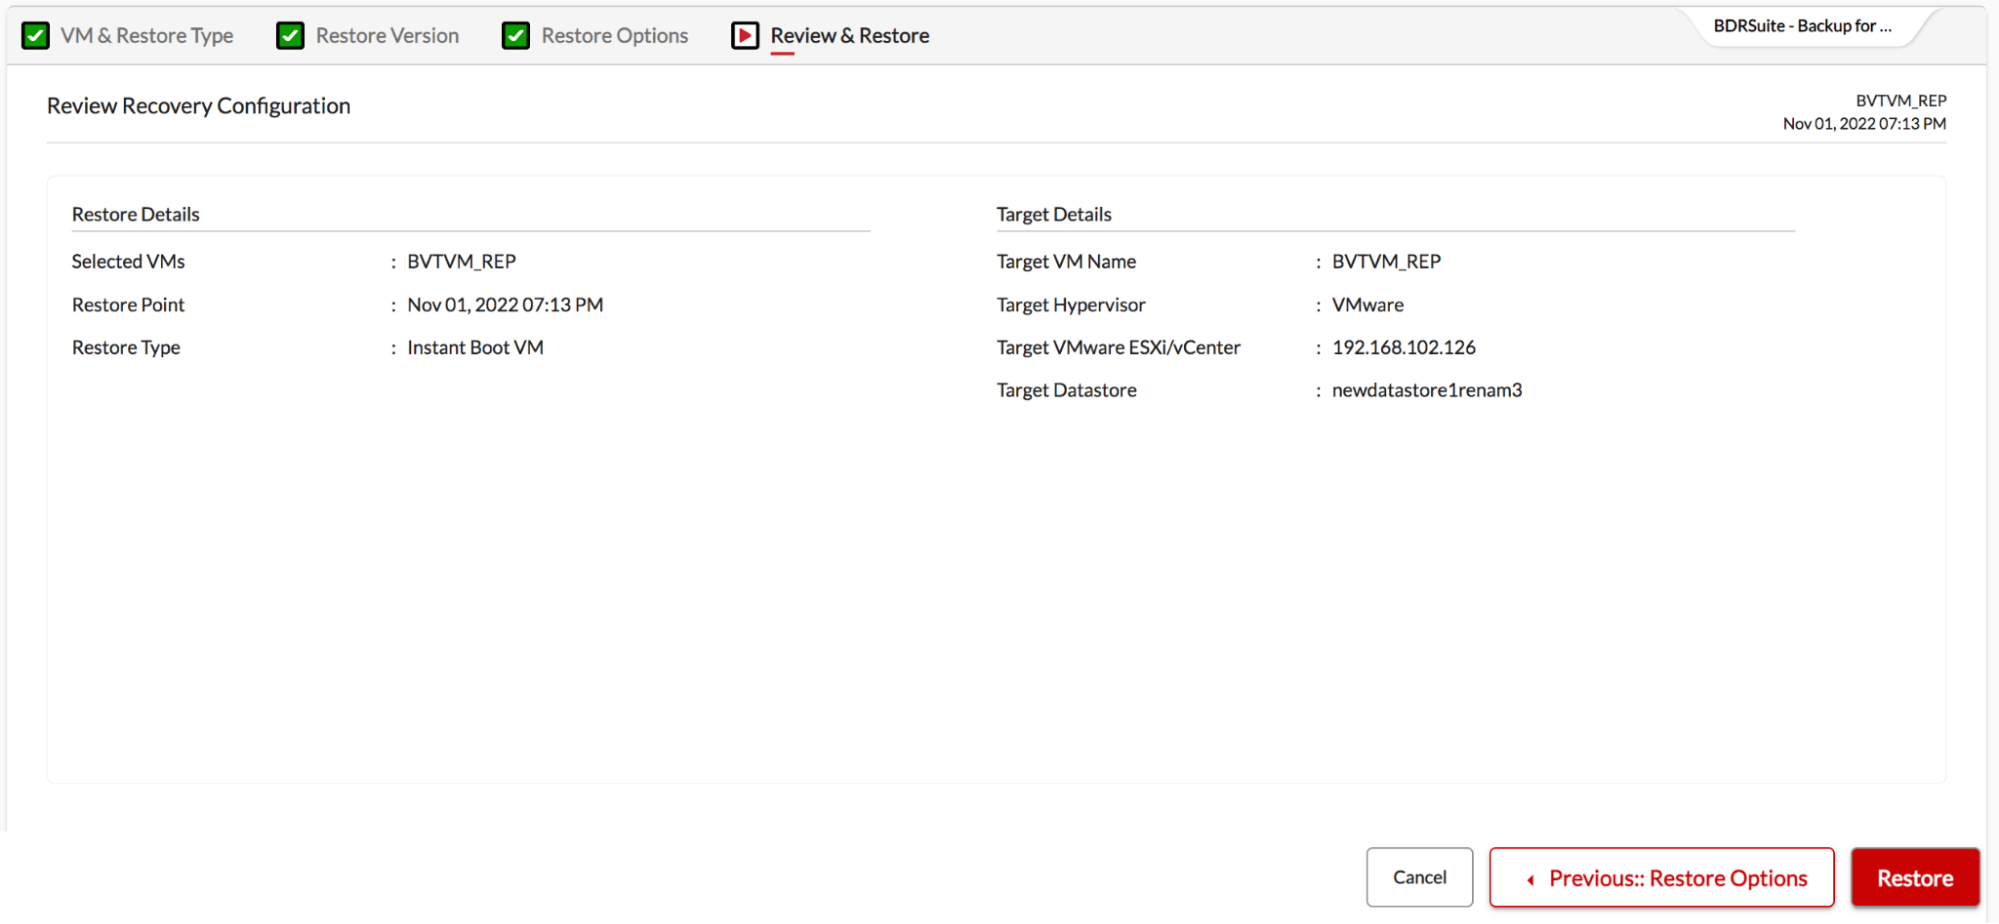
5. Finally, review the configuration and initiate the restore. The backed-up VM will be instantly booted on the target host.
For detailed information on Hyper-V Backup and Recovery Configuration, Refer to BDRSuite User Guide
Are you Interested in checking out BDRSuite? Try our 30-day free trial now or Request a demo
If you have any questions feel free to email us at: vembu-support@vembu.com
Follow our Twitter and Facebook feeds for new releases, updates, insightful posts and more.