
Read on:
Beginners’ Guide for Microsoft Hyper-V: How to Import OVA into Hyper-V – Part 44
One of the great things about virtualization is it gives developers, DevOps, and others the tools needed to provision infrastructure for their needs and use cases. One of the powerful technologies of modern hypervisors, like Hyper-V, is nested virtualization. Nested virtualization can provide the infrastructure needed without configuring and installing new physical infrastructure. So what is nested virtualization, and why do you use it with Hyper-V?
What is Nested Virtualization
Before understanding how to use nested virtualization, let’s define it and what it allows you to do. Microsoft Hyper-V is a nested virtualization-capable hypervisor that enables running a hypervisor within another hypervisor. What does that mean exactly?
With nested virtualization, you can install a hypervisor as a virtual machine running in another hypervisor host. The virtual machine is installed with Windows Server with the Hyper-V role enabled. The virtual machine has now become a hypervisor host capable of running its own virtual machines.
While it may be challenging to wrap your mind around this concept, nested virtualization allows you to run your favorite hypervisor inside a virtual machine. This capability provides many great benefits.

Nested virtualization use cases
You may be wondering why you would want to use nested virtualization if you already have access to a hypervisor running on a bare metal host. Let’s consider the following use cases:
- Lab environments and learning
- Development
- Testing multi-machine configurations easily
1. Lab environments and learning
The first use case we want to consider is lab environments and learning. Nested virtualization is extremely powerful regarding learning as it allows students of various technologies to “rinse and repeat” learning scenarios without worrying about breaking anything.
For instance, in learning about Hyper-V, you may want to spin many different Hyper-V virtual machines instead of playing around with your Hyper-V installation and configuration on your bare metal host. In this way, there is no danger of disrupting connectivity or changing settings that would cause issues for your Hyper-V lab.
Nested virtualization is one of the best ways to learn about virtualization technology. Hypervisors can be run as virtual machines with excellent VM capabilities, including checkpoints (snapshots). The benefit is that you can create a snapshot before playing around with Hyper-V configurations running inside the virtual machine. Then, if you break something, you can restore the checkpoint.
With this approach, you can set up entire lab scenarios, allowing you to repair things you break as you learn. Without the checkpoints in place, it can be frustrating if you don’t know how to get back to where you started if you want to repeat a process. Checkpoints allow you to do this easily. But, again, this isn’t possible without running your Hyper-V hosts as virtual machines.
2. Development
For many of the same reasons, developers can use nested virtualization to configure and test scenarios that would be difficult to do without leveraging nested VMs. For example, if they want to set up a Visual Studio phone emulator in a virtual machine or test configurations that require many different hosts, nested virtualization allows developers to do this without access to large numbers of physical hosts.
3. Testing multi-machine configurations
Nested virtualization allows setting up multi-machine configurations, such as a Hyper-V cluster, without having the 2-3 nodes needed using traditional hardware. Again, this tool allows working with Hyper-V cluster technologies without having multiple Hyper-V hosts in your lab. You can set up as many Hyper-V virtual machines as you have the resources and configure multiple cluster scenarios on a single Hyper-V host.
You can leverage nested virtualization in Microsoft Azure
Microsoft has enabled admins to have access to nested virtualization in Microsoft Azure. It means that if you are leveraging Microsoft Azure Infrastructure-as-a-Service (IaaS) platform, you can run Hyper-V or another hypervisor nested inside your Hyper-V host running in Azure.
How is nested virtualization technically possible?
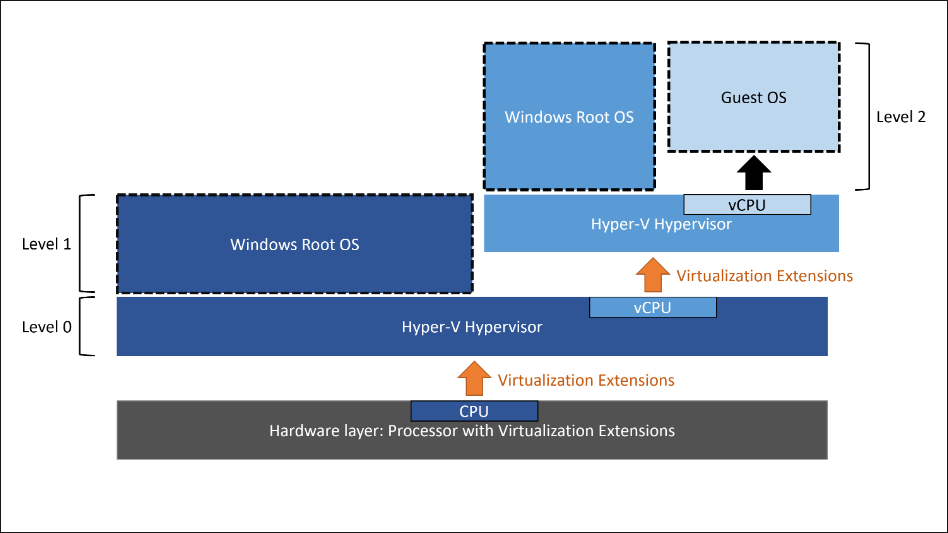
You may wonder how exactly nested virtualization works. Nested virtualization capabilities would not be possible without the advanced technology found in today’s modern CPUs from Intel and AMD. These modern CPUs have instructions and features built into the physical CPU that provide powerful virtualization capabilities and increase the performance of today’s virtual machines running on current CPU technology.
In most scenarios, you do not want to expose these CPU virtualization instructions to virtual machines. However, when you need to run a hypervisor inside a virtual machine, you can enable these instruction sets to be exposed to individual VMs. When nested virtualization is enabled, Hyper-V exposes the hardware virtualization extensions to the guest virtual machine.
It is important to note that Microsoft does not support nested virtualization inside a Hyper-V virtual machine for anything besides Hyper-V. Note the following processor technologies supported with nested virtualization with Hyper-V:
- Intel processor with VT-x and EPT technology – Supported on Windows Server 2016 and higher and VM configuration 8.0 or higher
- AMD EPYC/Ryzen processor or later – Hyper-V host must be Windows Server 2022 or Windows 11 and higher. The virtual machine version needs to be version 10.0 or higher
Enabling nested virtualization in Hyper-V
How do you enable nested virtualization with Hyper-V?
Configuring nested virtualization for a Hyper-V virtual machine is done using PowerShell. With PowerShell, you can enable and disable nested virtualization.
Enable nested virtualization:
Set-VMProcessor -VMName
Once you have enabled nested virtualization, you install Hyper-V in the guest virtual machine as you normally would.
Disable nested virtualization:
Set-VMProcessor -VMName < VMName > -ExposeVirtualizationExtensions $false
How is nested virtualization networking configured?
As you can imagine, nested virtualization adds complexity to the networking of guest virtual machines running inside the nested Hyper-V installation. However, a couple of ways exist to achieve network connectivity for virtual machines running inside a nested hypervisor.
- MAC address spoofing – With MAC address spoofing, you are allowing network packets to be routed through two virtual switches. Since the MAC addresses would appear to be spoofed, you need to allow MAC address spoofing
- Get-VMNetworkAdapter -VMName < VMName > | Set-VMNetworkAdapter -MacAddressSpoofing On
- Network Address Translation (NAT) – The other solution is Network Address Translation. This method is the only way to configure nested virtualization in Azure
- New-VMSwitch -Name VmNAT -SwitchType Internal
- New-NetNat –Name LocalNAT –InternalIPInterfaceAddressPrefix “192.168.100.0/24”
Wrapping Up
Nested virtualization is a great tool for Hyper-V beginners, developers, DevOps engineers, and anyone needing access to multiple Hyper-V nodes without the physical hardware to do so. Hyper-V exposes hardware-assisted virtualization capabilities from the physical CPU to the guest virtual machine, enabling you to install Hyper-V inside Hyper-V and run guest virtual machines in the nested Hyper-V instance.
Follow our Twitter and Facebook feeds for new releases, updates, insightful posts and more.

Leave A Comment