
Introduction
Mounting an Amazon S3 bucket in an EC2 Linux instance provides a way to access and manipulate S3 objects as if they were local files and directories on the instance’s file system. This can offer several benefits depending on your use case:
- Simplified Data Management: Mounting an S3 bucket makes it easier to manage and interact with your data. You can use familiar Linux commands to read, write, and manipulate files in the bucket without needing to use the AWS SDK or command-line tools directly
- Application Compatibility: Some applications might be designed to work with local file systems rather than S3’s object storage. By mounting an S3 bucket, you can make these applications compatible with S3 storage without needing to modify their code
- Data Migration: If you have existing applications that were designed to work with local file systems, but you want to transition to using S3 for storage, mounting the S3 bucket can be a transitional step. This allows you to gradually migrate your data and applications to S3 without significant changes to your application code
- Backup and Restore: Mounting an S3 bucket can simplify backup and restore processes. You can use standard Linux backup tools to copy files to the mounted bucket, making it easy to create backups of important data
- Batch Processing and Analysis: If you have batch processing or data analysis tasks that require reading and writing large amounts of data, mounting an S3 bucket can provide a more convenient way to handle these operations without dealing with the complexities of S3 APIs
There are some limitations and drawbacks that need to be considered:
- Performance: Accessing S3 through the mounted file system might not be as performant as using native S3 APIs, especially for large files or frequent operations. S3’s durability and scalability benefits might also be partially compromised
- Consistency: S3 is designed as an eventually consistent system, whereas a local file system expects immediate consistency. This can lead to scenarios where changes made to the S3 bucket might not be immediately visible when accessed through the mounted file system
- Security: Depending on the permissions and configuration, mounting an S3 bucket might introduce security risks if not properly controlled. It’s crucial to manage access and permissions carefully
In many cases, it’s recommended to evaluate whether using S3 directly through its APIs or utilizing higher-level AWS services (such as Amazon EFS for file storage) might be more suitable for your requirements. Mounting an S3 bucket using tools like s3fs can be a convenient approach for specific use cases, but it’s important to understand its trade-offs and limitations before implementing it in a production environment.
Step by step procedure to Mount S3 bucket in Linux EC2 instance
Mounting an Amazon S3 bucket as a file system on a Linux EC2 instance can be achieved using the tool s3fs. Step by step procedure to perform this task is given below.
Note: Before proceeding, please make sure you have the necessary permissions to work with AWS resources and that you’ve installed the required software on your Linux EC2 instance.

We already have launched an EC2 instance. The details are given below.
EC2 instance: demo-ec2-s3
OS: Ubuntu

We already have an S3 bucket created. The details are given below.
S3 bucket: demo-s3-static-website-01

Install s3fs package to access S3 bucket:
Start by installing the s3fs package on your EC2 instance. This package allows you to mount an S3 bucket as a directory within your file system.
sudo apt-get update
ubuntu@ip-172-31-35-67:~$ sudo apt-get update
Hit:1 http://us-east-1.ec2.archive.ubuntu.com/ubuntu jammy InRelease
Hit:2 http://us-east-1.ec2.archive.ubuntu.com/ubuntu jammy-updates InRelease
Hit:3 http://us-east-1.ec2.archive.ubuntu.com/ubuntu jammy-backports InRelease
Hit:4 http://security.ubuntu.com/ubuntu jammy-security InRelease
Reading package lists… Done
sudo apt-get install s3fs
ubuntu@ip-172-31-35-67:~$ sudo apt-get install s3fs
Reading package lists… Done
Building dependency tree… Done
Reading state information… Done
The following additional packages will be installed:
bzip2 libfuse2 mailcap mime-support
Suggested packages:
bzip2-doc
The following NEW packages will be installed:
bzip2 libfuse2 mailcap mime-support s3fs
0 upgraded, 5 newly installed, 0 to remove and 112 not upgraded.
Need to get 450 kB of archives.
Do you want to continue? [Y/n] Y
Get:1 http://us-east-1.ec2.archive.ubuntu.com/ubuntu jammy/main amd64 bzip2 amd64 1.0.8-5build1 [34.8 kB]
Get:2 http://us-east-1.ec2.archive.ubuntu.com/ubuntu jammy/universe amd64 libfuse2 amd64 2.9.9-5ubuntu3 [90.3 kB]
Get:3 http://us-east-1.ec2.archive.ubuntu.com/ubuntu jammy/main amd64 mailcap all 3.70+nmu1ubuntu1 [23.8 kB]
Get:4 http://us-east-1.ec2.archive.ubuntu.com/ubuntu jammy/universe amd64 s3fs amd64 1.90-1 [297 kB]
Fetched 450 kB in 0s (13.1 MB/s)
Selecting previously unselected package bzip2.
Preparing to unpack …/bzip2_1.0.8-5build1_amd64.deb …
Unpacking bzip2 (1.0.8-5build1) …
Selecting previously unselected package libfuse2:amd64.
Preparing to unpack …/libfuse2_2.9.9-5ubuntu3_amd64.deb …
Unpacking libfuse2:amd64 (2.9.9-5ubuntu3) …
Selecting previously unselected package mailcap.
Preparing to unpack …/mailcap_3.70+nmu1ubuntu1_all.deb …
Unpacking mailcap (3.70+nmu1ubuntu1) …
Selecting previously unselected package mime-support.
Preparing to unpack …/mime-support_3.66_all.deb …
Unpacking mime-support (3.66) …
Selecting previously unselected package s3fs.
Preparing to unpack …/archives/s3fs_1.90-1_amd64.deb …
Unpacking s3fs (1.90-1) …
Setting up libfuse2:amd64 (2.9.9-5ubuntu3) …
Setting up bzip2 (1.0.8-5build1) …
Setting up mailcap (3.70+nmu1ubuntu1) …
Setting up mime-support (3.66) …
Setting up s3fs (1.90-1) …
Processing triggers for libc-bin (2.35-0ubuntu3.1) …
Processing triggers for man-db (2.10.2-1) …
Scanning processes…
Scanning linux images…
Running kernel seems to be up-to-date.No services need to be restarted.
No containers need to be restarted.
No user sessions are running outdated binaries.
root@ip-172-31-35-67:~#
Create IAM policy for S3 access
We will create a separate policy that provides only specific permissions for this task.
In the AWS console, search for IAM and click on policies

Click on “Create Policy”
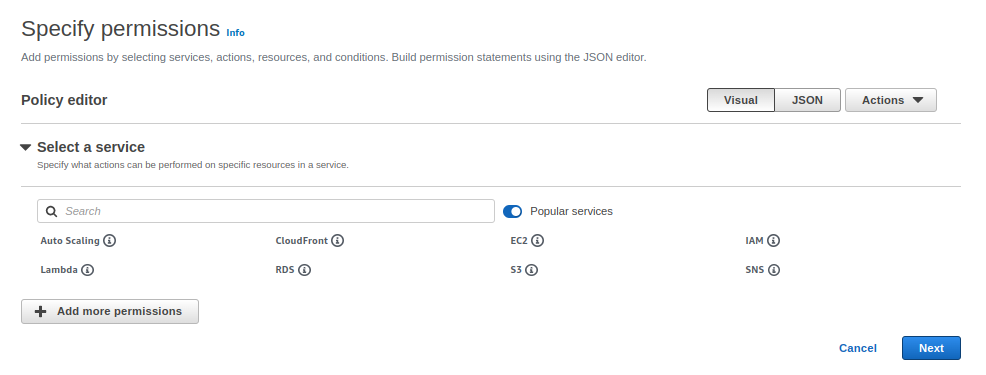
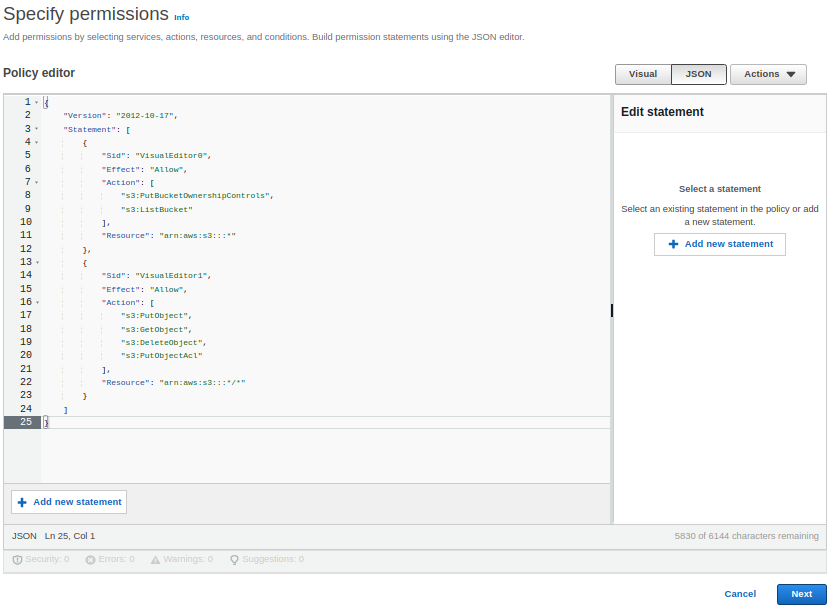
Click on JSON and add the below policy statement.
{
“Version”: “2012-10-17”,
“Statement”: [
{
“Sid”: “VisualEditor0”,
“Effect”: “Allow”,
“Action”: [
“s3:PutBucketOwnershipControls”,
“s3:ListBucket”
],
“Resource”: “arn:aws:s3:::*”
},
{
“Sid”: “VisualEditor1”,
“Effect”: “Allow”,
“Action”: [
“s3:PutObject”,
“s3:GetObject”,
“s3:DeleteObject”,
“s3:PutObjectAcl”
],
“Resource”: “arn:aws:s3:::*/*”
}
]
}
Give a name for the policy. Here we give the name as “demos3policy”.
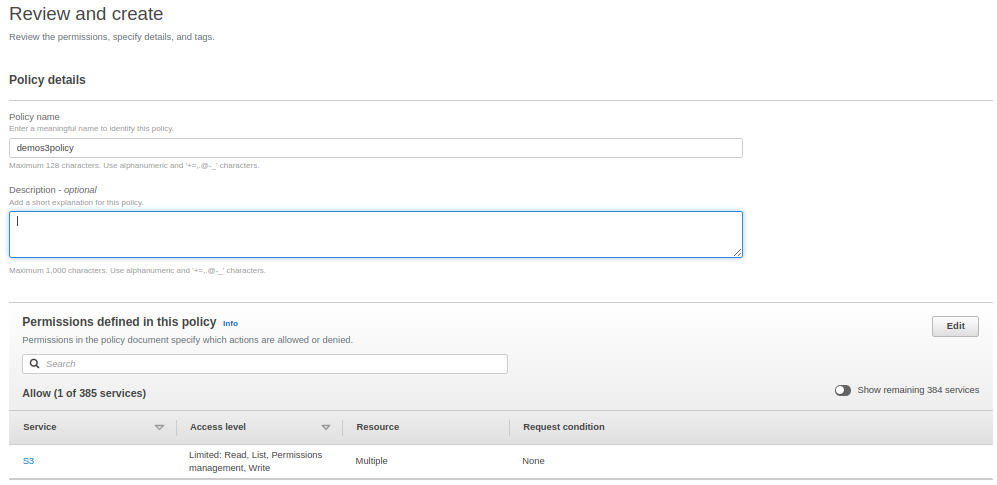
Now, click on “create policy”

Create IAM Credentials
You’ll need IAM credentials with the necessary permissions to access the S3 bucket. Create an IAM user and attach a policy that grants S3 read/write permissions to the bucket or the desired objects.
In AWS console, search for IAM and click on create users.
Click on create user

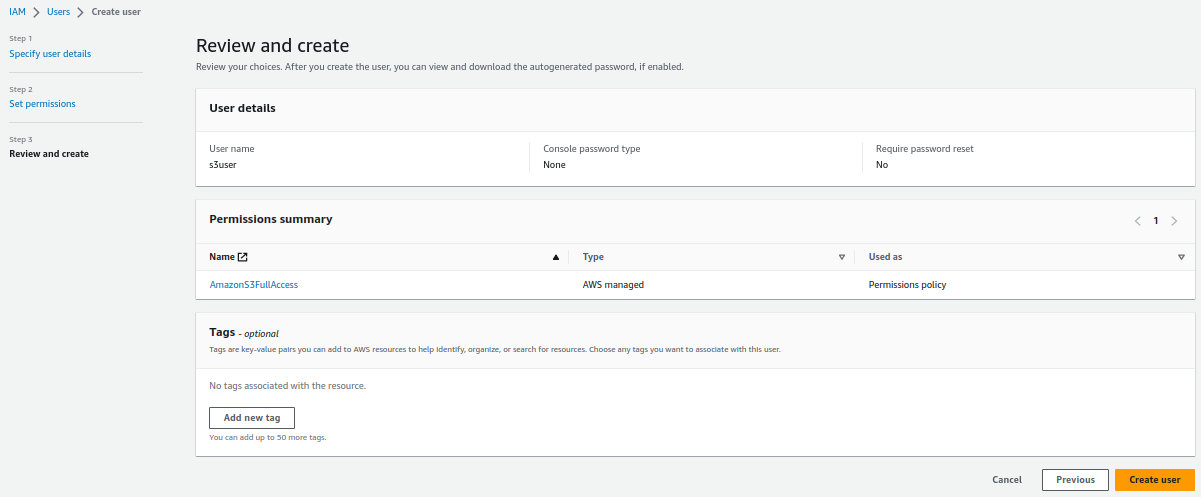
Enter a desired user name. Here we entered user name as s3user.

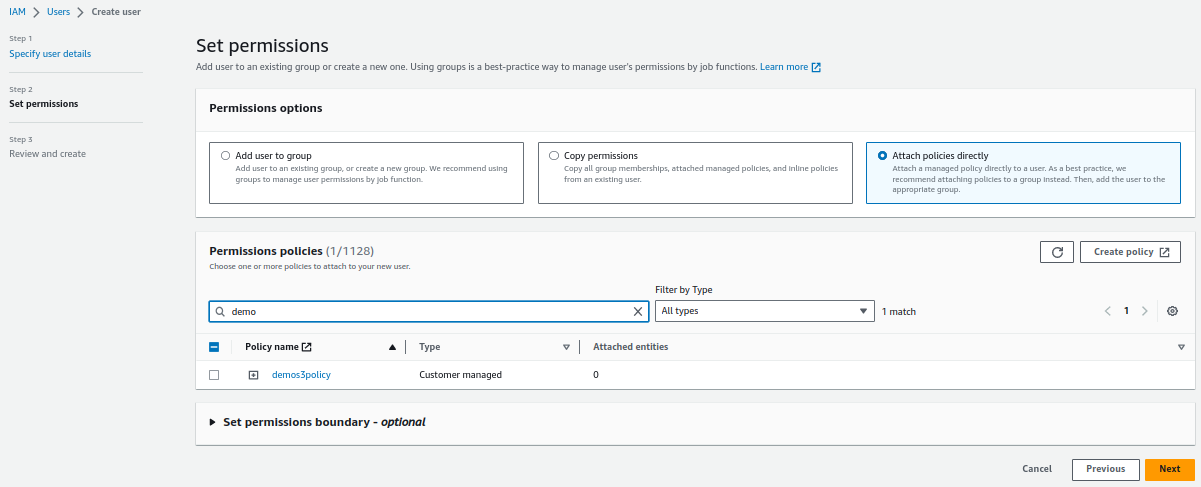
In the next screen attach a policy for the user. Here we are attaching S3 full access policy. Select the policy “demos3policy” that was created earlier.
Review and create the User.
Click on the user name that you have created from the IAM dashboard.

Click on security credentials
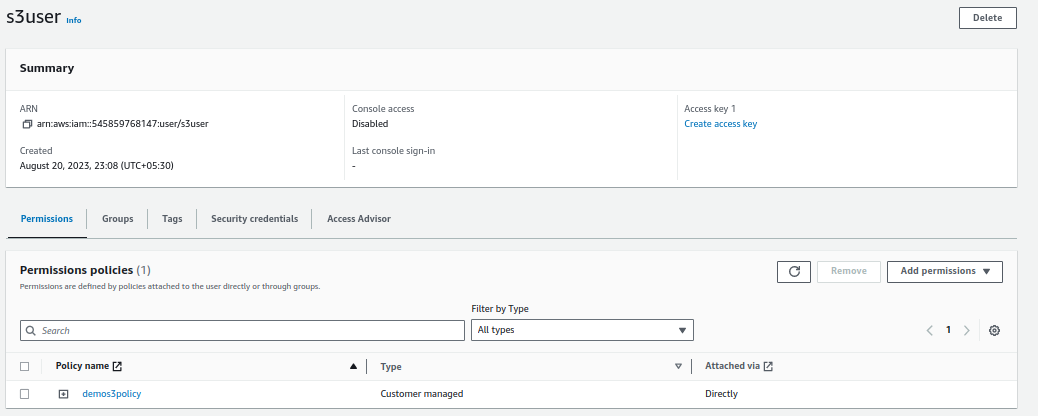
Click on “Create Access key”

Add permissions for CLI interface
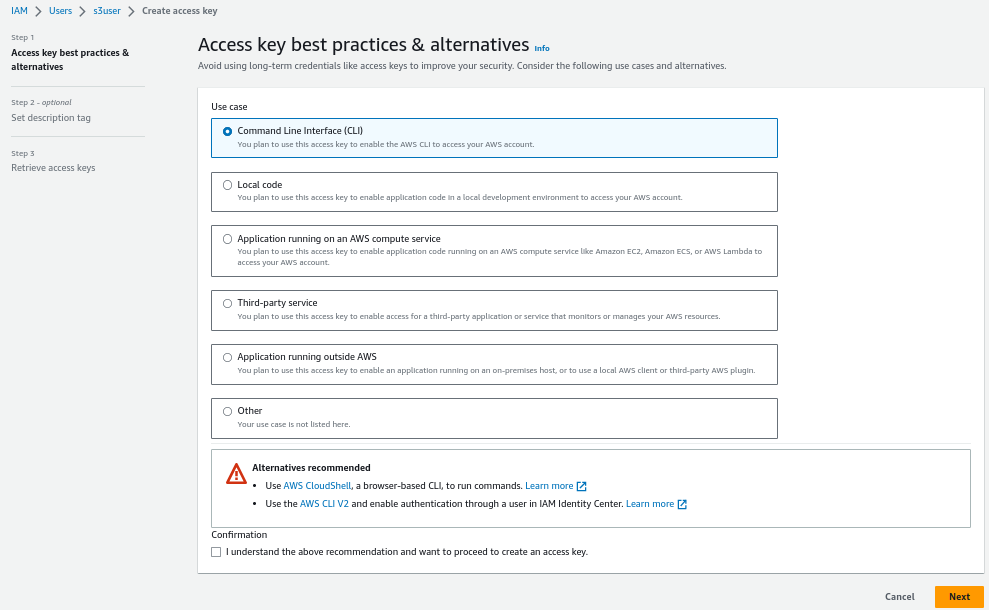
In the next step, enter a description for this key and in the next step, the access key and secret access key will be displayed. Save this information separately for later use.

Configure s3fs in EC2 instance
Once you have your IAM credentials, you need to configure s3fs with those credentials.
Create a file named .passwd-s3fs in your home directory:
echo “YOUR_ACCESS_KEY_ID:YOUR_SECRET_ACCESS_KEY” > ~/.passwd-s3fs
chmod 600 ~/.passwd-s3fs
Replace YOUR_ACCESS_KEY_ID and YOUR_SECRET_ACCESS_KEY with your actual IAM user’s access key and secret key.
Mount the S3 Bucket in EC2 instance
Create a directory where you want to mount your S3 bucket:
mkdir ~/my-s3-bucket
Mount the S3 bucket using the following command
Syntax:
s3fs
-o passwd_file= -o umask=022 -o allow_other
s3fs demo-s3-static-website-01 ~/my-s3-bucket -o passwd_file=~/.passwd-s3fs -o umask=022 -o allow_other
The options used here:
-o passwd_file=~/.passwd-s3fs: Specifies the location of the password file.
-o umask=022: Sets the permissions for the mounted files and directories.
-o allow_other: Allows other users to access the mounted bucket (use cautiously for security reasons)
Access the mounted bucket from EC2 instance
Once the S3 bucket is mounted, you can access it like a regular directory in your file system. You can copy, read, and write files as needed.
ubuntu@ip-172-31-35-67:~$ df -h my-s3-bucket
Filesystem Size Used Avail Use% Mounted on
s3fs 16E 0 16E 0% /home/ubuntu/my-s3-bucketubuntu@ip-172-31-35-67:~/my-s3-bucket$ pwd
/home/ubuntu/my-s3-bucketubuntu@ip-172-31-35-67:~/my-s3-bucket$ ls -l
total 2
-rwxr-xr-x 1 ubuntu ubuntu 1484 Aug 19 18:49 index.html
ubuntu@ip-172-31-35-67:~/my-s3-bucket$
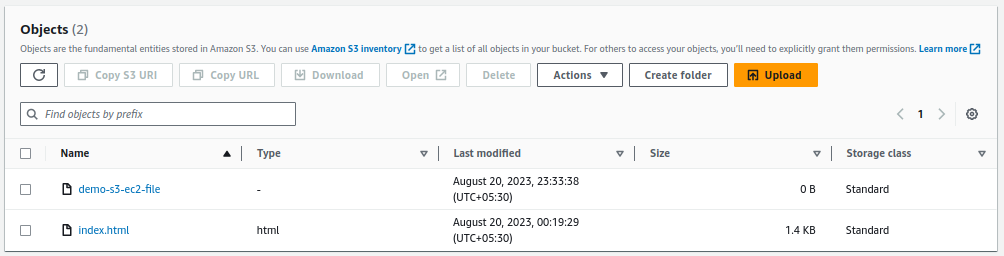
Create a file in the S3 bucket from the EC2 instance
ubuntu@ip-172-31-35-67:~/my-s3-bucket$ touch demo-s3-ec2-file
ubuntu@ip-172-31-35-67:~/my-s3-bucket$ ls -l
total 2
-rwxr-xr-x 1 ubuntu ubuntu 0 Aug 20 18:03 demo-s3-ec2-file
-rwxr-xr-x 1 ubuntu ubuntu 1484 Aug 19 18:49 index.html
ubuntu@ip-172-31-35-67:~/my-s3-bucket$
The file created will be visible in the S3 bucket console as well.
Unmount the S3 Bucket
When you’re done using the S3 bucket, unmount it using the following command:
ubuntu@ip-172-31-35-67:~$ fusermount -u ~/my-s3-bucket
ubuntu@ip-172-31-35-67:~$
ubuntu@ip-172-31-35-67:~$ df -h ~/my-s3-bucket
Filesystem Size Used Avail Use% Mounted on
/dev/root 7.6G 2.1G 5.6G 27% /
ubuntu@ip-172-31-35-67:~$
This will unmount the bucket from the directory.
Conclusion:
In this blog, we have seen the step by step procedure to mount an S3 bucket in EC2 instance and add contents to the bucket. This approach is a very simple procedure and helps us in many use cases. However, using s3fs to mount an S3 bucket as a file system can have limitations and performance implications compared to using S3 directly. It’s important to consider your specific use case and requirements when deciding whether this approach is suitable for your needs.
Related Posts:
Machine Learning in AWS: Model training with Amazon Sagemaker
Follow our Twitter and Facebook feeds for new releases, updates, insightful posts and more.

Leave A Comment