
Amazon Elastic Kubernetes Service (Amazon EKS) is a managed Kubernetes (K8s) service provided by Amazon Web Services (AWS). Kubernetes is an open-source container orchestration platform that automates the deployment, scaling, and management of containerized applications. EKS makes it easier for users to run, manage, and scale containerized applications using Kubernetes on AWS infrastructure. EKS is a fully managed service, which means AWS takes care of the underlying infrastructure, control plane, and Kubernetes software updates, allowing users to focus on deploying and managing their applications.
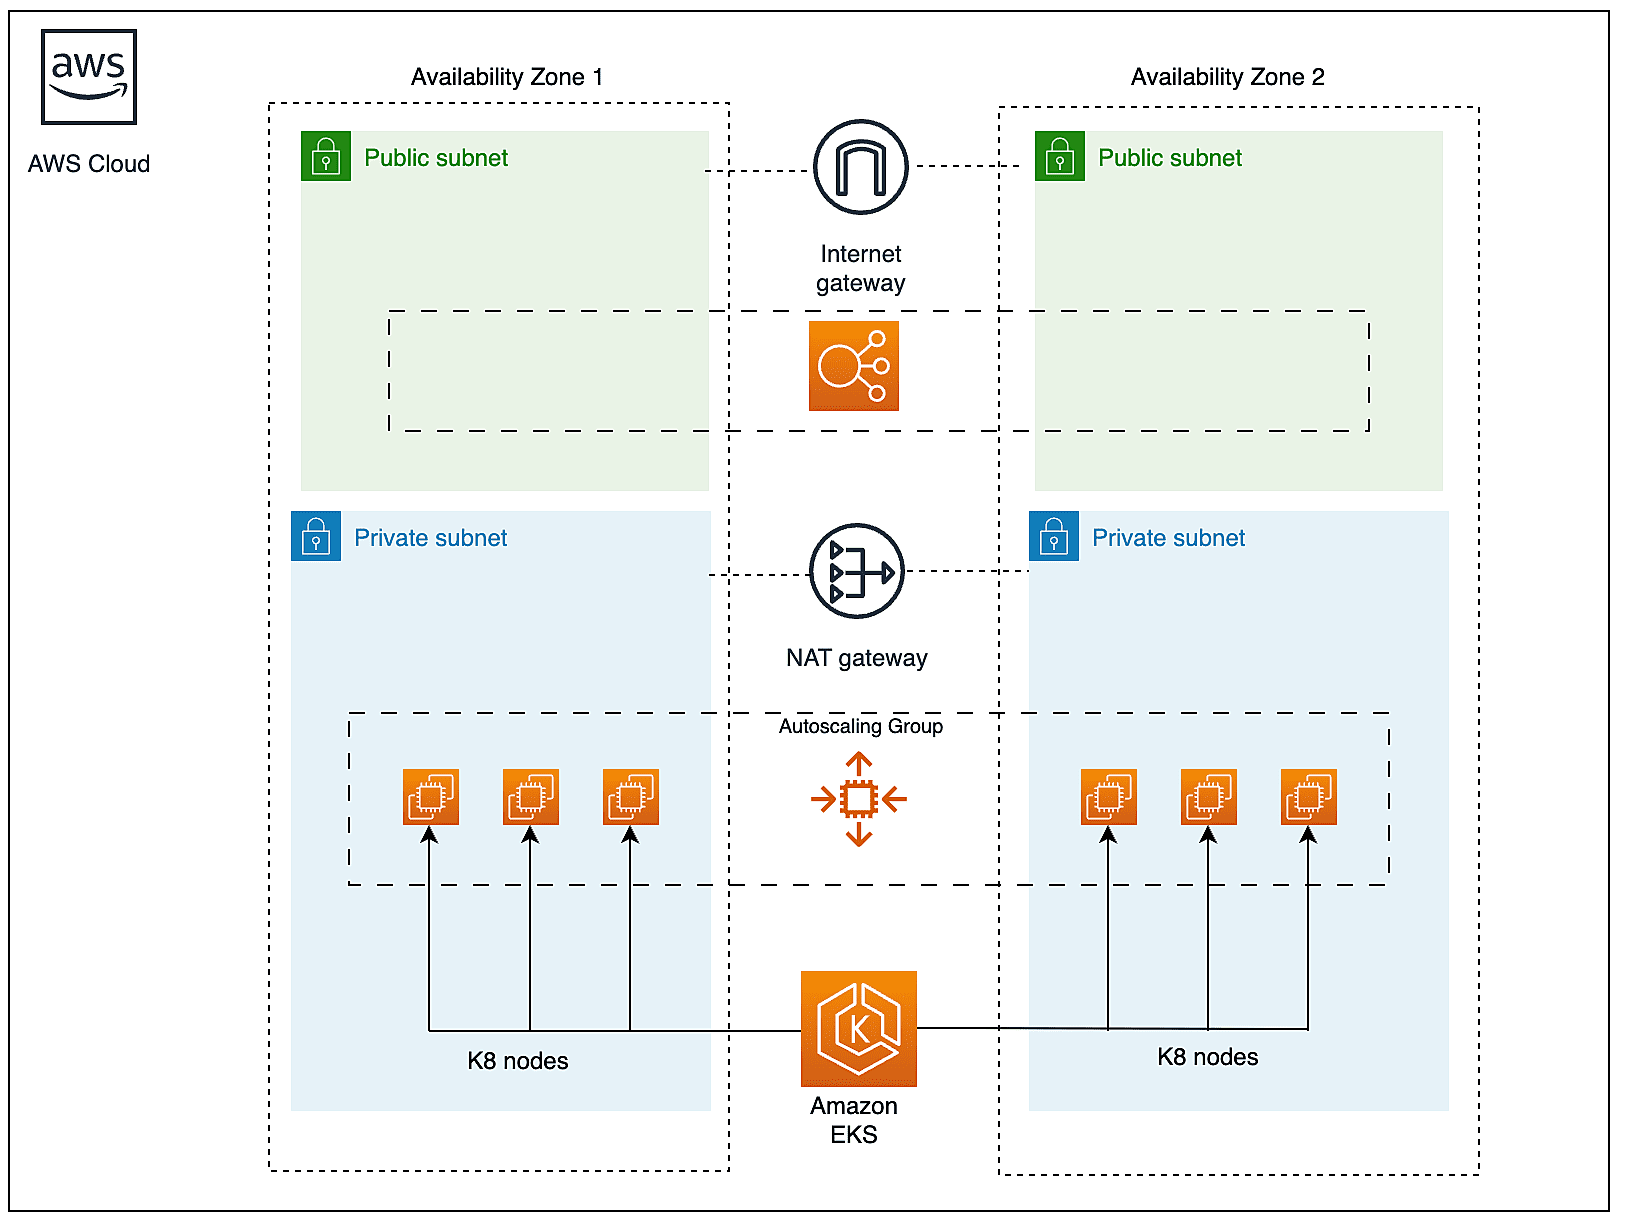
EKS is compatible with standard Kubernetes, which means you can use existing Kubernetes tools, applications, and configurations with EKS. This ensures a consistent experience for users familiar with Kubernetes. EKS automatically runs Kubernetes control plane components across multiple Availability Zones (AZs) for high availability and fault tolerance.
Creating EKS cluster:
Creating an Amazon Elastic Kubernetes Service (Amazon EKS) cluster involves several steps. Let’s see the step-by-step procedure.
Prerequisites:
- An AWS account
- AWS CLI or AWS Management Console access
- IAM user or role with appropriate permissions
- Install and Configure AWS CLI: You should install the AWS Command Line Interface (CLI) and configure it with your AWS credentials using aws configure. Here is my AWS CLI version.
uxpro-$ aws –version
aws-cli/2.4.22 Python/3.9.10 Darwin/22.3.0 source/arm64 prompt/off
uxpro-$
- Create an Amazon VPC (Virtual Private Cloud): EKS clusters run within a VPC. You can create a VPC using the AWS Management Console or the AWS CLI. Here is an existing VPC for the demo.

- Create Security Groups and Subnets: Create the necessary security groups and subnets within your VPC. You’ll need security groups for your worker nodes and subnets where they will be launched.

- Create an IAM Role for EKS: Create an IAM role that EKS can assume to manage your cluster and worker nodes. This role should have the AmazonEKSClusterPolicy and AmazonEKSServicePolicy policies attached.


- Install and Configure kubectl: You’ll need kubectl to interact with your Kubernetes cluster. Install it on your local machine and configure it to use the AWS CLI for authentication.
uxpro-$ kubectl version
WARNING: This version information is deprecated and will be replaced with the output from kubectl version –short. Use –output=yaml|json to get the full version.
Client Version: version.Info{Major:”1″, Minor:”25″, GitVersion:”v1.25.0″, GitCommit:”a866cbe2e5bbaa01cfd5e969aa3e033f3282a8a2″, GitTreeState:”clean”, BuildDate:”2022-08-23T17:36:43Z”, GoVersion:”go1.19″, Compiler:”gc”, Platform:”darwin/arm64″}
Kustomize Version: v4.5.7
Server Version: version.Info{Major:”1″, Minor:”19″, GitVersion:”v1.19.16″, GitCommit:”e37e4ab4cc8dcda84f1344dda47a97bb1927d074″, GitTreeState:”clean”, BuildDate:”2022-09-02T00:47:29Z”, GoVersion:”go1.15.15″, Compiler:”gc”, Platform:”linux/arm64″}
WARNING: version difference between client (1.25) and server (1.19) exceeds the supported minor version skew of +/-1uxpro-$
- Create an EKS Cluster: Use the AWS Management Console, AWS CLI, or an AWS CloudFormation template to create your EKS cluster.
Here’s an example of creating a cluster using the AWS CLI:
uxpro-$ aws eks –region us-east-2 create-cluster –name uabdreks1 \
–role-arn arn:aws:iam::xx62xxxx7x7:role/EKSRole-BDRSuite \
–resources-vpc-config subnetIds=subnet-703b403c,\
subnet-aff822c4,subnet-09ccdc73,securityGroupIds=sg-06ad35a69c1b8f717“cluster”: {
“name”: “uabdreks1”,
“arn”: “arn:aws:eks:us-east-2:xxxxxxxxx:cluster/uabdreks1”,
“createdAt”: “2023-09-18T21:14:19.388000+05:30”,
“version”: “1.27”,
“roleArn”: “arn:aws:iam::4xxxxxxxxxxx:role/EKSRole-BDRSuite”,
“resourcesVpcConfig”: {
“subnetIds”: [
“subnet-703b403c”,
“subnet-aff822c4”,
“subnet-09ccdc73”
],
“securityGroupIds”: [
“sg-06ad35a69c1b8f717”
],
“vpcId”: “vpc-a8d163c3”,
“endpointPublicAccess”: true,
“endpointPrivateAccess”: false,
“publicAccessCidrs”: [
“0.0.0.0/0”
]
},
“kubernetesNetworkConfig”: {
“serviceIpv4Cidr”: “10.100.0.0/16”,
“ipFamily”: “ipv4”
},
“logging”: {
“clusterLogging”: [
{
“types”: [
“api”,
“audit”,
“authenticator”,
“controllerManager”,
“scheduler”
],
“enabled”: false
}
]
},
“status”: “CREATING”,
“certificateAuthority”: {},
“platformVersion”: “eks.5”,
“tags”: {}
}
} - Wait for Cluster Creation: EKS cluster creation can take several minutes. You can check the status of your cluster using the AWS CLI:
uxpro-$ aws eks list-clusters
{
“clusters”: [
“uabdreks1”
]
}
uxpro-$ aws eks describe-cluster –name uabdreks1 |grep status
“status”: “CREATING“,uxpro-$
- Once the cluster is created, you will get the cluster status like below.
uxpro-$ aws eks describe-cluster –name uabdreks1 |grep status
“status”: “ACTIVE“,uxpro-$
- Add the cluster context to access the cluster using kubectl.
uxpro-$ aws eks –region us-east-2 update-kubeconfig –name uabdreks1
Added new context arn:aws:eks:us-east-2:xxxxxxxxx:cluster/uabdreks1 to /Users/ua/.kube/configuxpro-$>
If you do not have kubectl, you can download it from Kubernetes.io portal.
- Once you have kubectl, you can use the following command to list the worker nodes.
uxpro-$ ./kubectl get nodes
No resources founduxpro-$
uxpro-$ curl -LO “https://dl.k8s.io/release/v1.23.1/bin/darwin/arm64/kubectl”
% Total % Received % Xferd Average Speed Time Time Time Current
Dload Upload Total Spent Left Speed
100 138 100 138 0 0 390 0 –:–:– –:–:– –:–:– 395
60 52.8M 60 32.0M 0 0 595k 0 0:01:30 0:00:54 0:00:36 780k
100 52.8M 100 52.8M 0 0 618k 0 0:01:27 0:01:27 –:–:– 795kuxpro-$ chmod +x kubectl
Conclusion:
We have successfully launched Amazon EKS cluster. In the backend, AWS has spin-up the master nodes in highly available manner where we do not get access to those. We will have only access to the kube API which can be accessed via kubectl command. What’s next ? You’ll need to configure your worker nodes to join the EKS cluster. This typically involves using an Amazon Machine Image (AMI) preconfigured for EKS, launching EC2 instances, and specifying the EKS cluster name during instance launch.
Read More:
AWS for Beginners: What is Amazon Athena and How it works? Part 44
Follow our Twitter and Facebook feeds for new releases, updates, insightful posts and more.

Leave A Comment