
VMware vSphere 6.7 Update 1 Upgrade and Security Configuration

- Read the new vSphere version release notes
- This includes reading the release notes for vCenter Server and the ESXi hypervisor
- Backup your configuration
- Make sure you have configuration backups for vCenter as well as your ESXi hosts
- Check to make sure you have compatibility with other vSphere solutions or third-party products before performing the upgrade. Typically, when a new vSphere version is released, not all VMware solutions immediately are compatible. Some solutions require new releases to ensure compatibility
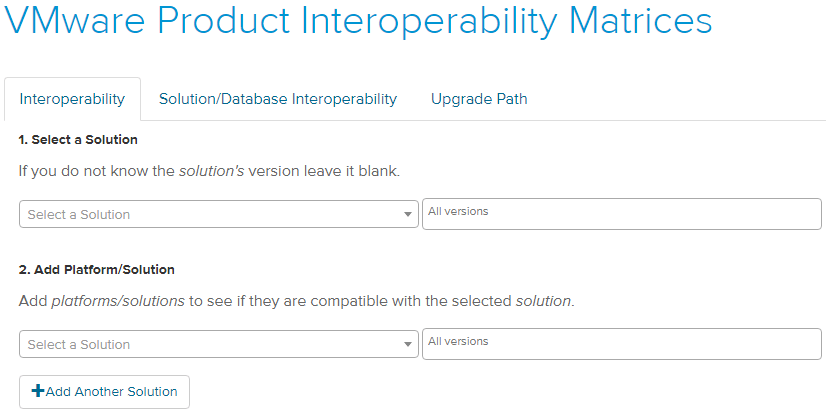
- Use the VMware Interoperability Matrix to determine interoperability between VMware solutions and products
- If you are using an external Platform Services Controller, upgrade Platform Services Controller appliance 6.0 to version 6.7
- Upgrade the vCenter Server to vSphere 6.7 Update 1 – This is an extremely important step as it allows choosing a supported upgrade method, depending on the version you are coming from
- You must first ensure your current deployment supports upgrading or migrating to the vCenter Server 6.7 Update 1 deployment
- Use the Graphical Deployment Tool – This allows upgrading vCenter Server by means of a two-step process to first deploy the new VCSA appliance as an OVA and then copying the existing data to the new appliance which then assumes the identity
- Use the Migration Assistant Interface – This allows migrating from the legacy SSO Platform Services Controller, or vCenter Server on Windows to the VCSA appliance
- Use the CLI installer – This allows advanced users the means to upgrade VCSA appliances or vCenter Server on Windows to the latest version
- Using the vCenter Admin VAMI interface – This is the administrative interface in VCSA that allows patching the appliance to the latest version within the major release
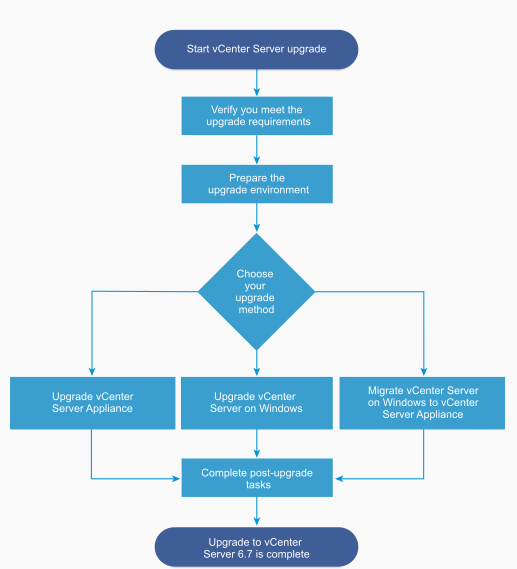
- Upgrade your ESXi hosts – Upgrading the ESXi hypervisor on cluster hosts comes after upgrading the vCenter Server. The vCenter Server must be at the same level or higher than the ESXi hosts it manages. Typically, customers want to keep the version of ESXi in sync with the version of vCenter. However, it is worth mentioning that the latest vCenter Server 6.7 Update 1 supports managing down level ESXi hosts
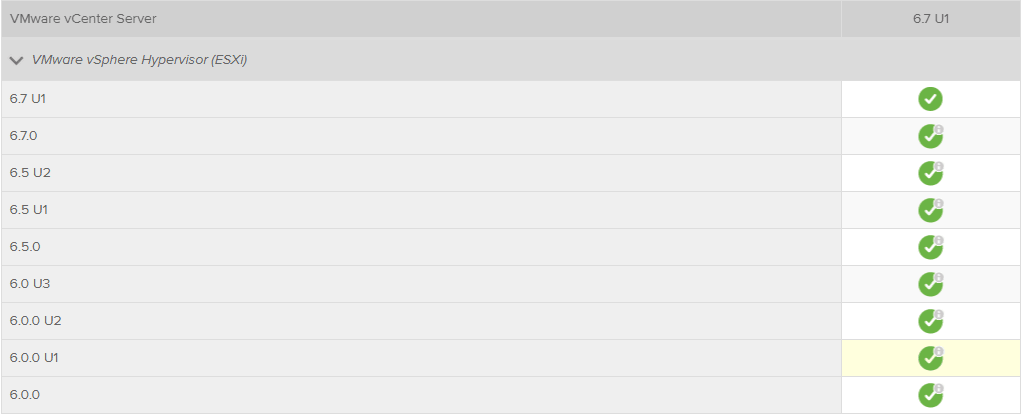
- As shown below, vCenter Server 6.7 Update 1 supports managing ESXi hosts all the way back to version 6.0. There may be reasons a customer might choose to do this. By using the latest vCenter Server version, you have the latest HTML 5 interface and all the other nice features that the new VCSA brings to the table. However, VMware has deprecated support in ESXi for legacy Windows Server versions such as 2003 starting in vSphere 6.7. If a customer is running legacy Windows Server operating systems, this might be a reason to run the latest vCenter with a down level ESXi host version
- Upgrade Virtual Machine VMware Tools – While VMware has decoupled the VMware Tools releases from the vSphere version itself, new vSphere versions generally come with an updated version of VMware Tools if you choose this option for the ESXi hypervisor download. After upgrading your vCenter Server and ESXi hosts, you will want to roll through the virtual machines and upgrade VMware tools. This can be done manually in vSphere or can easily be done programmatically with PowerCLI
- Upgrade Virtual Machine compatibility – This is a step that is certainly not required, however, if there are new virtual hardware features or other configuration that a new vSphere version unlocks that you want to take advantage of, you will want to upgrade your virtual hardware compatibility
By following the steps above, upgrading vSphere environments to the latest versions including vSphere 6.7 Update 1 can be performed smoothly and effectively. What are some other considerations to make?
Data protection solutions rely on being able to interact with the backup APIs that are found in vSphere. With new versions and releases, VMware at times either changes the way the API works or changes the API altogether. Once the upgrade happens, if the data protection solution is not engineered to be able to deal with the new APIs, jobs will generally start failing with miscellaneous errors. So, it is key to ensure compatibility up front with data protection solutions to make sure they are compatible with the version you are upgrading to, such as vSphere 6.7 Update 1.
Along the lines of what we have discussed with the data protection solutions interacting with vCenter Server, count on the downtime required for vCenter Server depending on the version you are coming from. Patching vCenter from the VAMI will not take as long as the Upgrade process takes with the GUI tool 2-step process. If you have monitoring solutions or other third-party products that integrate with vCenter Server, expect the downtime required for these solutions as well while vCenter is undergoing the upgrade. While the VMs themselves will still be available, make sure you can withstand the time “flying blind” if you rely on monitoring solutions with hooks into vCenter.
- vRealize Automation
- vRealize Orchestrator
- vRealize Business for Cloud
- vRealize Operations Manager
- vRealize Log Insight
- vRealize Log Insight Agent
- vRealize Operations Endpoint Agents
- vADP-based Backup Solution
- NSX-v
- External PSC
- vCenter Server
- VUM
- vSphere Replication
- vSphere Site Recovery Manager
- vSphere Update Manager Download Service
- ESXi hypervisor
- VMware Tools
- Virtual Hardware
- vSAN/VMFS
In the following walkthrough, let’s take a look at upgrading a simple vSphere environment that only consists of vCenter Server and a cluster of ESXi hosts. In the above list, we have highlighted the vCenter Server and ESXi hypervisor in the list above. As you can see, these both sit in various places in the recommended order of operations from an overall VMware products standpoint. If you have any of the other solutions, you will need to look and see where it fits in the overall order of upgrade operations set forth by VMware.
When looking at a simple configuration of only vCenter Server and the ESXi hosts in the cluster, the process to upgrade the vSphere components in that configuration involves upgrading vCenter Server first, and then upgrading the ESXi hosts. In the following walkthrough, let’s upgrade an existing vCenter 6.5 U2 VCSA installation to vCenter 6.7 Update 1 VCSA. The process is the same as the one established with the VCSA 6.5 upgrade process. The ISO installer that is downloaded contains the GUI installer/upgrade utility that allows deploying, upgrading, migrating from Windows vCenter, or restoring an installation.
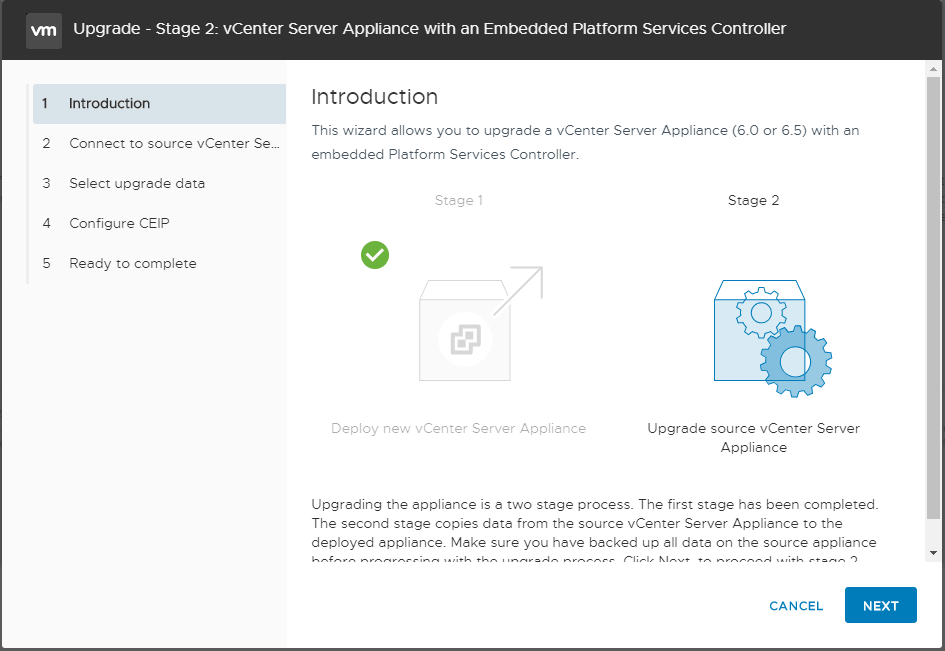
When upgrading, the process involves deploying a new vCenter Server VCSA 6.7 Update 1 appliance and then copying the configuration and data from the upgrade source VCSA appliance over to the new appliance. The new appliance then assumes the identity of the source appliance and the old VCSA appliance is powered off.
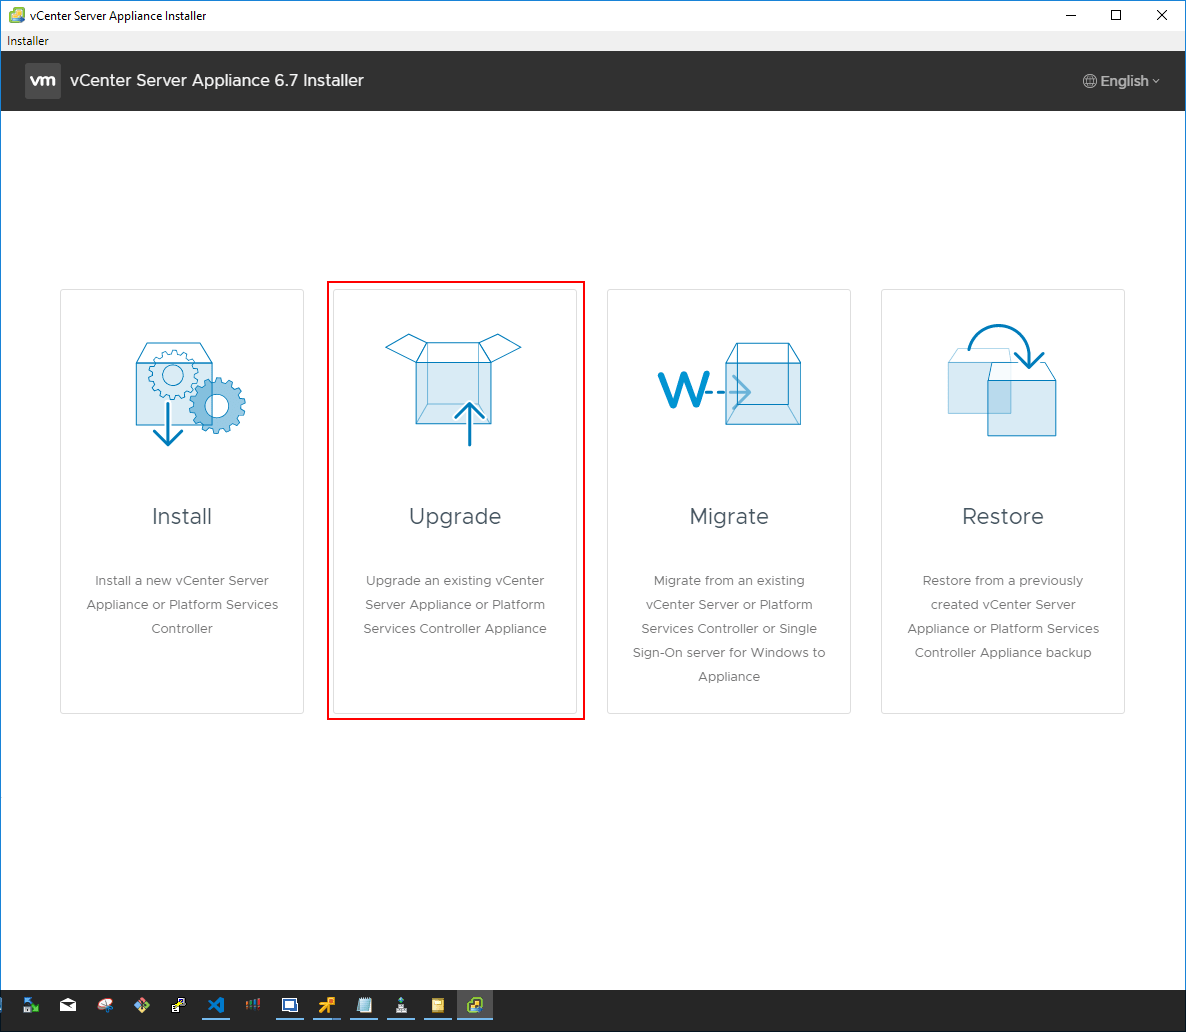
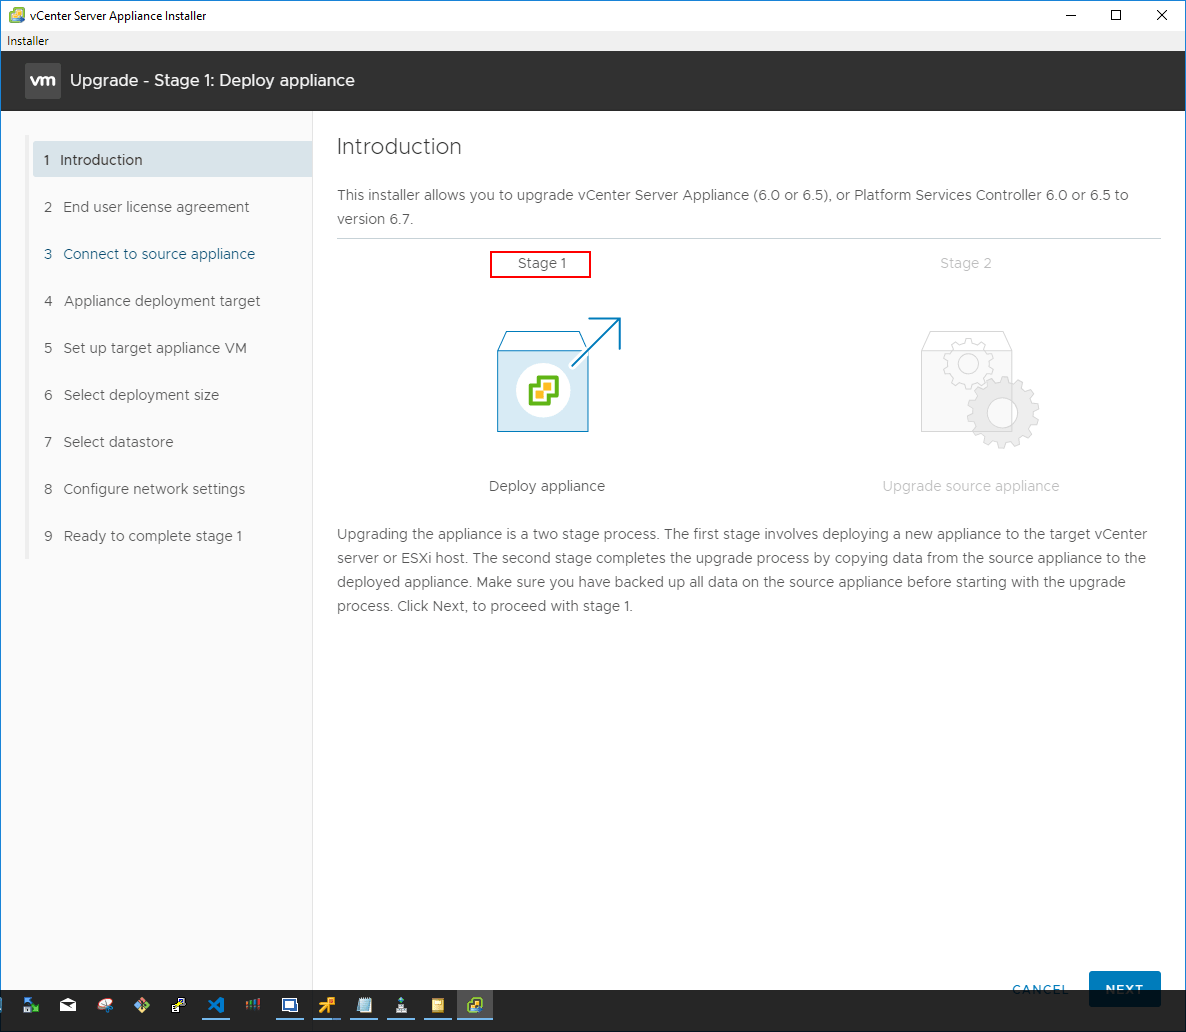
The installer will happen in 2 stages. The first stage is to deploy the appliance. The introductory screen describes the process in detail and the various steps taken in each stage.
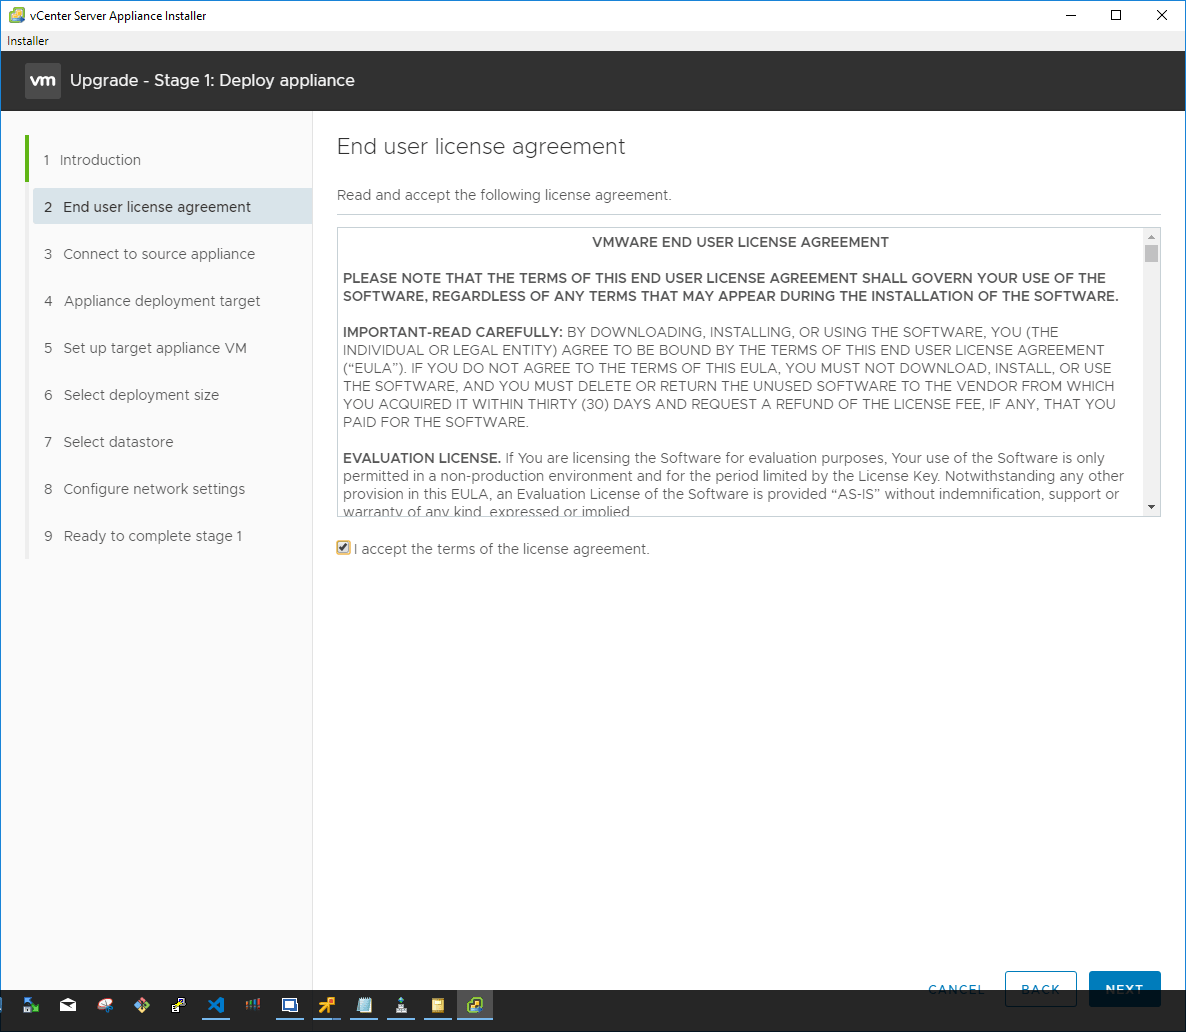
Next, accept the EULA presented for the installer.
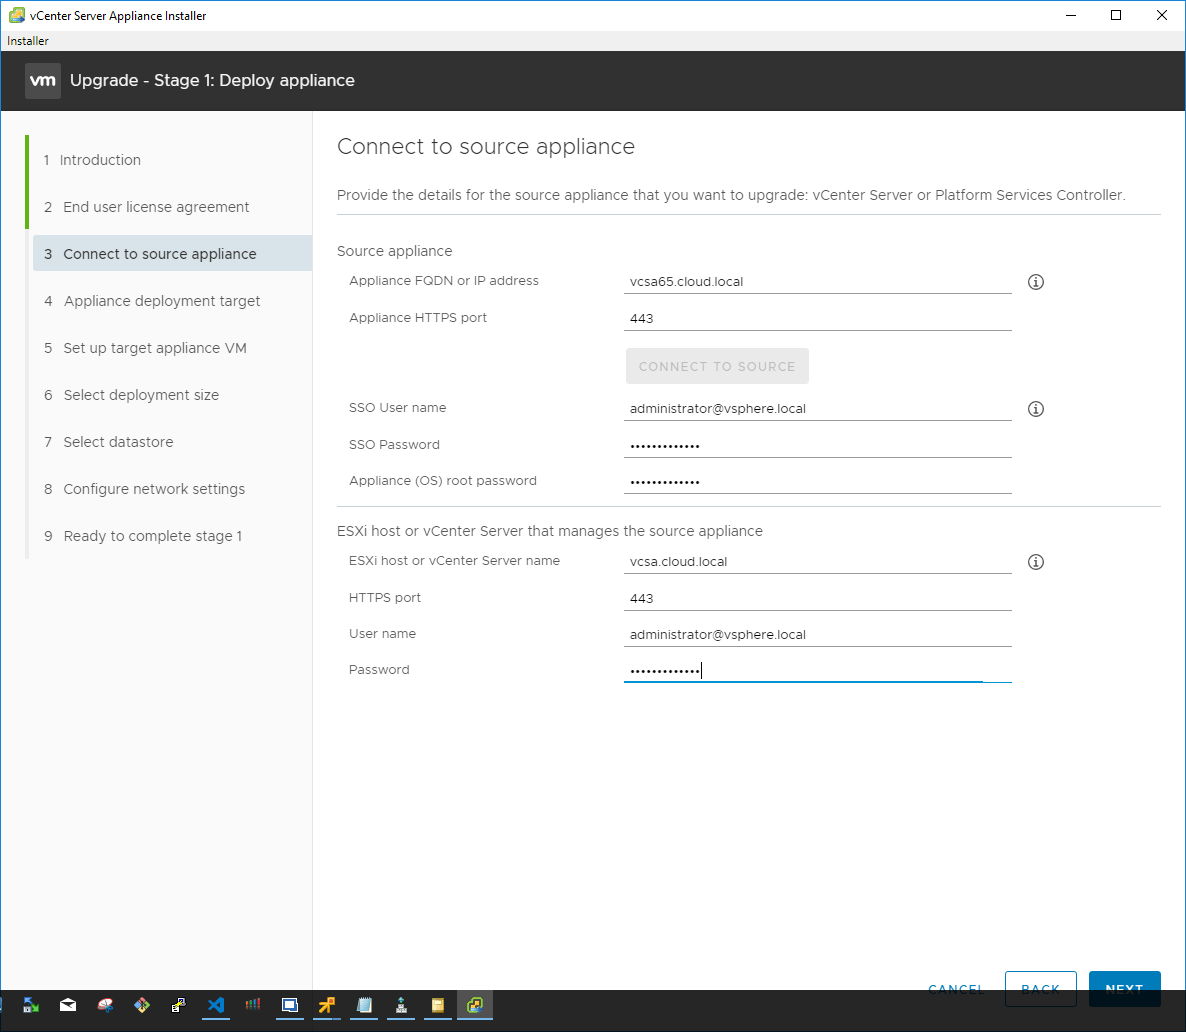
Now, we connect to the source appliance by providing the credentials for connectivity. Additionally, you connect to the source ESXi host or vCenter Server that manages the source appliance.
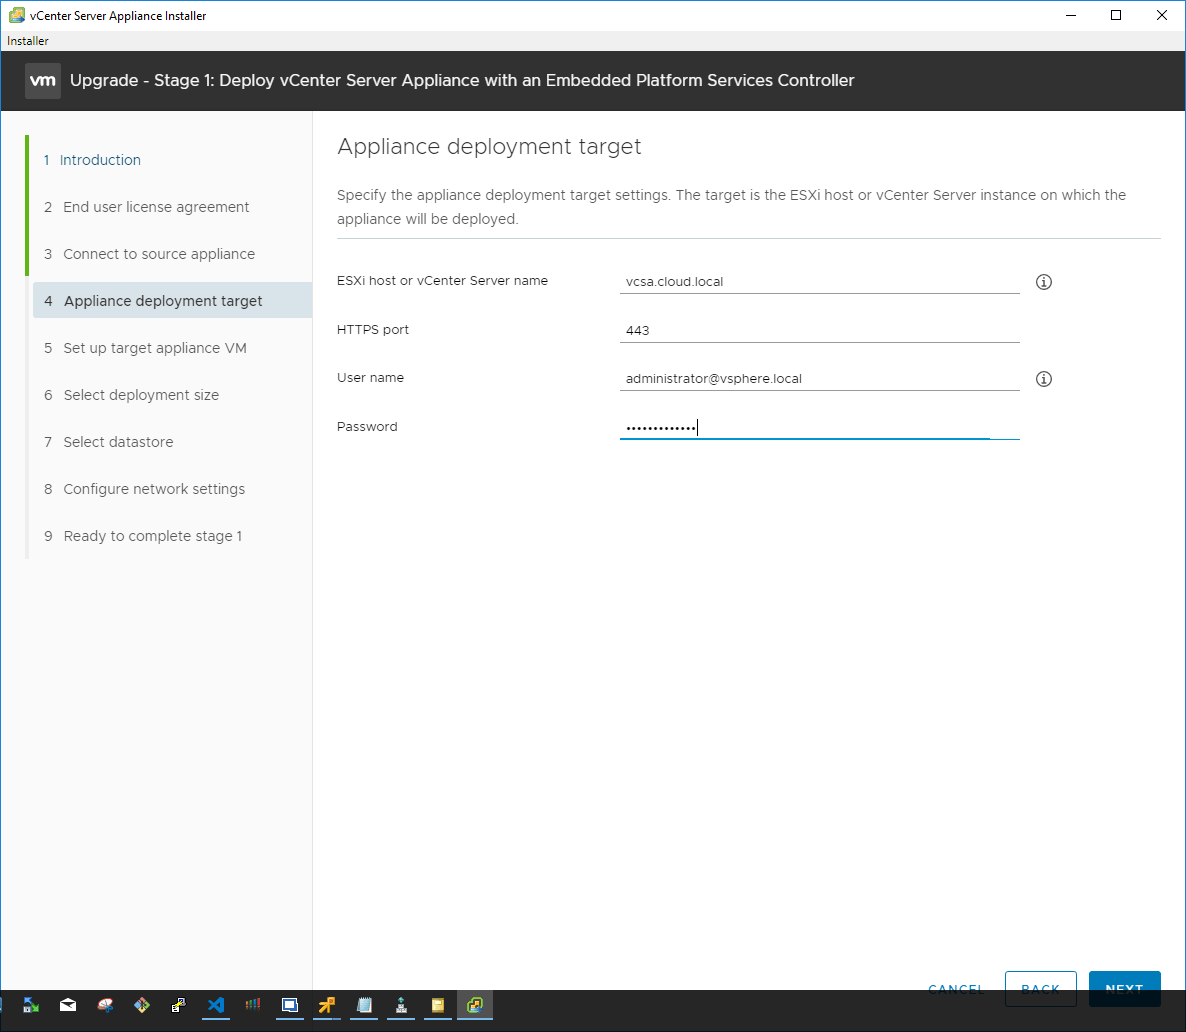
Next, connect to the appliance deployment target by providing the hostname and the credentials. This allows the installer to create the new appliance.
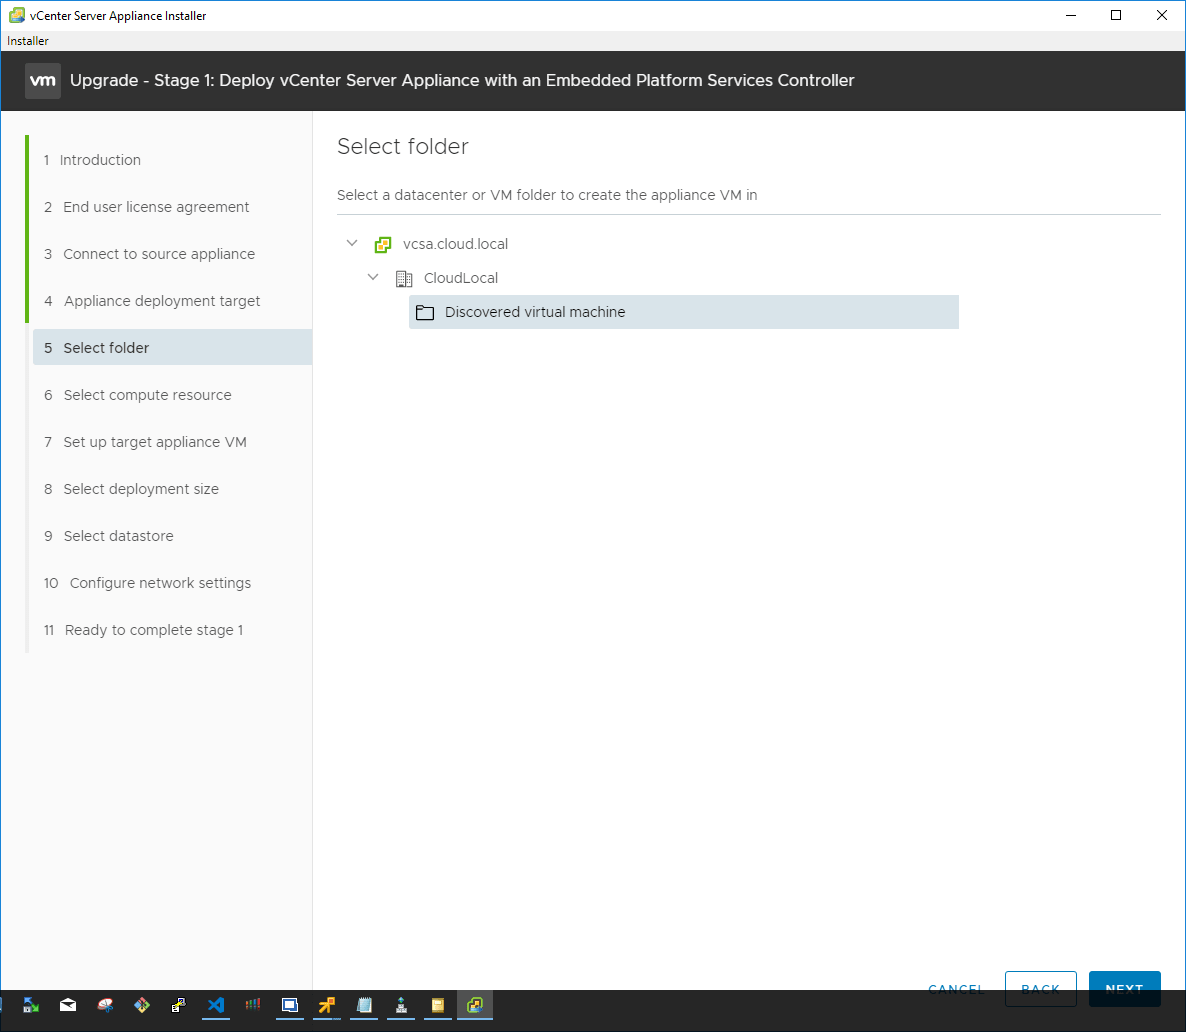
Select the folder for the new appliance creation in the target vSphere infrastructure.
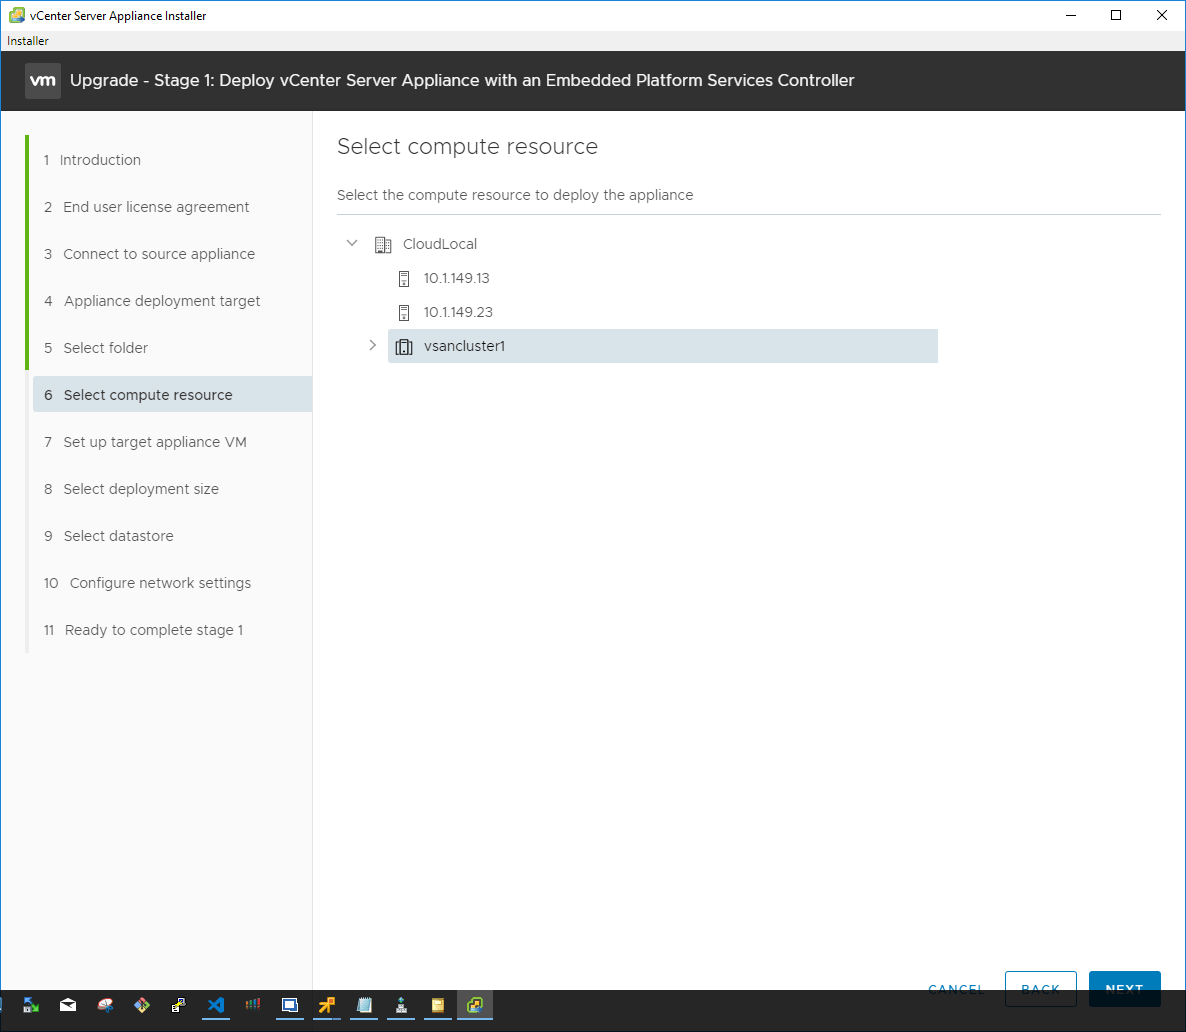
Select the compute resource such as a standalone host or vSphere cluster to house the new vCenter Server Appliance.
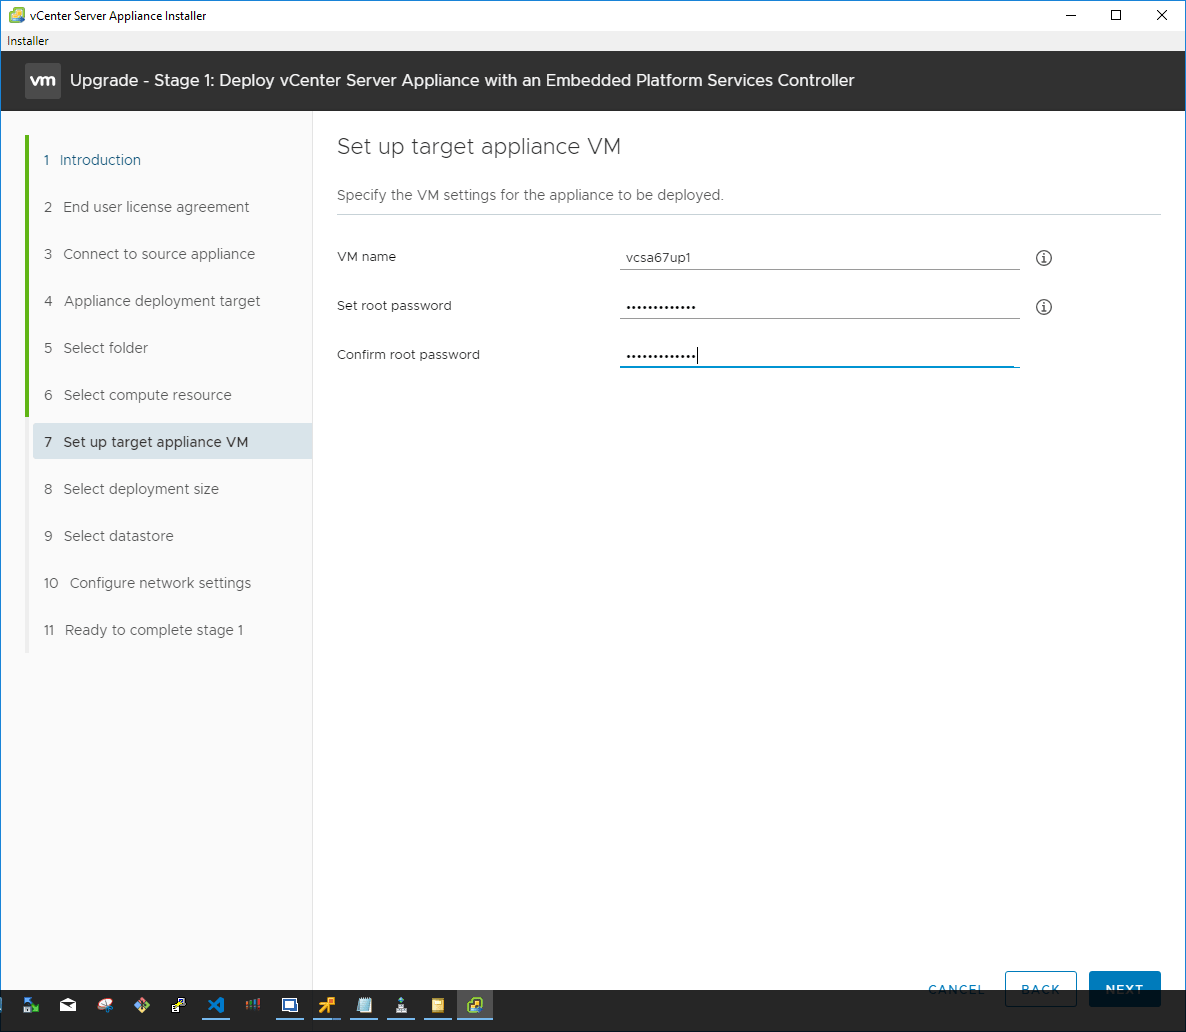
After configuring the vSphere connection to the target environment, you are asked to set up the target appliance virtual machine by providing a name, root password and confirming the root password.
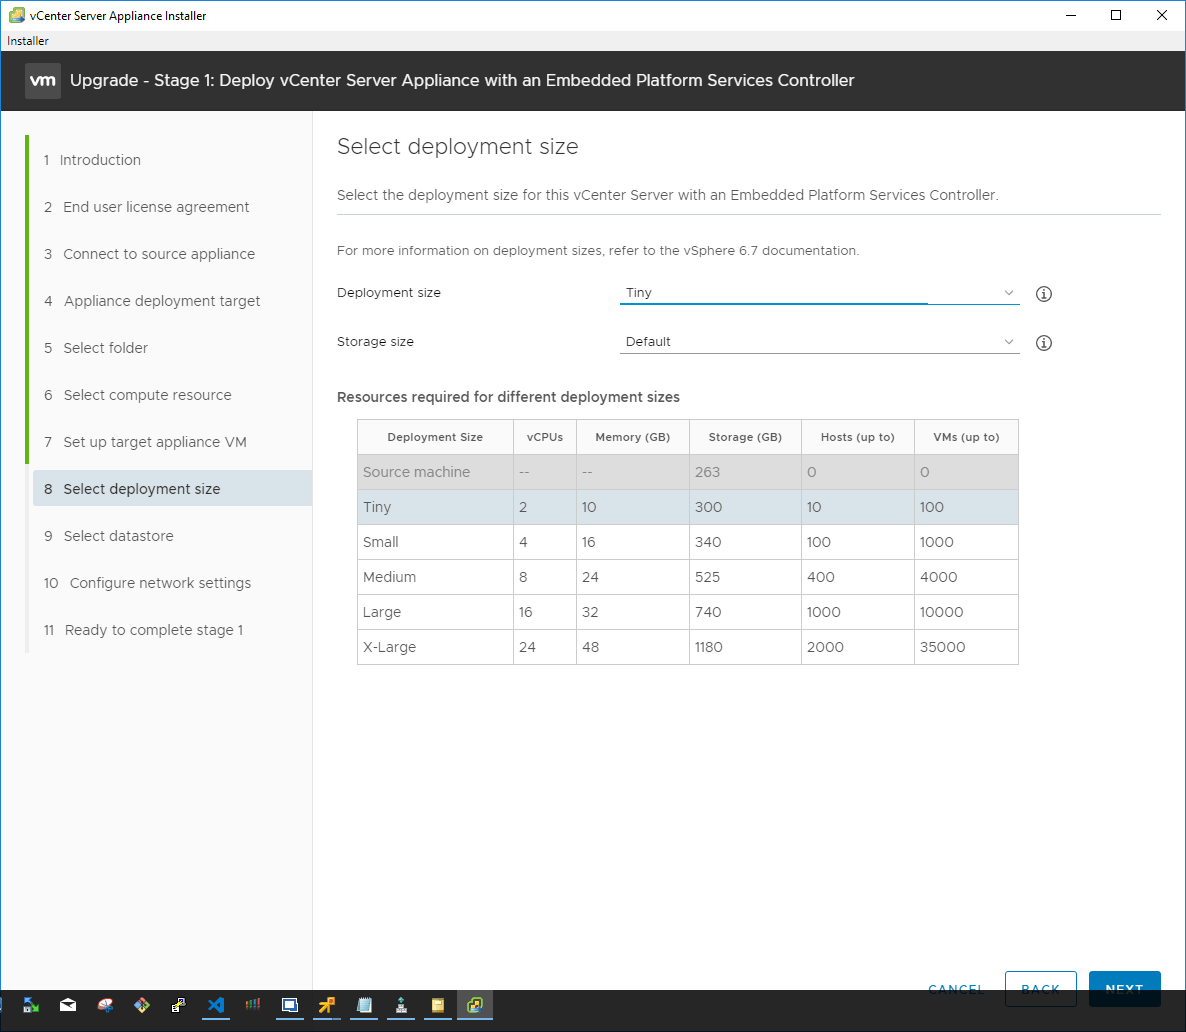
Configure the deployment size for the resulting VCSA appliance. The installer provides great information right on the installer GUI configuration page for the deployment size options.
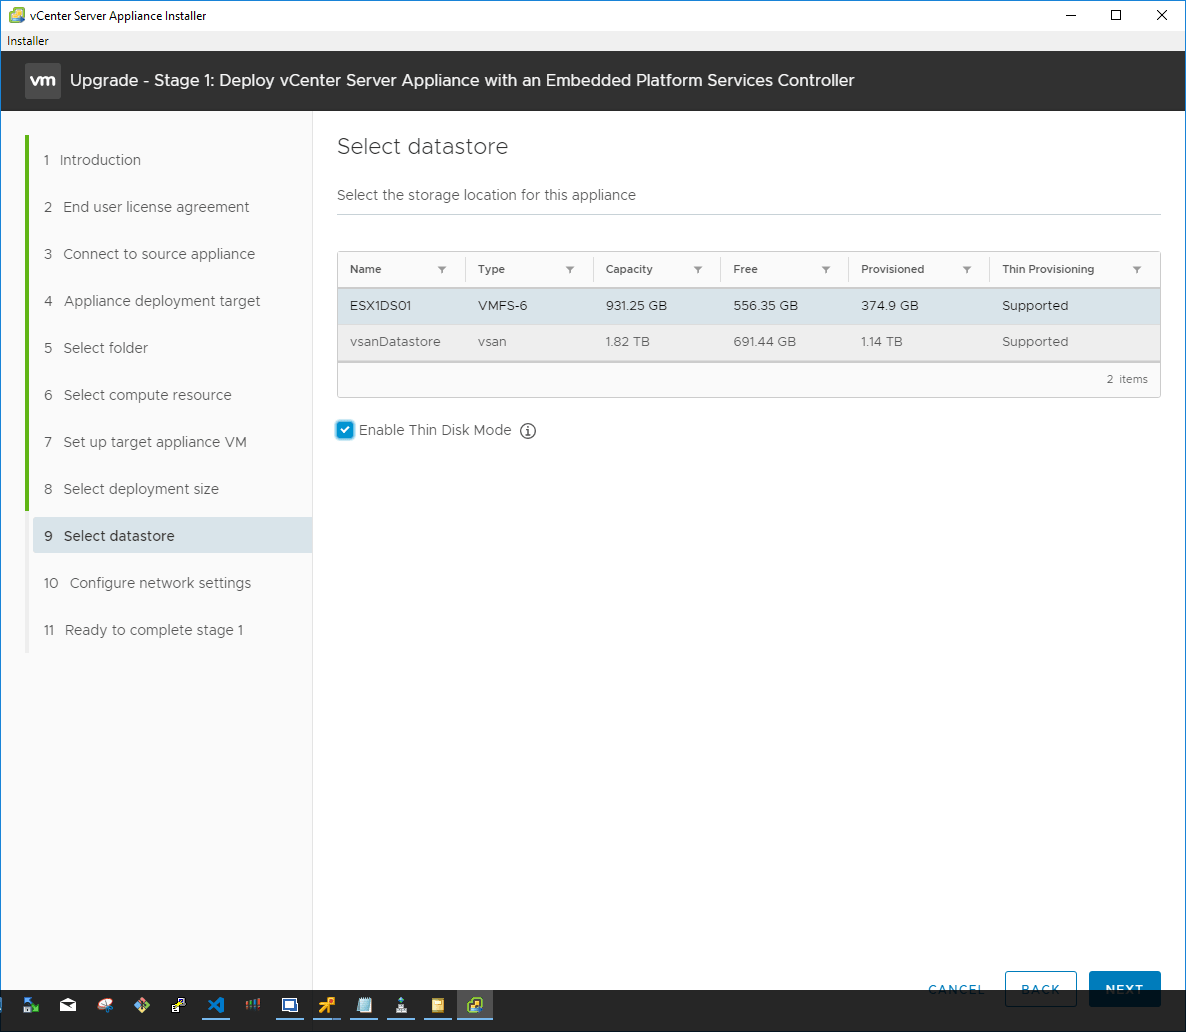
Select the datastore the new VCSA appliance will be housed in. You also have the option to select the Enable Thin Disk Mode which thin provisions the resulting VCSA appliance disks on the datastore. This means that blocks are only zeroed out when they are written to. This saves a tremendous amount of space since space is only claimed on the datastore as the blocks are written to.
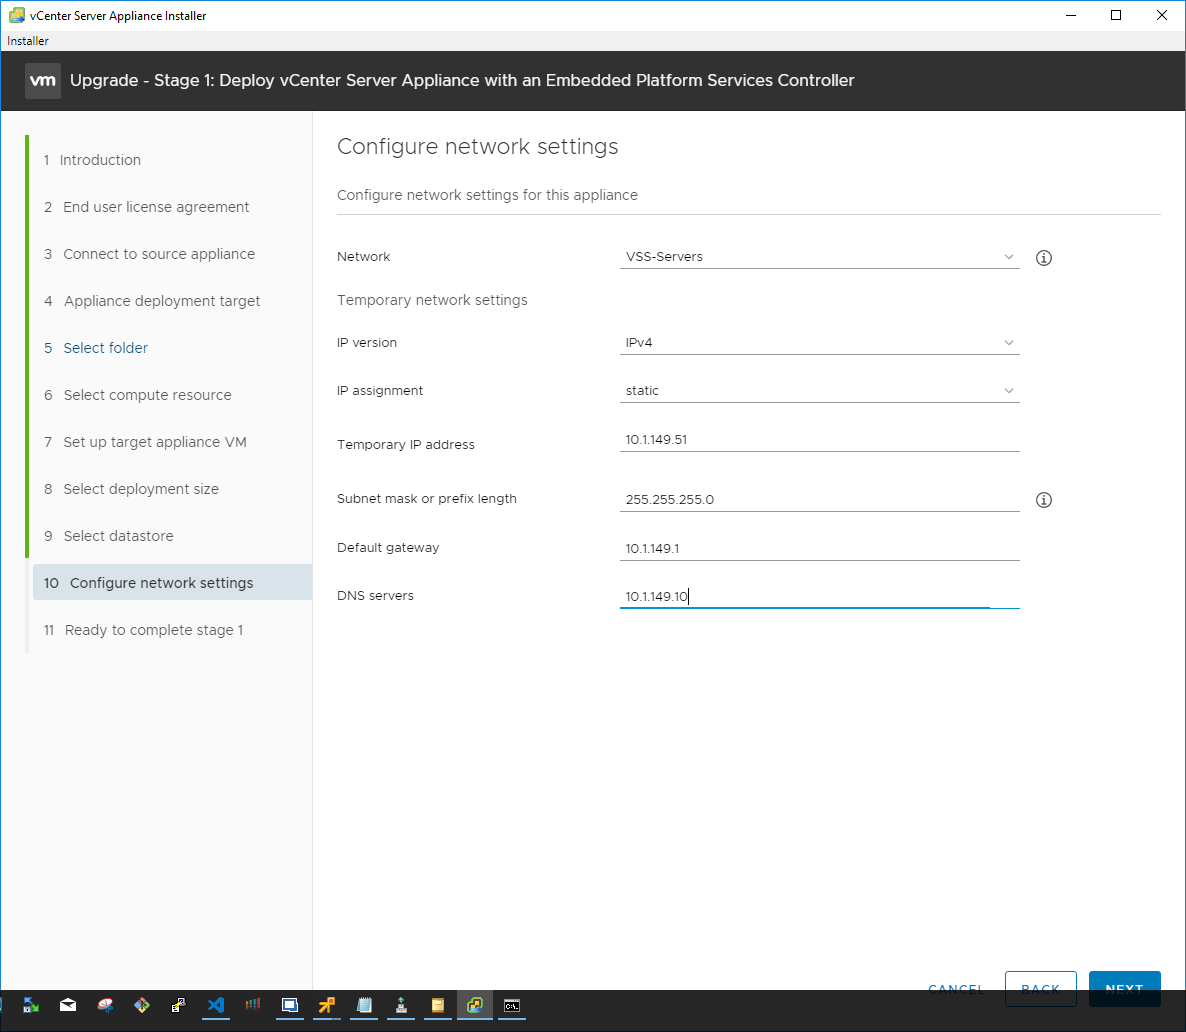
On the network settings configuration, choose the port group to attach the resulting VCSA appliance to as well as the temporary IP address for the appliance. Keep in mind that ultimately, the installer is going to assume the IP address of the source appliance. So here, we are simply giving it an IP address that will allow it to communicate with the source appliance during the upgrade process to copy data across.
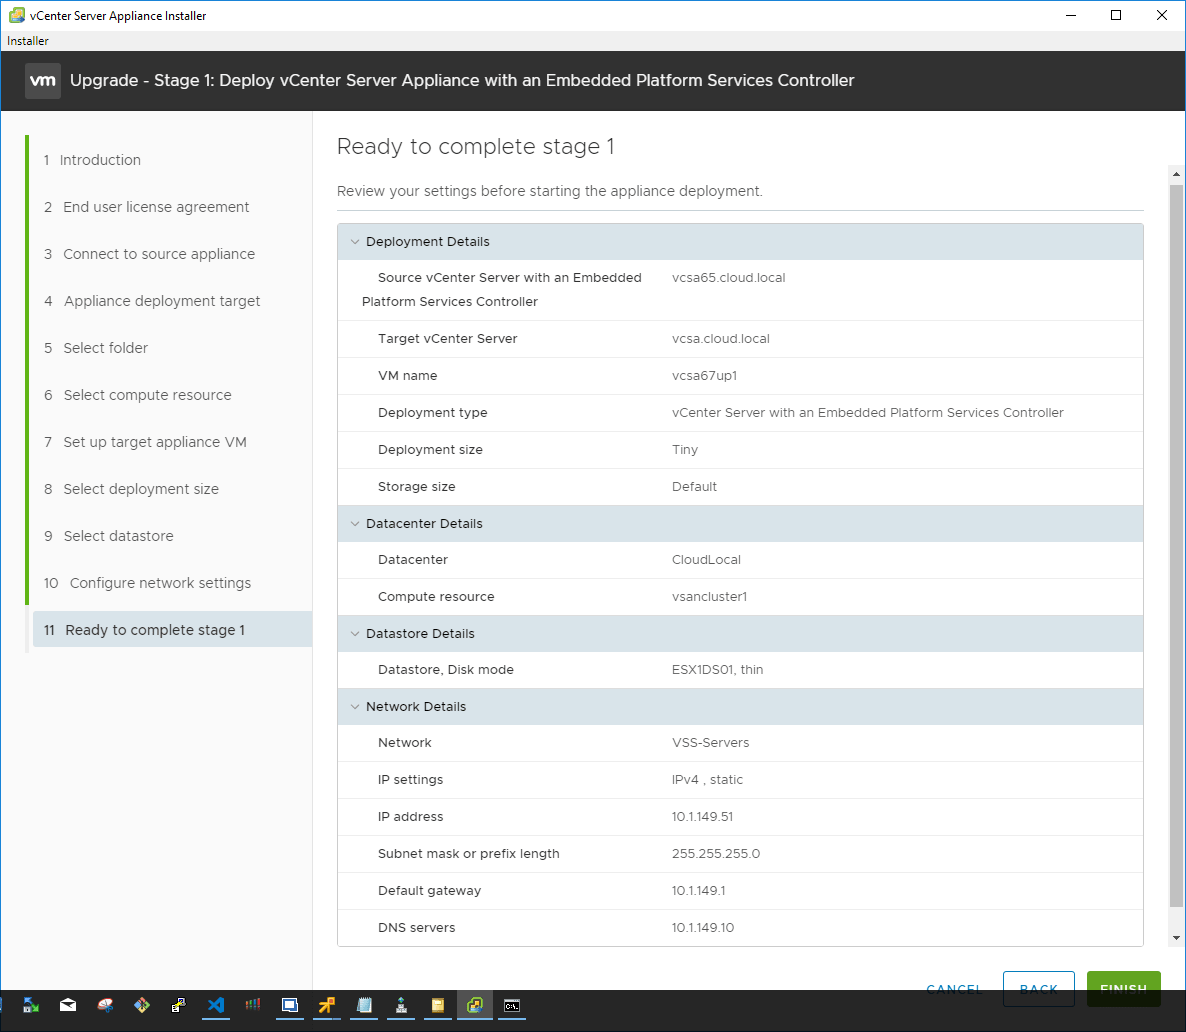
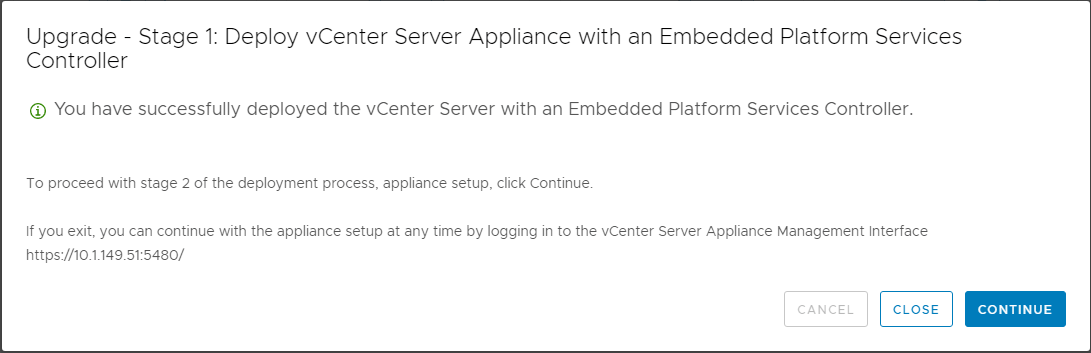
The Stage 1 process is now ready to begin the actual configuration of the VCSA appliance in line with the parameters configured during the wizard. Click Finish.
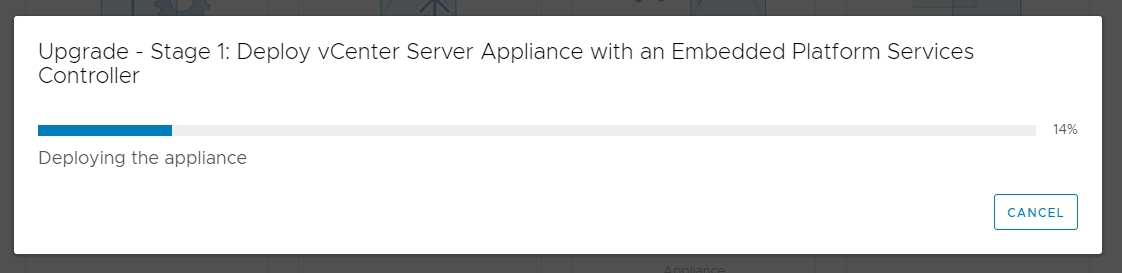
Stage 1 – Deploy vCenter Server Appliance with an Embedded Platform Services Controller begins. The new appliance VM is deployed into the vSphere inventory.
Stage 1 of the deployment finishes. Stage 2 begins.
In Stage 2, the installer copies data from the source vCenter Server Appliance to the deployed appliance. In the introduction screen, the process details are displayed.
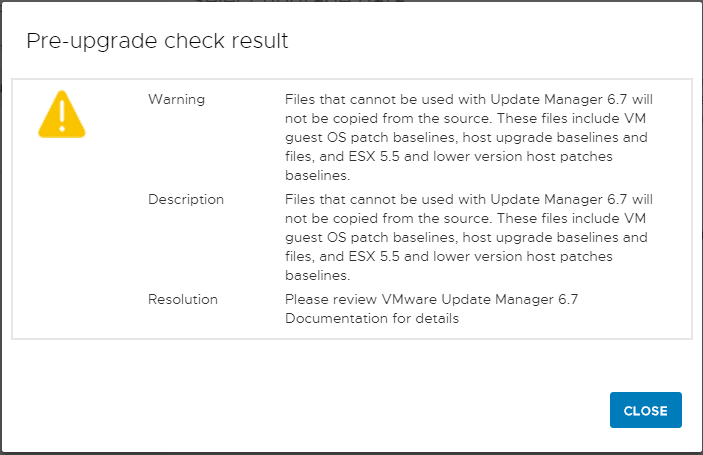
The Pre-upgrade check result will display any warning or other errors that are found. Below, we have warnings about legacy patch baselines, etc.
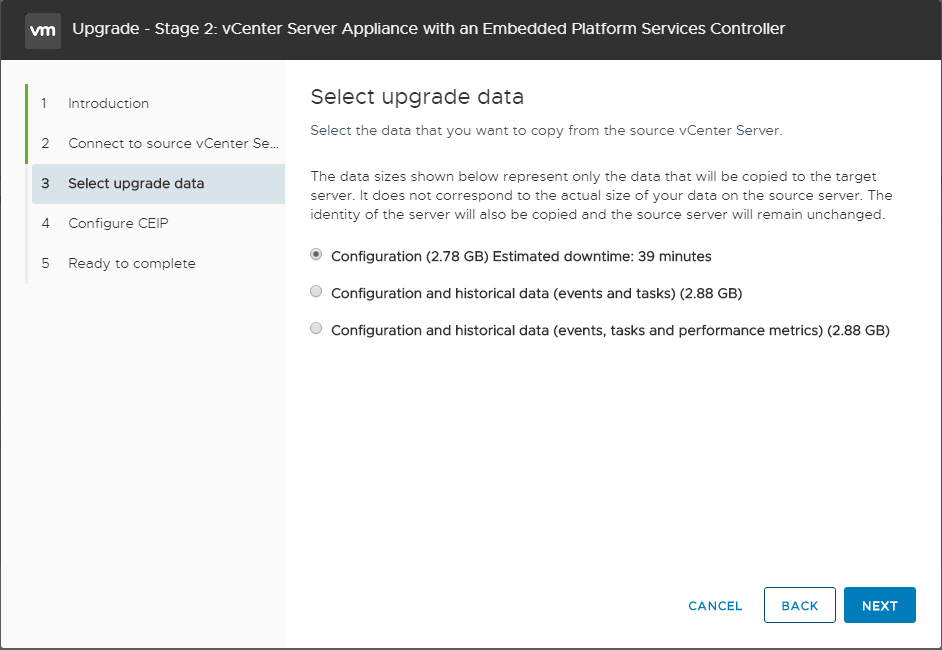
After connecting to the source vCenter Server, the Select Upgrade data screen displays. Here you can choose which data is copied to the new appliance. The various data sizes are displayed for each option.
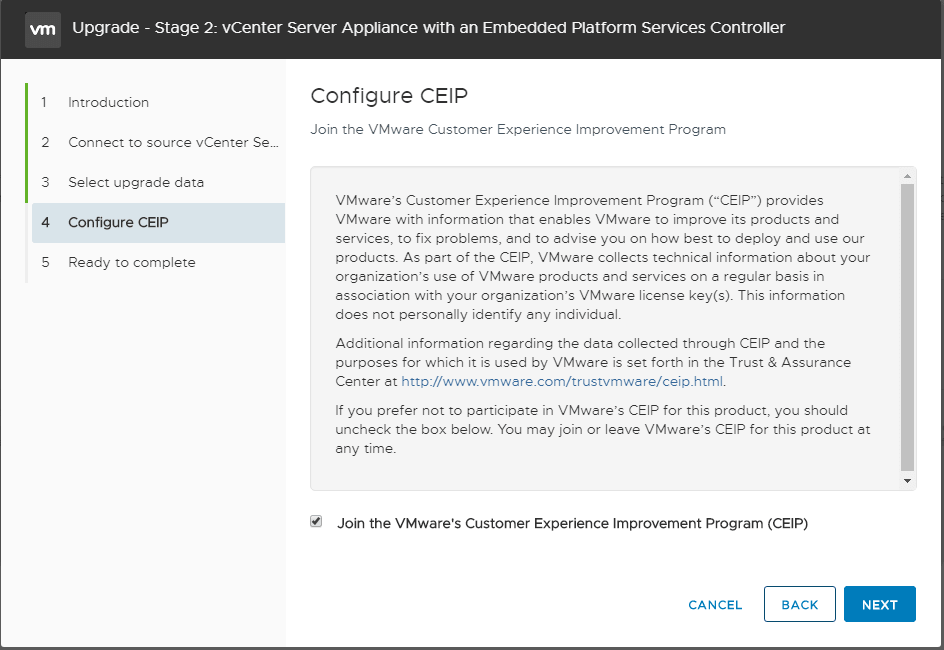
Next, choose whether or not to participate in the CEIP program by checking or unchecking the box.
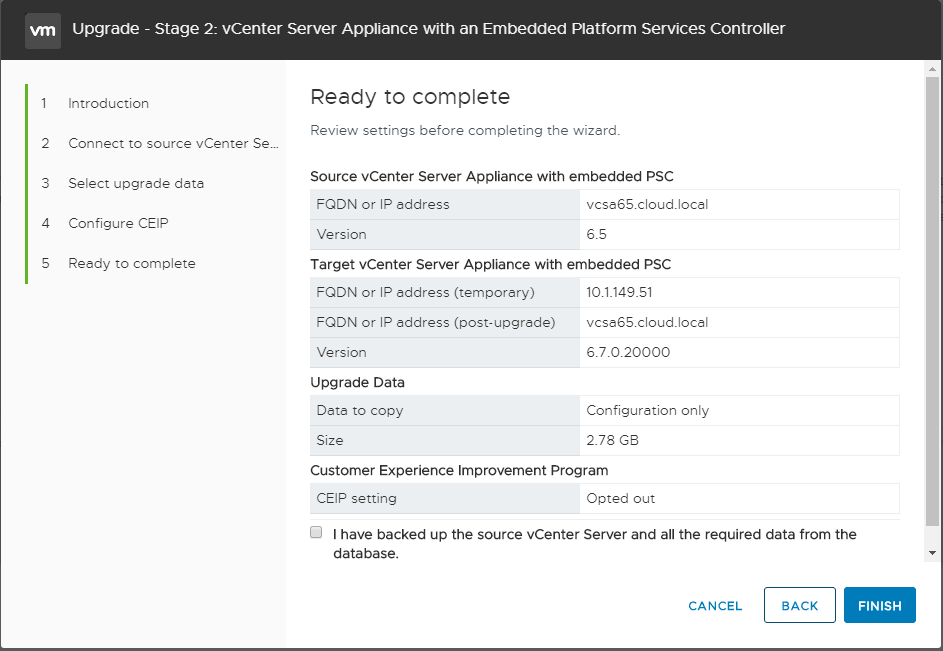
Stage 2 of the upgrade process is ready to begin. The chosen options are displayed on the screen along with the option to either go back or Finish the process.
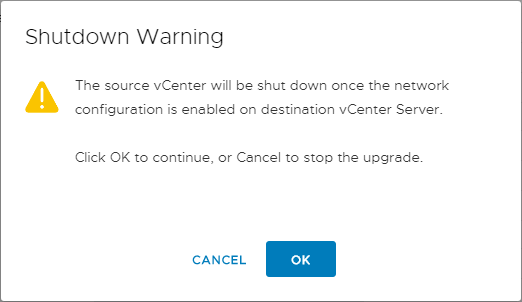
You will see a warning displayed indicating the source VCSA appliance will be shut down during the process. Click OK to continue with the process.
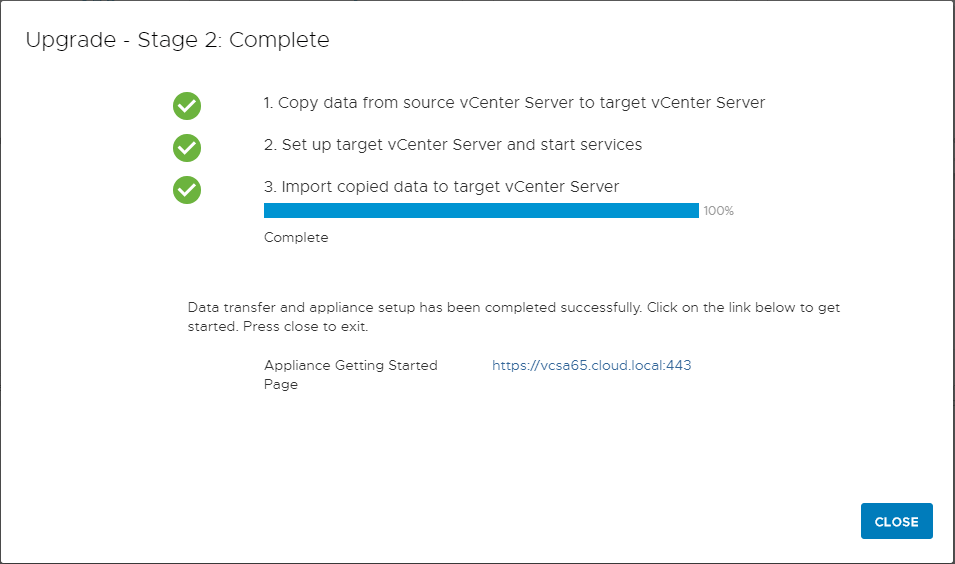
The Data transfer and appliance setup begin in the Stage 2 process.
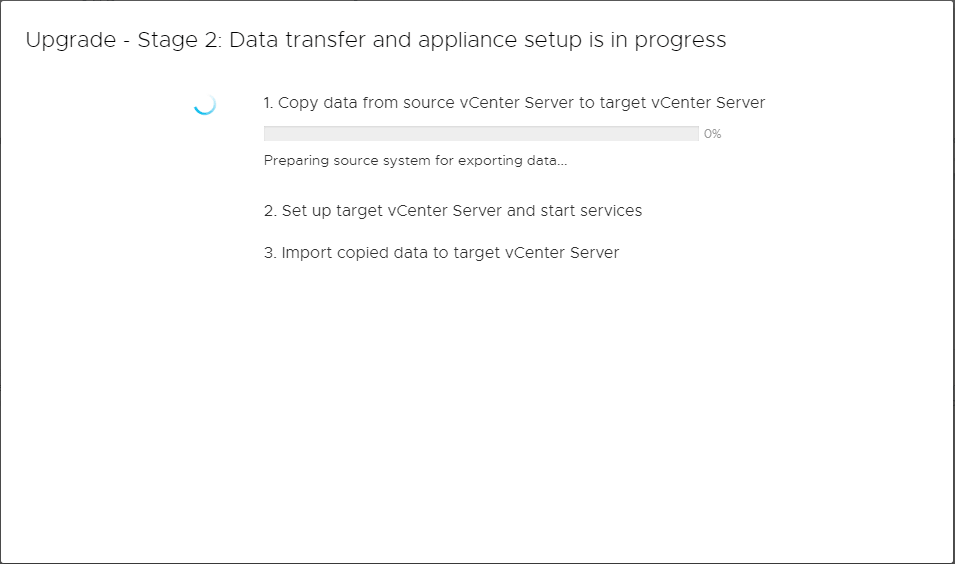
After some time, the Stage 2 process will complete. As you can see the three steps as defined are to copy data, set up the target vCenter Server and start processes, and then import copied data to the target vCenter Server. After a successful upgrade process, you will see the link to the appliance displayed on Stage 2 complete screen.
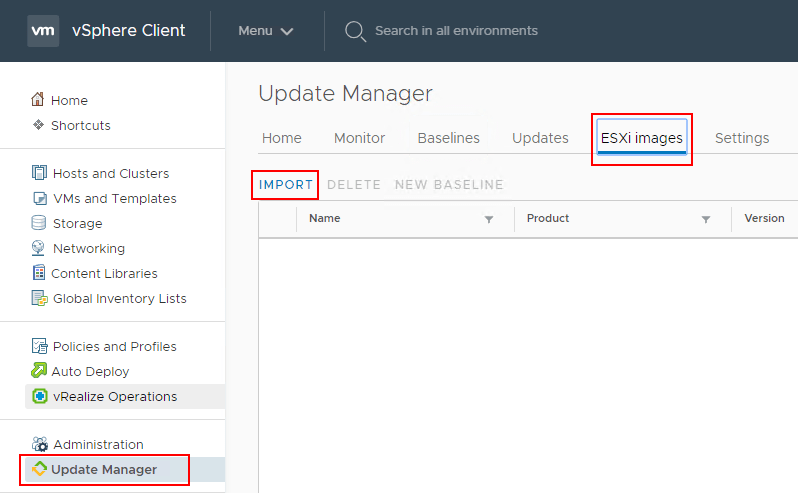
The first thing that we need to do is upload the new ESXi 6.7 ISO. To do this navigate in the HTML 5 client to Update Manager >> ESXi Images >> Import.
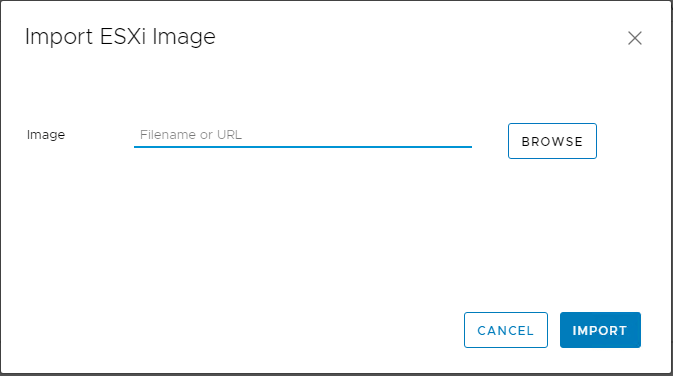
Choose to import an ESXi Image and Browse to the ISO file for ESXi 6.7 Update 1. As soon as you select it, it will start to import and then upload the image.
Below, the process to import the ESXi image has begun. The first step uploads the image and step 2 imports the image into the Update Manager images catalog.

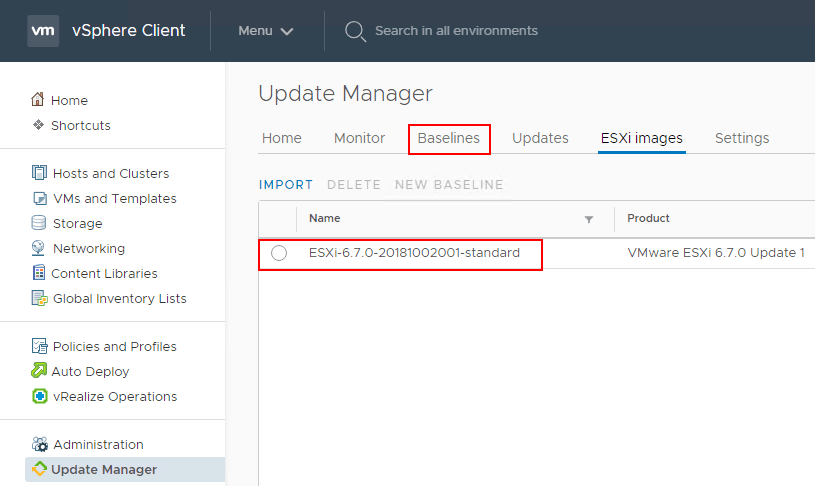
After the upload and import finishes, you should be able to see the ESXi image that was just uploaded under the ESXi Images tab.
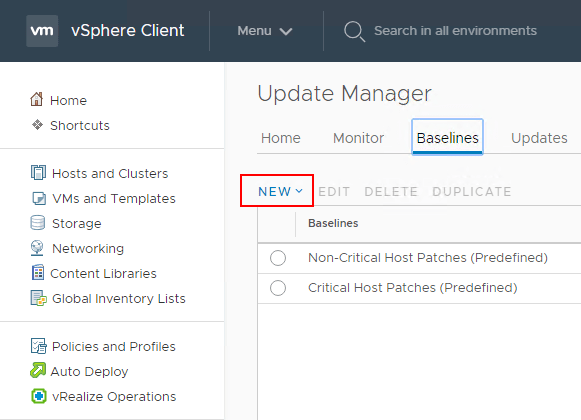
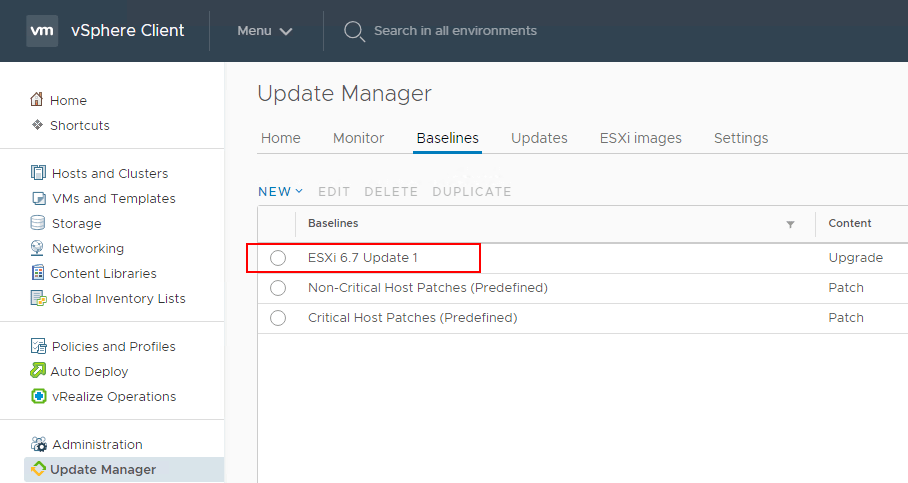
Now that the image is uploaded, we can create a new Baseline which allows assigning the action to a “template” of sorts for upgrading, updating, etc. The host has to meet the baseline by the scan operation or it will show out of compliance. Click Baselines >> New.
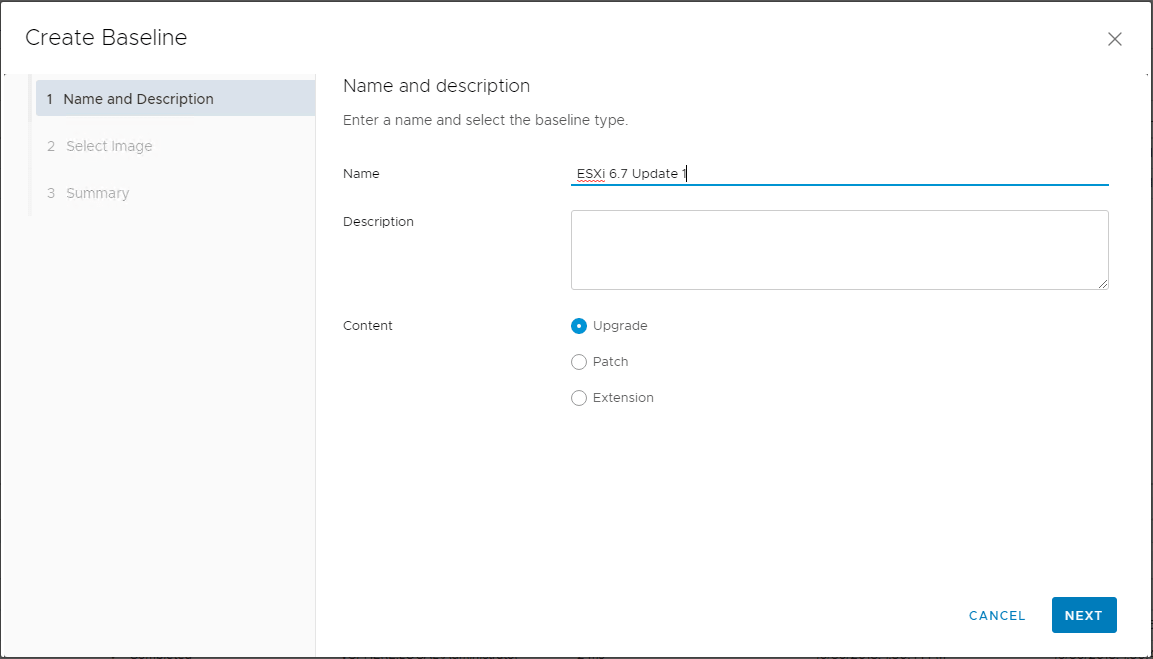
This will launch the Create Baseline wizard. The Create Baseline wizard is a 3-step process that will allow naming and setting the description for the baseline, selecting an image, and finalizing the baseline. Below, the Name for the Baseline is configured and the Content type is set to Upgrade.
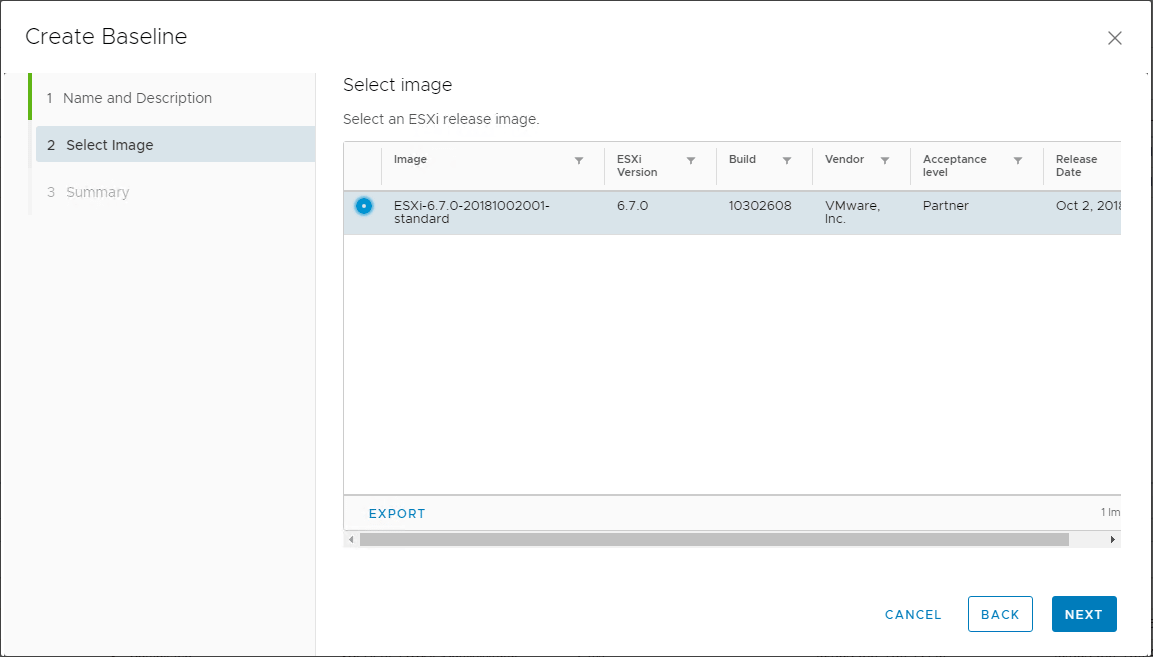
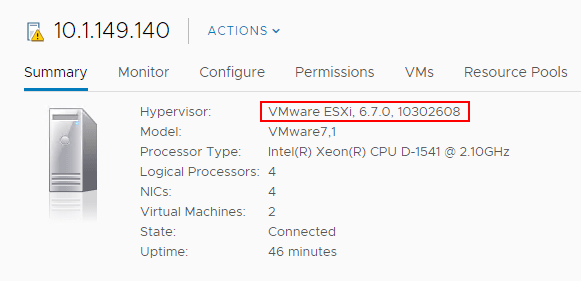
One step 2, select the image that was uploaded previously for ESXi 6.7 Update 1. You can identify this is Update 1 by the Build version which is 10302608.
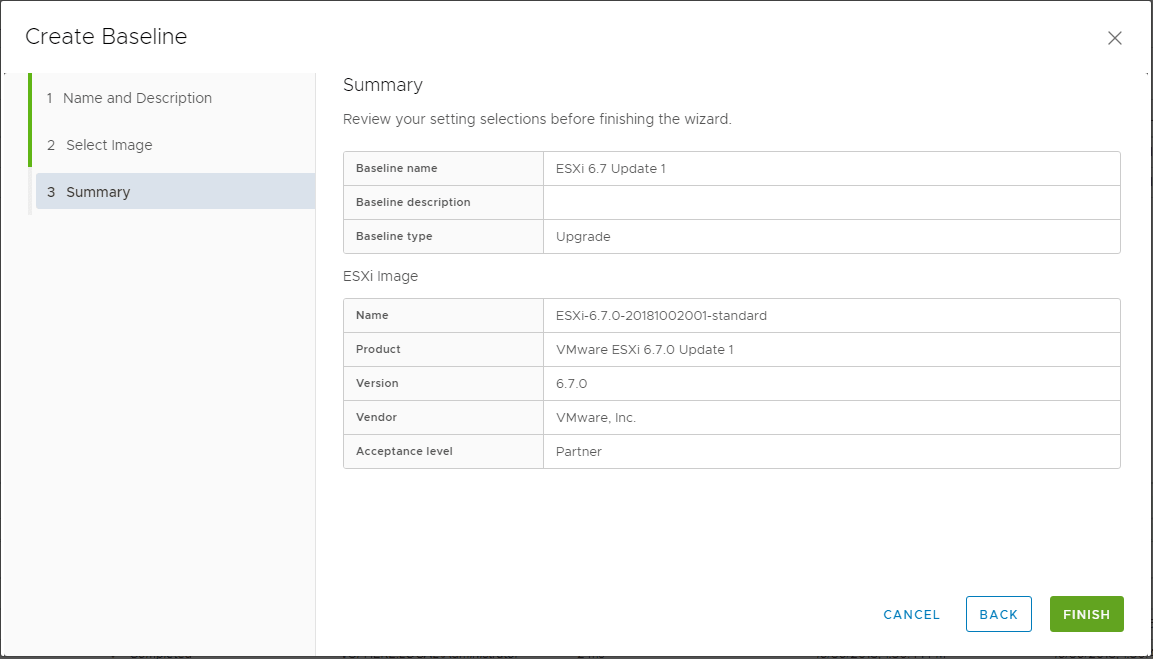
On the Summary screen, you can verify the baseline is configured correctly and then Finish the wizard to finalize the baseline creation.
After the Baseline is created, you should be able to see the new Baseline listed in the Baselines listing.
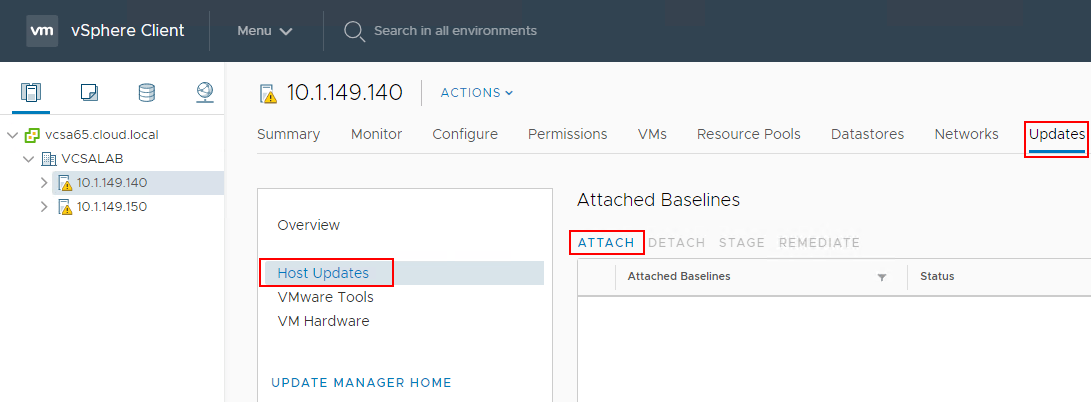
Now that the vSphere ESXi 6.7 Update 1 ISO image has been uploaded and the new upgrade baseline for ESXi 6.7 Update 1 has been created, you can attach the baseline to the ESXi host that is to be remediated. To do this, select the host click Updates >> Host Updates >> Attach to select the newly created baseline.
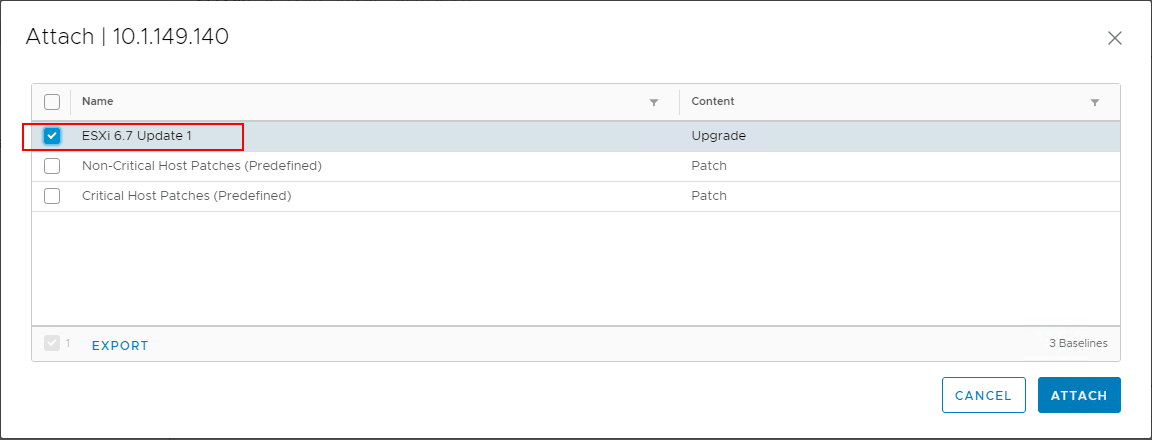
On the Attach screen, select the newly created baseline that contains the Upgrade action to ESXi 6.7 Update 1.
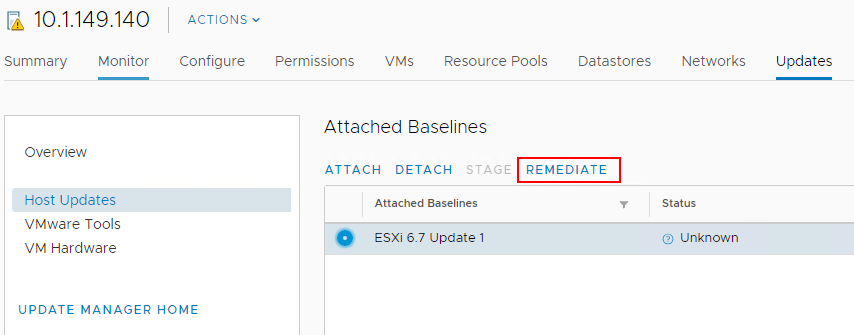
Next, choose the Remediate button under Updates >> Host Updates. This will allow the host to be scanned and remediated based on the attached baselines.
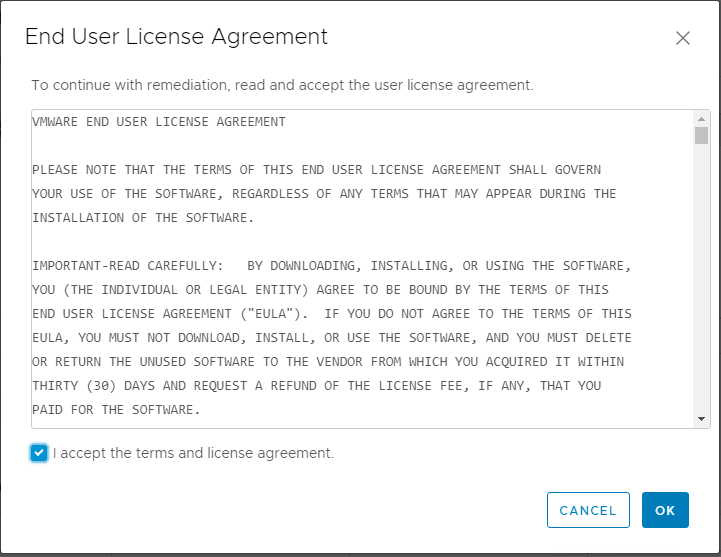
Once Remediate is clicked, the EULA for ESXi 6.7 Update 1 is displayed. Place a check in the box to accept the EULA and click OK.
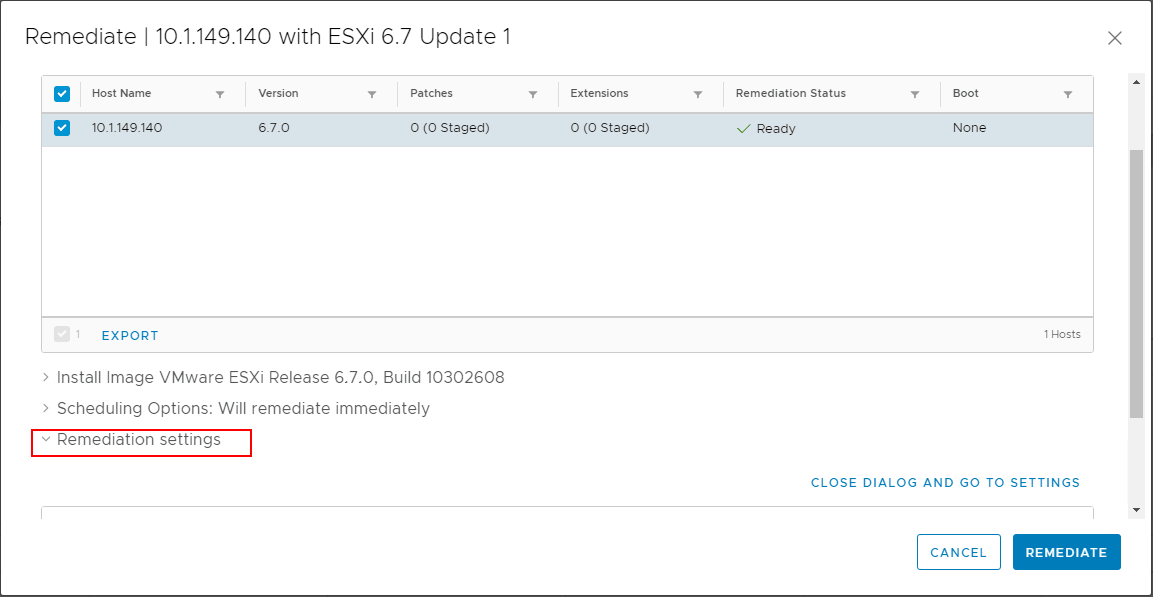
The Remediate screen is displayed for the host. The host will automatically be checked for remediating. At this point, you can simply click the Remediate button to begin the upgrade process or customize the remediate action further.
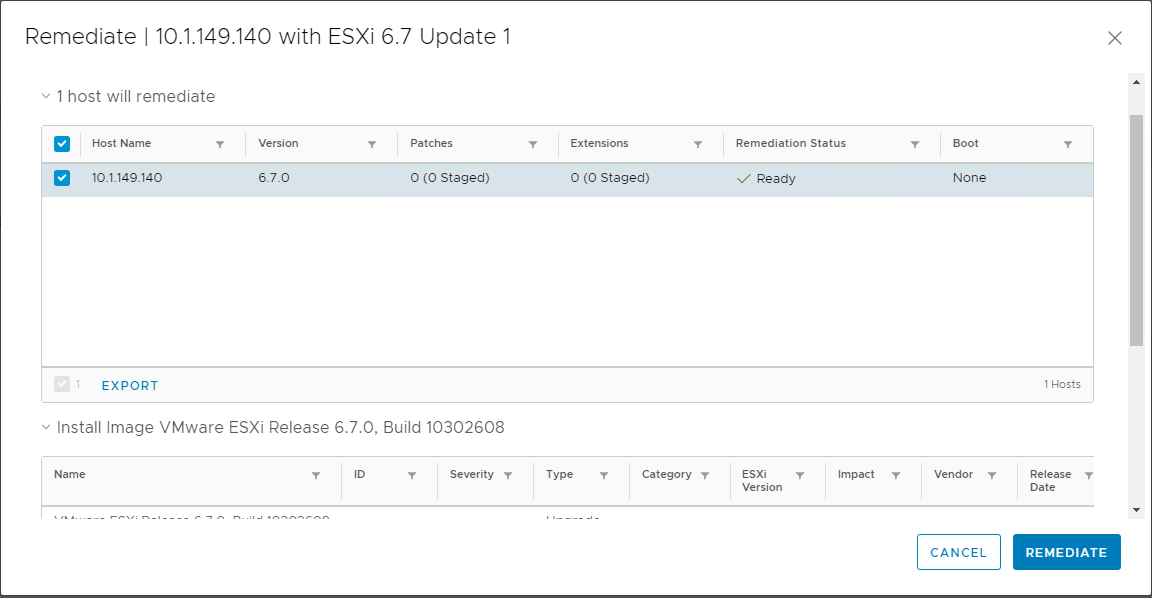
You can expand the various options on the bottom of the Remediate screen such as Scheduling Options and Remediation Settings. These allow configuring the scheduling of the upgrade as well as other remediation settings on the host itself.
After clicking the Remediate button, you will see the Remediate entity action kick off in the Recent Tasks pane in vCenter Server.
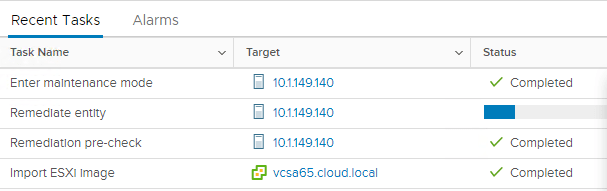
The upgrade process will automatically reboot the host in question. After the host reboots, you can take the host out of maintenance mode and verify the Hypervisor version under the Summary tab. The version should reflect VMware ESXi, 6.7.0, 10302608. This is the build version for ESXi 6.7 Update 1.
Imagine the scenario and use case of how this type of security protects your virtualized environment and perhaps, very sensitive data. If an unscrupulous system administrator or someone who has potential access to the VMware vSphere storage copied the virtual machine disk files to a removable device, they could take the disk to another VMware vSphere environment, import the virtual machine disk files into the new environment, power up the virtual machine, and have access to all the data stored on the virtual machine disk file that was copied from the source environment.
Another scenario might involve a domain controller. What if an employee or someone who gained access to VMware vSphere storage was able to copy a domain controller virtual machine to removable storage. They could then perform the same task as above and import the virtual machine into a new VMware vSphere environment, perhaps at home. Then they could run Active Directory password utilities relentlessly against the environment, completely outside the scanning, alerting, and other security mechanisms that might be running on-premises. Passwords can potentially be gathered from the “offline” Active Directory environment and provide an extremely dangerous security situation if this goes undiscovered. The employee could have access to domain admin credentials and potentially impersonate other users, compromising data, stealing data, and even other outcomes.
The above scenarios are only a couple of examples of how unencrypted data can be compromised. Virtual machine disks that are not encrypted are fully readable with no special effort on the part of the attacker outside of having access to the data. Once virtual machine encryption is introduced into the environment, it becomes exponentially more difficult to compromise data, even if you have access to the virtual machine storage.
- Provision a supported Key Management Server cluster to issue encryption keys
- Establish trust between VMware vCenter Server and the Key Management Server cluster
- Change the storage policy to VM Encryption for virtual disks
The process to do this is straightforward and can easily be accomplished via the new fully-featured HTML 5 vSphere client in vSphere 6.7 Update 1. The first requirement as listed is to provision a Key Management Server cluster. Most will probably provision a virtual solution running by way of a virtual appliance either in a production or management cluster. The Key Management Server cluster or KMS cluster will most likely be made up of multiple nodes for resiliency and in accord with best practice.
The Key Management Server solution must support the Key Management Interoperability Protocol (KMIP) 1.1 standard to be used as a KMS solution in VMware vSphere. You can find out more about which solutions are supported in the VMware Compatibility Guide.
In the below walkthrough, we will add a supported KMS cluster server solution to the VMware vSphere environment for use with virtual machine encryption tasks.
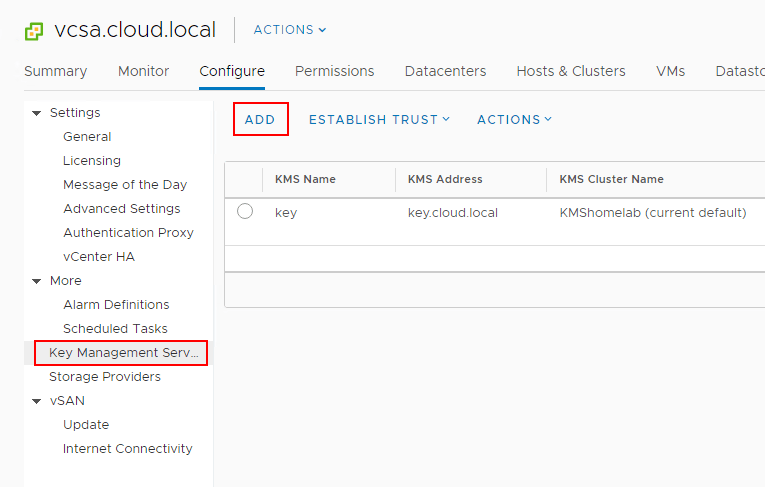
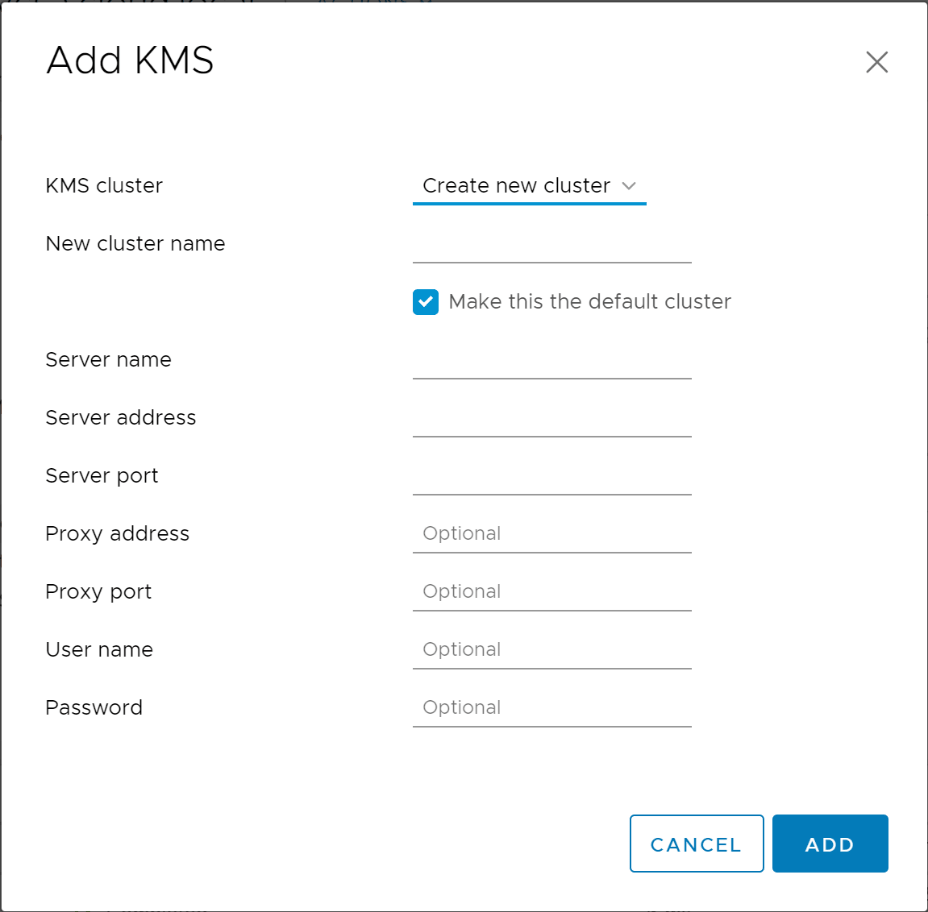
Navigate to the Configure menu of the vCenter Server inside of the vSphere client. Click Key Management Servers > Add.
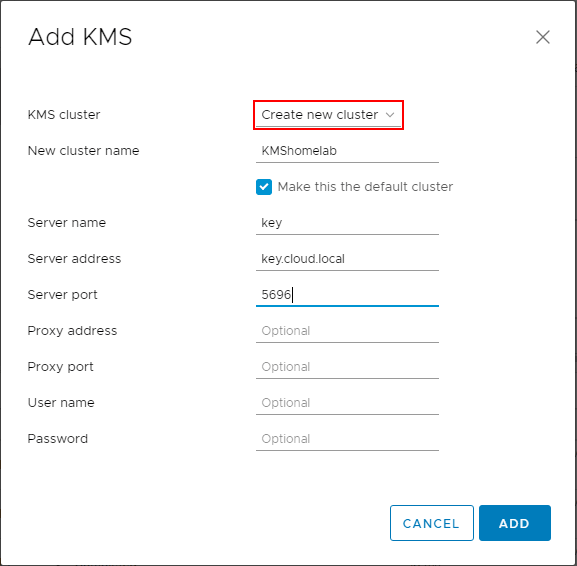
This will launch the Add KMS dialog box that will allow you to Create new cluster or point to an existing cluster. Below we are creating a new KMS cluster inside of the vCenter Server configuration. The process gathers the necessary configuration information including:
- KMS Cluster configuration (create new or point to existing)
- New cluster name with the choice to make the KMS cluster the default configuration
- Server name – This is the friendly name in vCenter Server
- Server address – The IP or FQDN of the KMS cluster
- Server port – port the KMS server is listening on
- Proxy address – (optional)
- Proxy port – (optional)
- User name – (optional)
- Password – (optional)
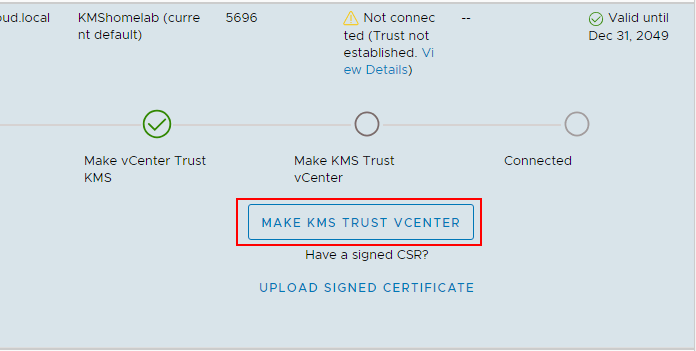
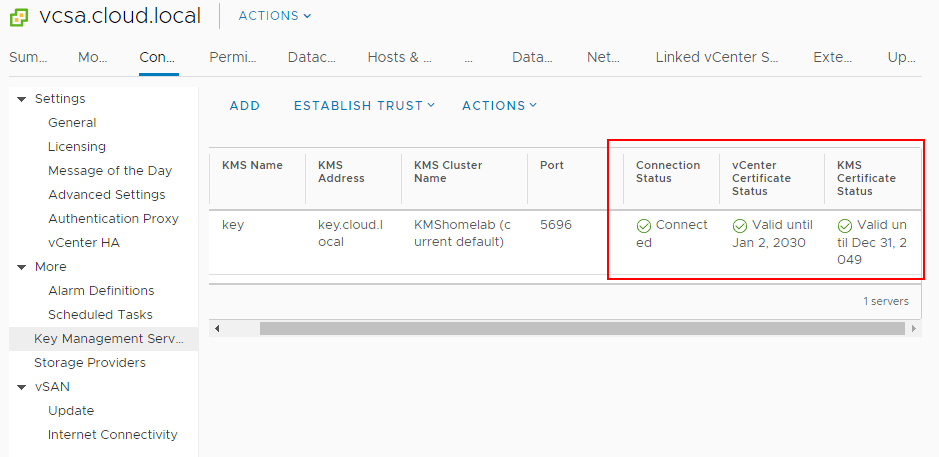
You will see the Make vCenter Trust KMS dialog box open after establishing the connection to the KMS server cluster. Even though you click Trust in this step, there are further steps required for establishing trust in vCenter.

Notice the connection status shows Not connected (Trust not established View Details).
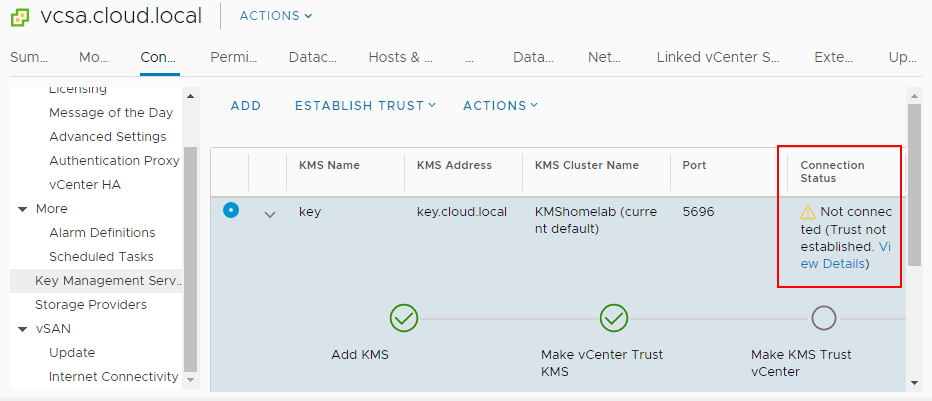
If you click to View Details you will see the MAKE KMS TRUST VCENTER button. Click this button to open the further configuration for trusting the KMS server.
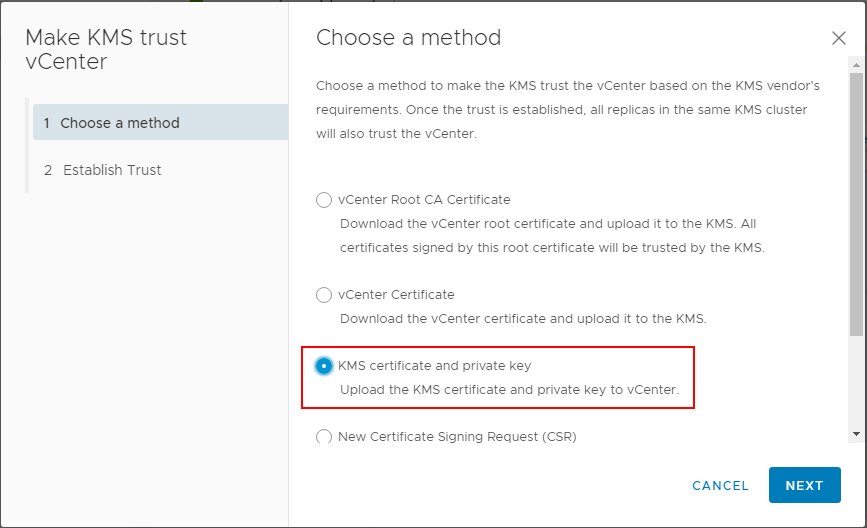
This will launch a wizard to Make KMS trust vCenter with a few options. Since in the lab, I have a certificate downloaded from the KMS server and a private key, I will be uploading these to vCenter for establishing trust.
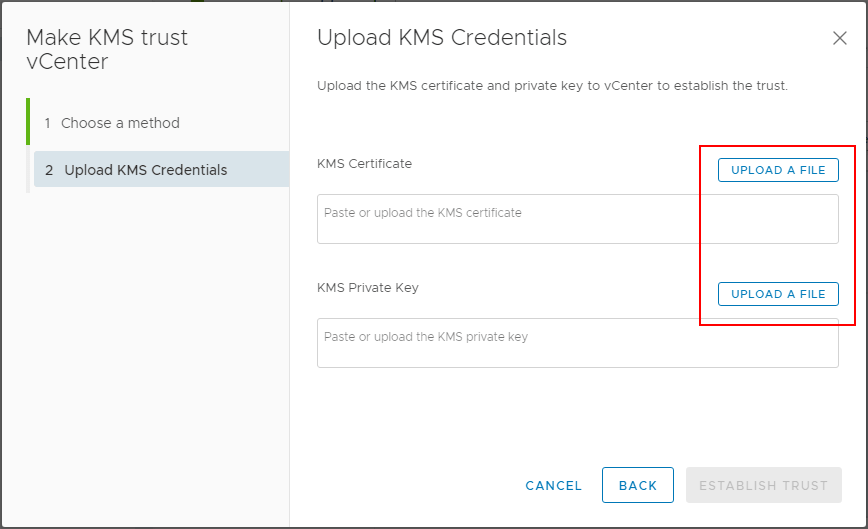
In the Upload KMS Credentials, you will see the Upload a file button for both the KMS Certificate and the KMS Private Key.
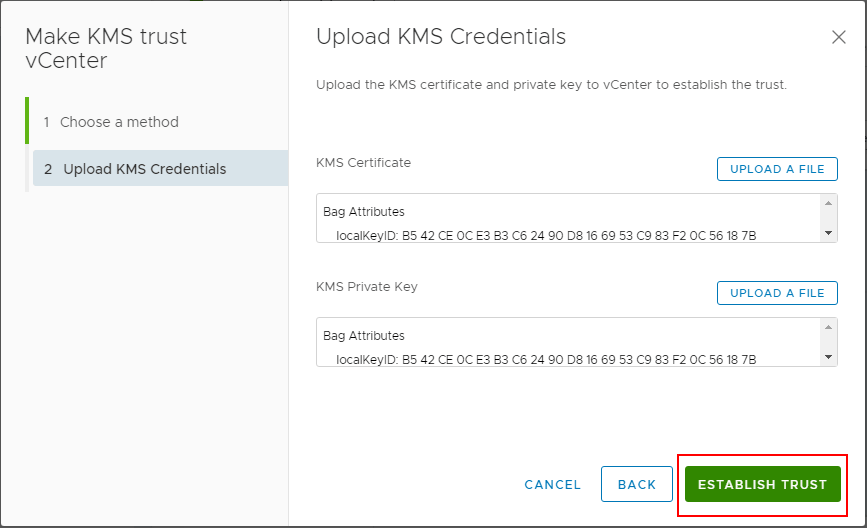
After uploading the certificate and private key, click the Establish Trust button.
Now, after establishing trust, you will see the connection status, vCenter Certificate Status, and KMS Certificate Status all showing with a green checkmark. Trust has been established.
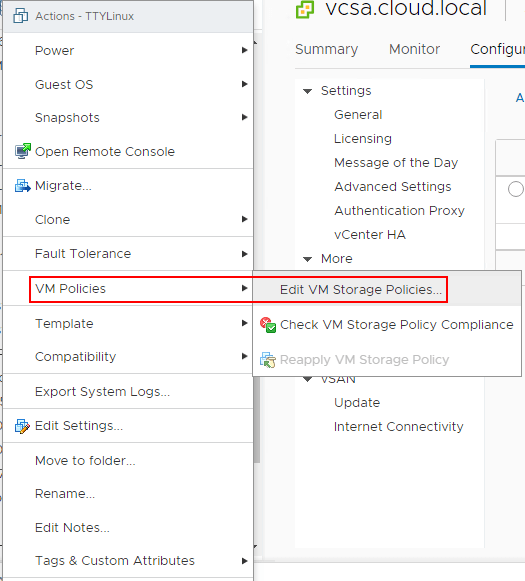
Now that the KMS cluster is in place, we can start encrypting virtual machine disks with the new functionality enabled by the KMS server. To encrypt virtual machine disks, right-click on a virtual machine in the vSphere client inventory, and choose VM Policies > Edit VM Storage Policies.
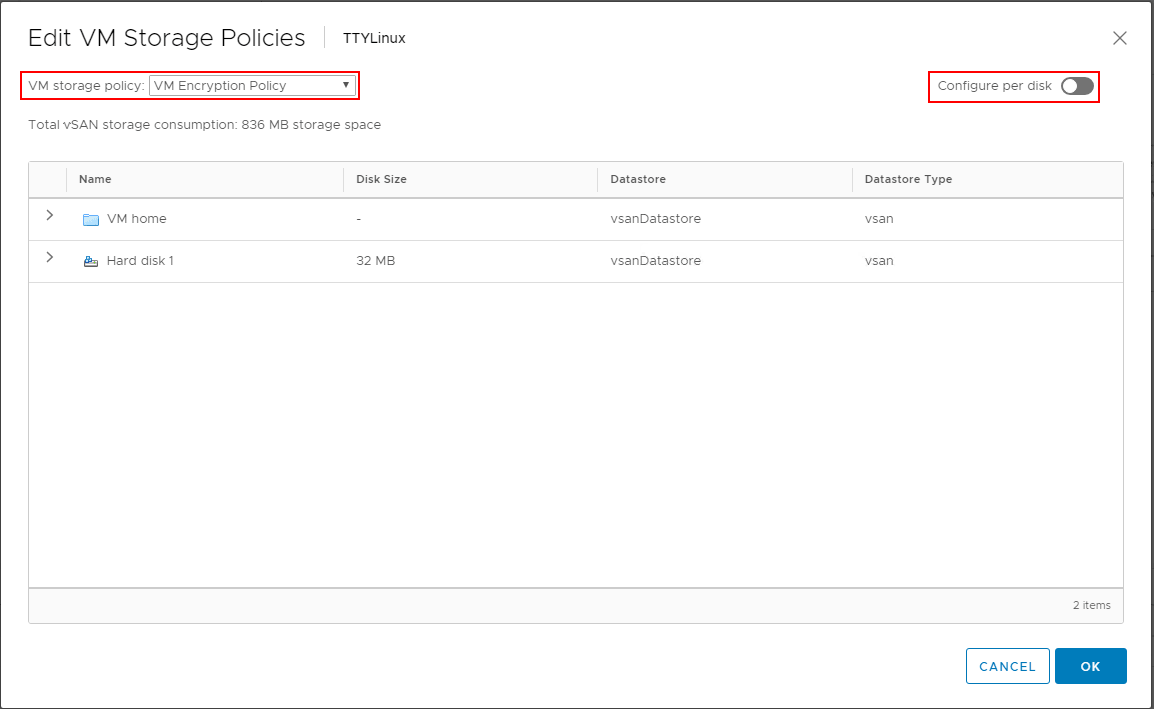
In the Edit VM Storage Policies dialog box, choose the VM Encryption Policy to enable encryption on the virtual machine disk(s). Note how you can granularly assign storage policies, including encryption on a per disk basis.
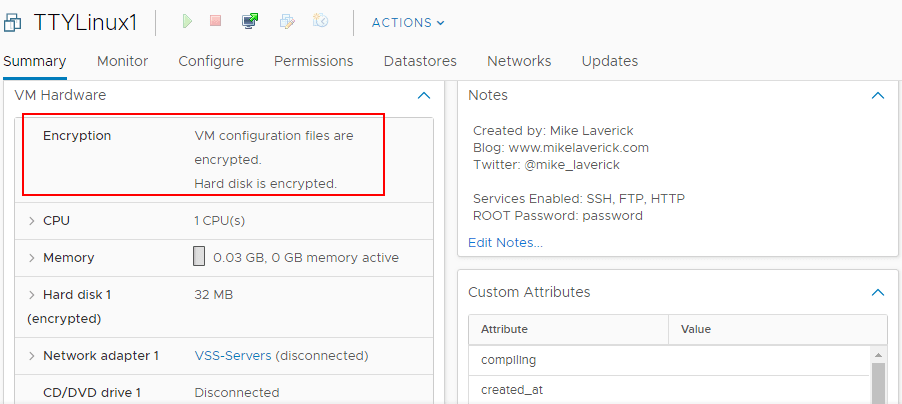
After assigning the VM encryption policy, you will see the Encryption section under the virtual machine properties populated with the status of VM configuration files are encrypted. Hard disk is encrypted.
Microsoft implements this feature in a rather ingenious way by utilizing the Hyper-V hypervisor to host the operating system to create this virtual secure mode which allows enforcing restrictions and protecting system and other operating system resources. Additionally, it is able to protect security information such as authenticated user credentials. When thinking about a system being compromised by malware or other malicious code, when virtualization-based security is being used, the damage that can be inflicted and information that can be stolen by the malware infecting the system can be greatly limited. Even if the malware has control of the OS kernel the underlying Hyper-V hypervisor can protect the sensitive areas of the system from being accessed by the malware.
VBS enables the following security mechanisms to harden your system and isolate key system resources from being compromised:
- Credential Guard – With Credential Guard, VBS can isolate and harden key system and user secrets against compromise
- Device Guard – Helps to prevent malware from being able to run on Windows operating systems
- Configurable Code Integrity
- One mechanism that can be enabled with virtualization-based security is Hypervisor-Enforced Code Integrity (HVCI). Many of the effective security mechanisms that help to filter malicious code allow for enforcing code integrity checks. HVCI uses VBS to check all kernel-mode drivers and binaries before they are started and can prevent unsigned drivers or system files from loading into system memory. Similarly, there is a user-mode variant that enforces checks of applications before they are loaded and will only start those applications that are signed by known, approved signers
- The Hyper-V hypervisor plays the mediator between applications and memory pages and the permissions that applications have to write across system memory. With these mechanisms in place, malware cannot modify memory and code pages cannot be modified or made executable
The requirements for implementing Virtualization-based security are the following:
- 64-bit CPU
- Second Level Address Translation or SLAT
- Intel VT-D or AMD-Vi, ARM64 SMMUs
- TPM 2.0
- Firmware support for SMM protection
- UEFI Memory Reporting
- Secure Memory Overwrite Request
- Hypervisor Code Integrity or HVCI compatible drivers
- VBS Hardware – You need the following Intel hardware for VBS
- Haswell CPU or later
- Not all VBS functionality is available on AMD CPUs
- Windows Guest OS Compatibility – The following operating systems are supported in the context of VBS running inside of vSphere 6.7:
- Windows 10 and Server 2016
- Unsupported VMware Features with Virtual Machines that have VBS enabled
- Fault tolerance
- PCI passthrough
- Hot add of CPU or memory
- Installation and Upgrade considerations:
- If Virtual machine versions less than VM version 14 are used with Windows 10 and Windows Server 2016, you must reinstall the operating system if you change to UEFI from BIOS
- If migrating virtual machines from previous vSphere releases to vSphere 6.7 and higher and plan on enabling VBS in the future, use UEFI to avoid an OS reinstall after the upgrade
Enable Virtualization-Based Security on the VMware vSphere virtual machine:
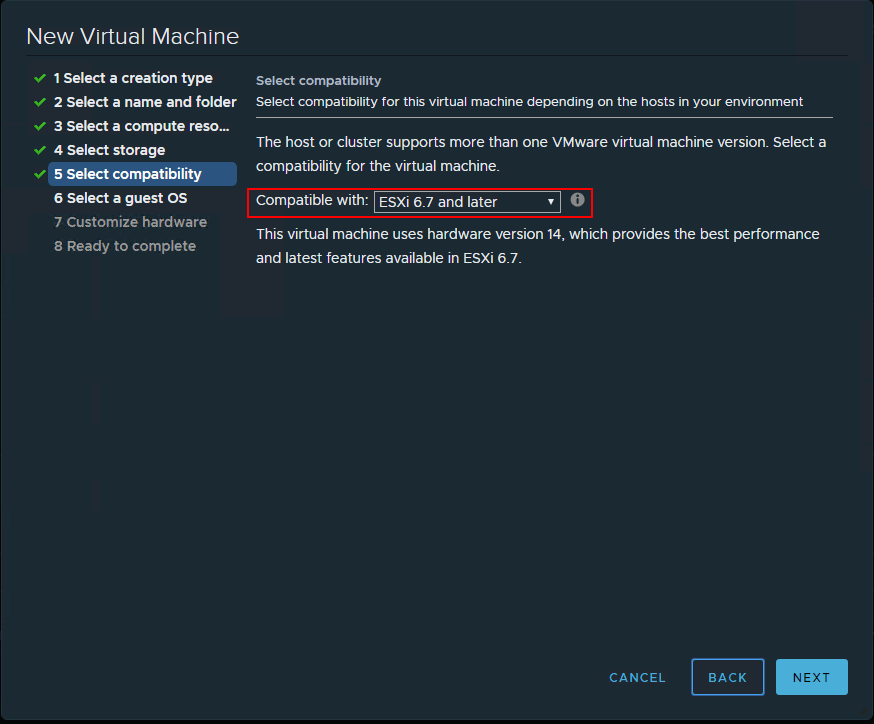
When you create a new virtual machine, the step, Select Compatibility needs to be configured for ESXi 6.7 and later to be able to configure the virtualization-based security mechanism.
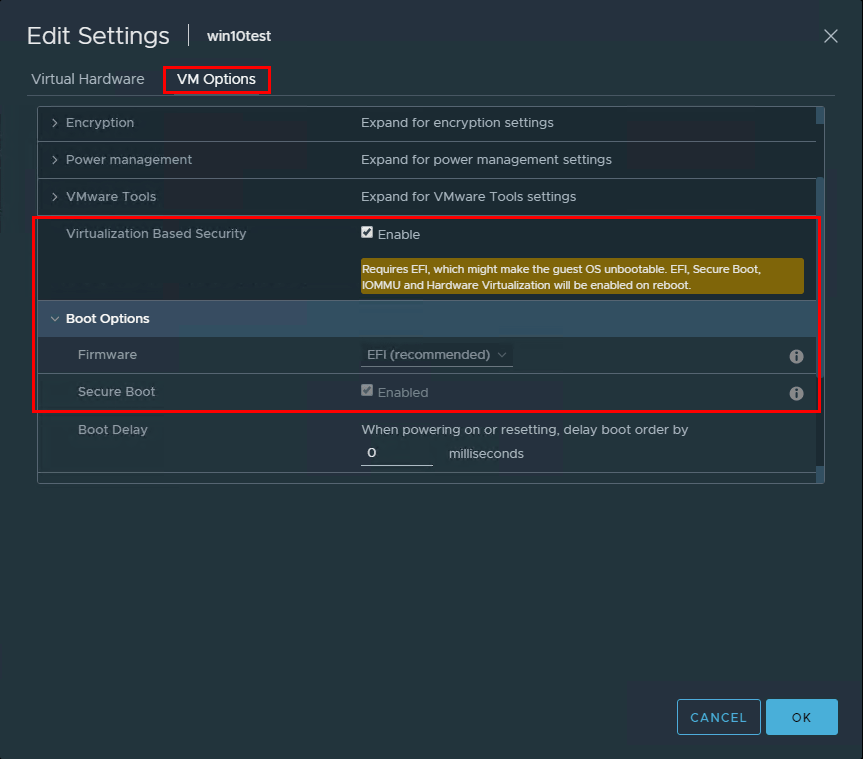
Once you have created a new virtual machine, go into the properties of the virtual machine and click the VM Options tab. Look for the Virtualization Based Security section. Place a checkbox in the Enable field. Also, make sure the Secure Boot is enabled and UEFI.
Now, it is simply a matter of installing the Hyper-V feature and configuring VBS.

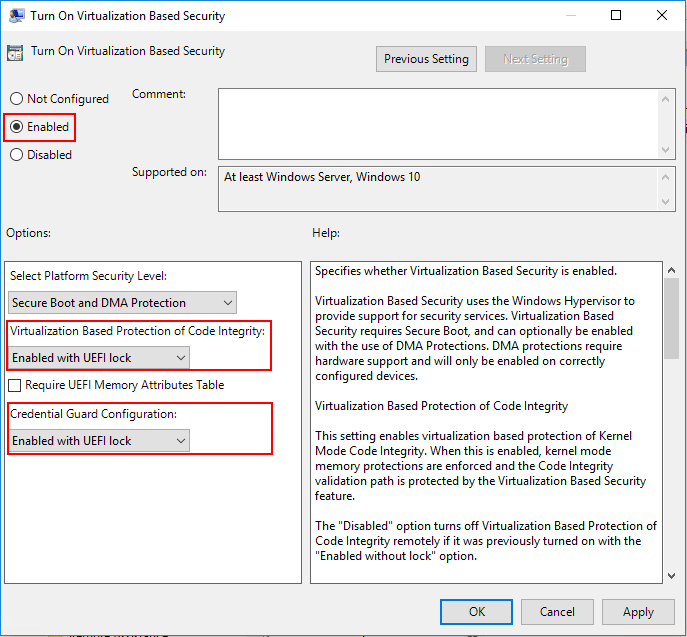
Navigate to Computer Configuration >> Administrative Templates >> System > Device Guard >> Turn On Virtualization Based Security
This technology is implemented in VMware vSphere 6.7 and can be added to a new virtual machine and even retro added to an existing virtual machine. When you add the vTPM device to a virtual machine, the VM files are encrypted as this is where the ultra-secure TPM data is housed. The disks are not encrypted as part of this process. However, disk encryption can be added at the same time or later. It is important to note, there is no special storage policy that is associated with the vTPM virtual hardware or that is implemented when this is added to a VM.
Many have had experience with some type of encryption used in conjunction with a VM in the past. This can certainly affect backups and the ability to create and restore backups. Can you backup a VM that has the vTPM module added, where the VM home files have been encrypted, as they are by default? Yes, you can. A couple of important considerations need to be made when thinking about the vTPM module and data protection. It is critical to backup all of the VM files including the *.nvram file as this contains the encryption keys used in conjunction with vTPM. Also, make sure to have the encryption key convenient when you perform a restore operation on a vTPM enabled virtual machine.
One might think that you would need a physical TPM attached to the virtual host for allowing the capability to add the vTPM. This is not the case. In fact, you can add the vTPM to a virtual machine running on a host that does not have a valid TPM module installed.
The VMware encryption process for virtual machines is enabled by the use of a Key Management Server cluster. The KMS cluster is added into vSphere and then the trust with the KMS cluster is verified to allow the provisioning of encryption keys. To be able to be used, the KMS cluster needs to be able to support the Key Management Interoperability Protocol (KMIP) 1.1.
Virtual machine requirements:
- EFI firmware
- Hardware version 14
Component requirements:
- vCenter Server 6.7 or 6.7 Update 1
- Virtual machine encryption (to encrypt the virtual machine home files)
- Key Management Server (KMS) configured for vCenter Server (virtual machine encryption depends on KMS)
Guest OS support:
- Windows Server 2019 (64 bit)
- Windows Server 2016 (64 bit)
- Windows 10 (64 bit)
On the Customize Hardware step of creating a new virtual machine process:
- Click Add New Hardware and select Trusted Platform Module
The process is similar to an existing virtual machine. You will simply need to Add New Hardware and add the Trusted Platform Module. Remember however that the firmware will need to be EFI firmware which if not already configured this way will require a reload of the operating system.
The VMware vSphere ESXi hypervisor includes extremely secure virtual networking capabilities that allow very secure network communication when configured correctly. Also, it allows for granular controls of each element of the virtual networking layer of the components listed above.
Aside from the secure nature of the VMware vSphere ESXi hypervisor and the virtual networking layer constructs that enable secure virtual network communication, there are other best practices that allow for securing the virtual networking layer. Let’s take a look at these best practices and how they can be implemented.
- Isolating network traffic
- Use firewalls to secure virtual network elements
- Consider network security policies
- Secure VM networking
- Use VLANs to protect virtual networks
- Secure network communication with virtual storage
- Use IPSec when possible
We will look at each of the above security mechanisms a bit closer to see how they can help with securing VMware vSphere virtual networking for production workloads.
- General Virtual Machine Protection
- Deploying VMs using Templates
- Securing the VM Console in vSphere
- Limiting VM resource usage
- Disabling unnecessary VM functions
- Use Virtualization-Based Security and vTPM 2.0
Let’s examine each of these in a bit more depth to understand how they allow for better security at the virtual machine level.
- Guest operating system patching – The guest operating system running inside a virtual machine, like a physical server, needs to be patched regularly with Windows or Linux guest operating system patches. Applying operating system patches is one of the best protections against many exploits which tend to compromise known vulnerabilities that these patches resolve. Keeping pates up to data ensures the best security within the guest VM from an operating system perspective.
- Antimalware Software – VMs like physical nodes typically need to have some type of antimalware software in place to ensure scanning and remediation of any malware that may be found on the guest operating system. Ensuring the antimalware software is up-to-date and scanning properly is also a priority when thinking about security.
- Controlling Serial port access – Serial ports allow for connecting physical devices to virtual machines and can be connected via passing these devices through from the host to the VM. Serial port connecting can allow low-level access to a VM which may be concerning from a security standpoint. Limiting VMs that have serial port access and those to have access to connect these devices to VMs certainly is a best practice from a security standpoint.
- Use remote management software to access guest operating systems running inside a virtual machine. These may include Microsoft Remote Desktop for Windows virtual machines or SSH for virtual machines running Linux
- Grant VM Console access only when necessary and limit the access of the VM Console to only 1 connection per the security configuration best practice recommendation
Procedure to limit the number of VM Console connections:
- Find the virtual machine in the vSphere Web Client inventory
- To find a virtual machine, select a datacenter, folder, cluster, resource pool, or host
- Click the Related Objects tab and click Virtual Machines
- Right-click the virtual machine and click Edit Settings
- Select VM Options
- Click Advanced and click Edit Configuration
- Add or edit the parameter RemoteDisplay.maxConnections and set the value to 1
- Click OK
To circumvent this as a possibility, Shares and resource pools can be used to prevent a denial of service attack that could allow one virtual machine to consume all available resources. To do this:
- Right-size virtual machines with only the needed resources in the vSphere environment
- Use shares to guarantee resources to critical VMs
- Group virtual machines with similar resources requirements into resource pools
- Within each resource pool, leave the shares set to the default value to ensure each VM has the same resource priority
- This will ensure that a single VM will not be able to monopolize resource usage on the vSphere ESXi host
- Unused services – Common services such as file services or web services should not be running inside a VM unless they are needed
- Unused physical devices – Attached CD/DVD drives, floppy drives, USB, serial and other ports should be disconnected or removed unless they are being used/needed
- Unused functionality – VMware shared folders and copy/paste operations should be disabled unless needed
- Screensaver – Disable screensaver
- Do not run X Windows on top of Linux if not needed – This creates security vulnerabilities unless it is needed
By lessening the attack surface and eliminating unnecessary functions, the security posture of the virtual machine is greatly increased.
Virtual TPM is now possible with vSphere 6.7 VMs which allows greatly enhancing the security features of a guest VM. The vTPM functionality allows adding a virtualized TPM 2.0 compatible module to a VM running inside vSphere 6.7. The guest OS uses the vTPM module to store sensitive information, provide cryptographic operations and attest to the integrity of the VM platform.
