Full VM Recovery
Live Recovery to ESXi Server
If you want to permanently restore your VMs either to the same host or to a different virtual host, it can be done through the Full VM Recovery option. The VMs will be restored into the data store that is present in the storage repositories.
- Once the restore process begins, Vembu utilizes any one of the following VMware data transport modes depending upon the configurations you provide for restoring the VM data. The modes are as follows :
- HotAdd mode
- Direct SAN mode
- Network mode
- Vembu will restore your VMs through HotAdd mode if your BDR Backup Server is employed as a Virtual Machine in the ESXi host. Once the Full VM Recovery process begins, the VM data will be restored by attaching an empty disk either to BDR Backup Server or to your VMBackup Client. After the data transfer to the attached disk is completed, the disk will be reattached to the VMs that are restored.
- Vembu will restore your VM data through Direct SAN mode if your BDR Backup Server, ESXi host, and VM Datastore are deployed in a SAN Environment. Vembu will start the data transfer through SAN mode by utilizing FC SAN or iSCSI SAN for transferring the VM data.
- When you transfer data through LAN, Vembu uses NBD (Network Block Device) and NBDSSL(Secure NBD) as the transport mode for data transfer. The VM data will be transported to the ESXi host or vCenter server through a TCP/IP connection. The difference between NBD and NBDSSL mode is that the data transfer will be encrypted between the virtual host and the BDR Backup Server in NBDSSL mode.
Procedure
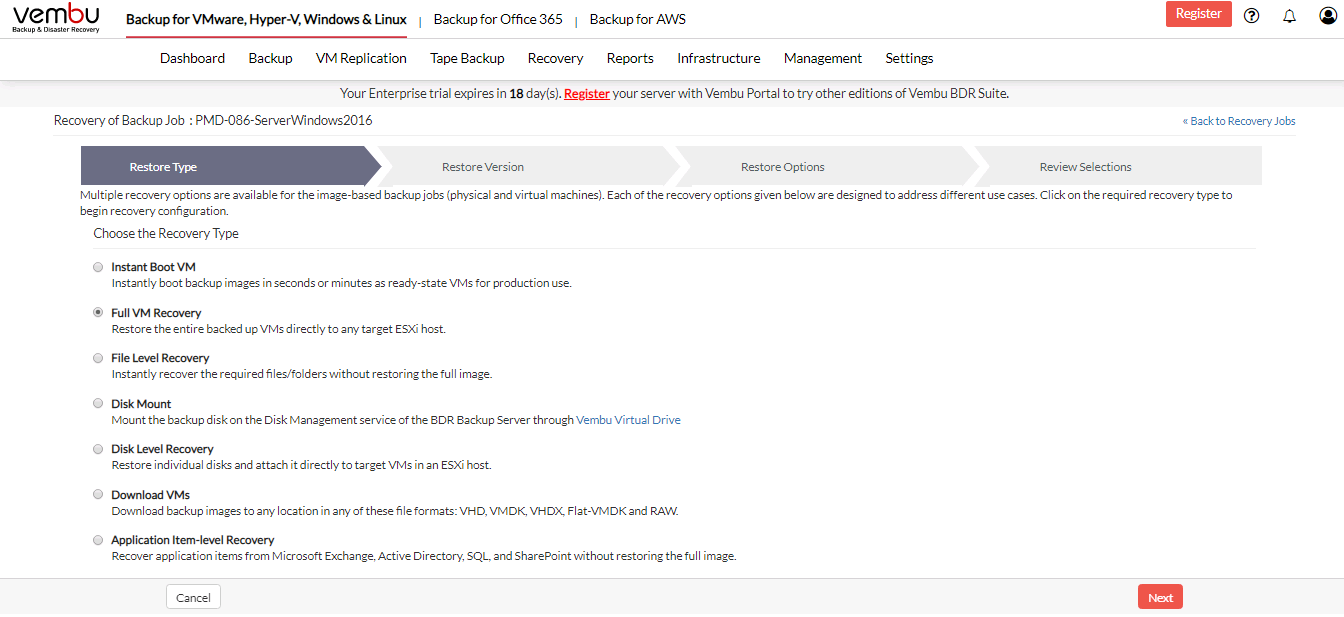
Step 1: Choose the Restore Type
- Click the Recovery tab and select the restore icon near the VMware backup that is to be restored. Select Full VM Recovery as the Restore type and click Next.
Step 2: Choose the Restore Version
- The next step will be to choose the restore version (time-stamp) of your backup data. The latest restore version will be at the top of the tree followed by the older restore versions. If the time-stamp consists of the Persistent data (+P) option and you restore that version, all the changes you have made in the VM will be restored. The restore version also consists of (d)- daily merge, (w)- weekly merge and (m)- monthly merge.
- The restore version is created based on the end time of the backup (i.e the date and time when the backup process scheduled is completed), this is named Recovery points. The full backup and incremental backup time-stamps are listed with the latest backup version as a parent node and old backup version further sub-nodes. You can fall back to the required time-stamp to recover the backed up data.
- Select the Include persistent boot changes in the restore option if you want to restore your backup data along with the changes made.
The 'Include persistent boot changes in restore' option will be available only if you are restoring the time-stamp with (+P) |

- Select the restore version and proceed to select restore data.
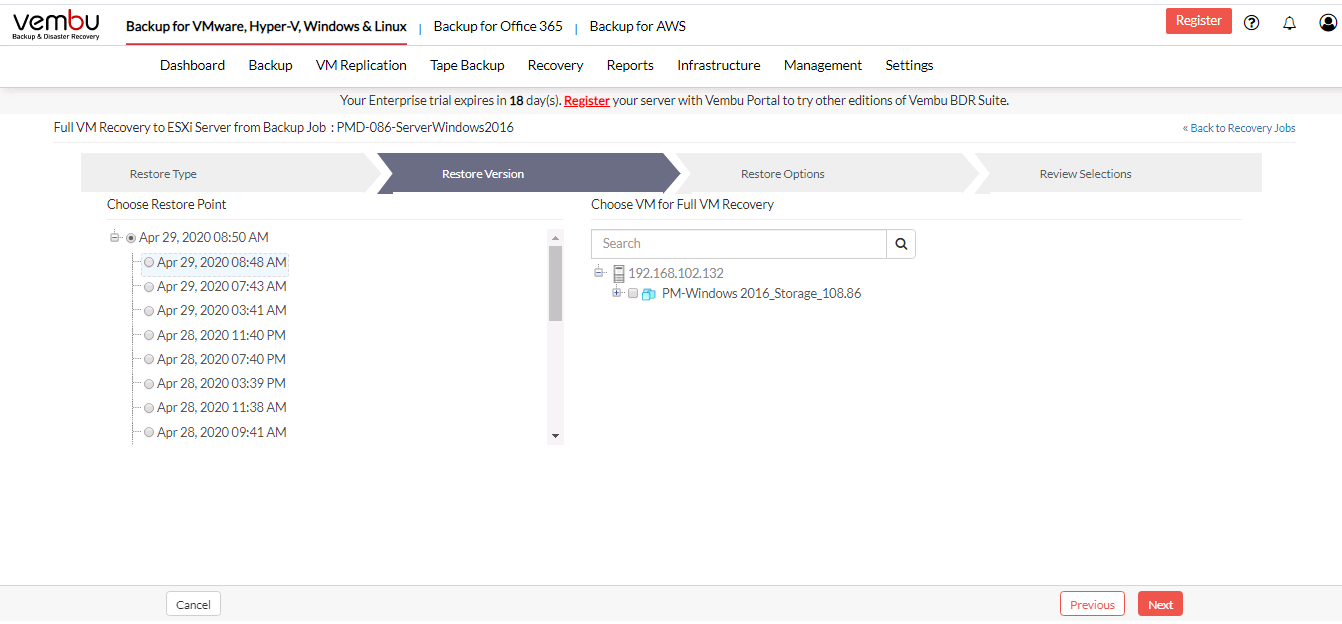
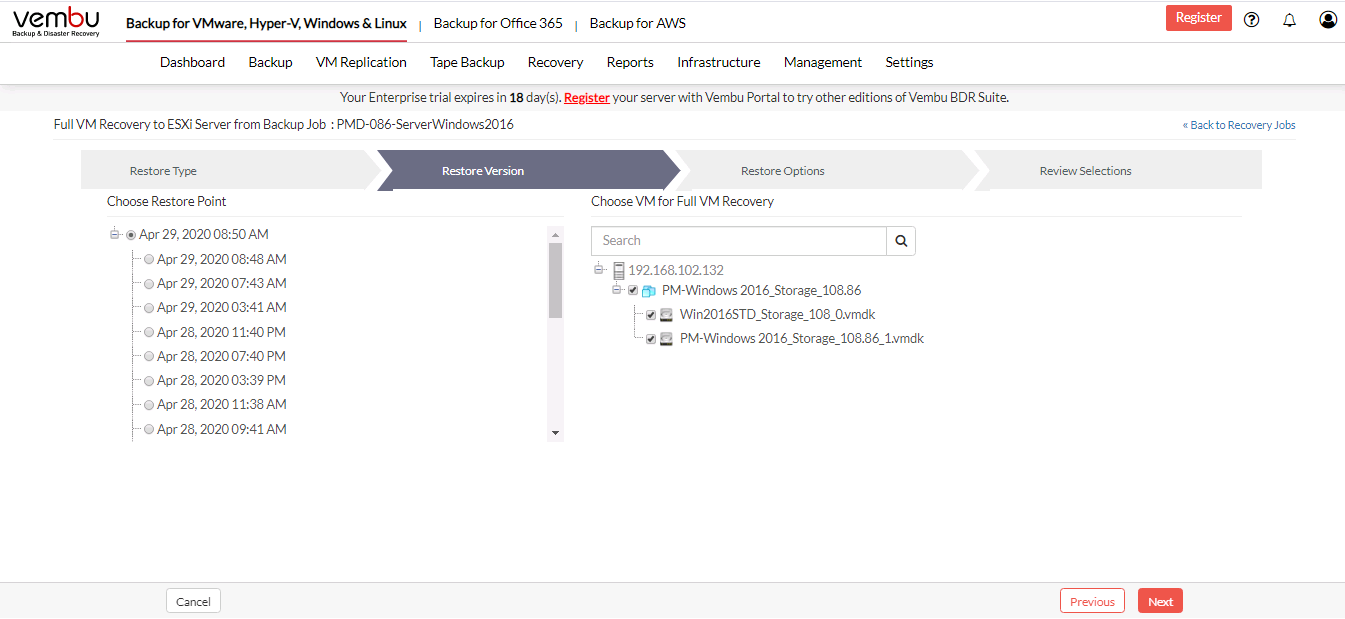
Step 3: Choose the Restore Data
- Once you are done selecting the restore version, the next step is to select the Restore data. You can select the entire VM or select individual disks under that VM for the restore process.
- You can search for a particular VM from the search tab. Click Next to proceed to configure restore options.
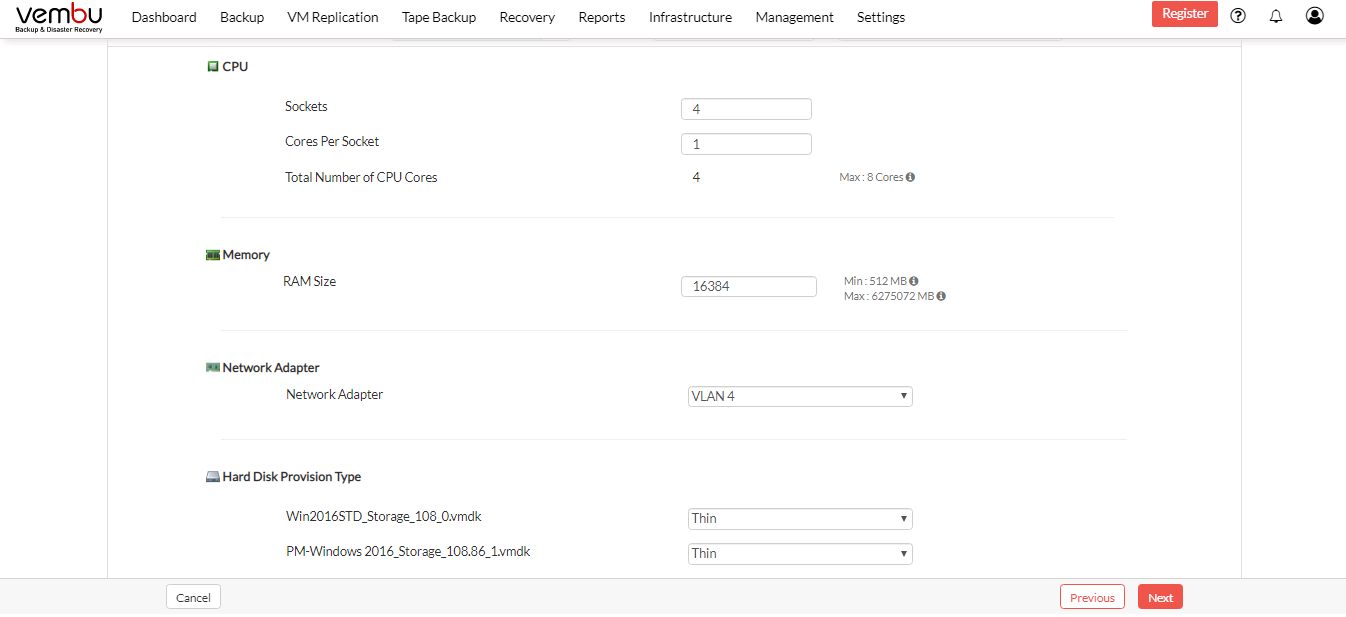
Step 4: Configure Restore Options
While configuring the Full VM Recovery, you can customize the options for your hardware configurations for the target VM. You can customize the configurations details for the target VM such as:
- Changing the memory
- No. of CPUs
- No of Cores Per Socket
- Virtual Machine Disk provision types
- Network
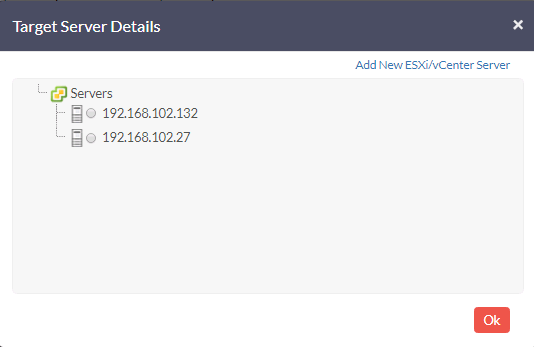
- If you have backed up more than one VM, then while restoring you can select a single server to which the VM will be restored. Click the Select Target Server option and select the server to which the VMs will be restored or if you want to restore your VMs to individual servers, click the Select Target Server option in the Host Name section.
- Select the required server from the Servers drop-down list or add a new server using the Add VMware Server option. Provide the Hostname/IP Address of the server and select a credential from the Select Credentials drop-down list.
- Read here on adding new credentials - Credential
- If you have added a vCenter Server select the following:
- Select the ESXi host
- Select the Target Datastore
- Enter the Target VM Name
- If you have added an ESXi host, enter the following details:
- Select Target Datastore
- Enter Target VM Name
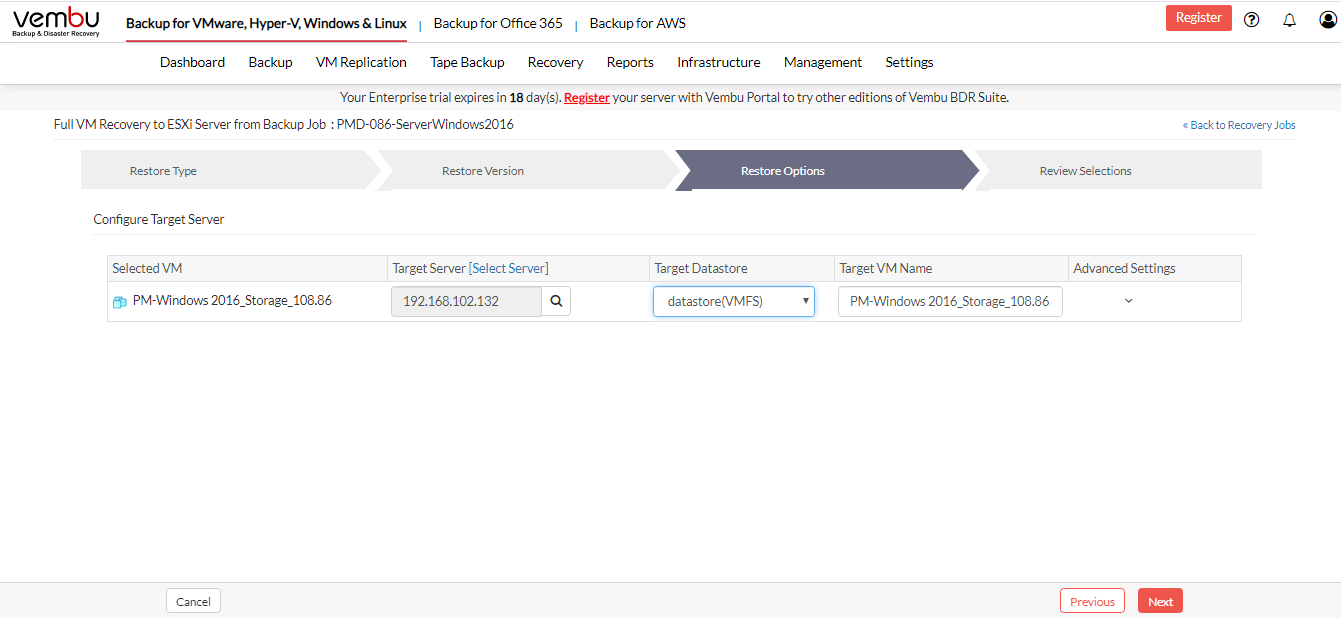
- Click the More option near the target VM name and configure the settings. Auto-filled values will be taken from source VM configurations.
- While restoring, you can choose different disk types. The disks that have been backed up will be listed, choose the respective disks that are required disk type. The types are:
- Thin
- Thick [Eager Zeroed]
- Thick [Lazy Zeroed]
- You can customize your CPU and memory settings. The maximum and minimum values are based on the target ESXi server’s configuration. You cannot provide a value that exceeds the maximum supported value. For example, ESXi server Version 4.0 supports max CPU Sockets up to 8 while ESXi server version 6.5 supports up to 128. Make sure you provide the value within the maximum and minimum value range displayed, else the message “Provided value for memory is not in the specified range” will pop-up, similar for CPU settings.
- Check whether you have selected the same configurations that are applicable in the target server also, else the message "VM(s) selected for restore is incompatible with the selected target server. Please select different target server" will appear. Refer this link - https://kb.vmware.com/s/article/2051652
If you enter the same VM name, the message name “VM with same name already exists in selected host. Please enter different VM name” will pop-up |
- Click Next to review your configurations
Only [a-z][A-Z][0-9][ - _ ] characters are allowed in the VM name to be created |
Step 5: Review Configurations
- The final step in this restore process is to review the configurations you have selected.
- Check the following:
- Restore type
- Restore version
- VM machine selected for restore
- Target Server IP Address
- Target Datastore
- Target VM Name
- Verify all the details and click Restore Now. This will trigger the Full VM Recovery process.

- You will be redirected to the recovery page. From the Status tab click the arrow mark which will open the restore progress window.
- The following details will be available in the restore progress page:
- Backup Schedule
- User Name
- Current File
- Total Files
- Transfer Rate
- Files Restored
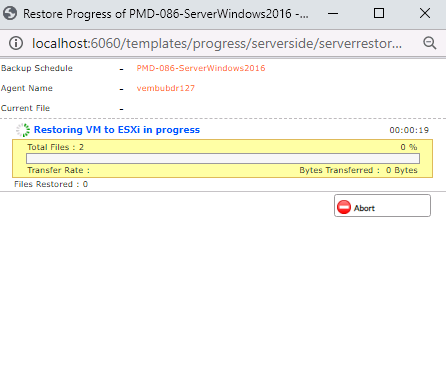
To enhance the restore performance, close the restore progress window and open it occasionally to check the restore progress |
- You have the option of aborting the restore process. From the Recovery page click the Abort Server Side Restore option, this will open a pop-up window. Click Yes to abort the restore.
- Or open the restore progress window and click the Abort (-) option which will open a pop-up window. Click OK to abort the restore process.