Windows
BDR Backup Server - Windows
Prerequisites
Refer system requirements for BDR Backup Server here - BDR Backup Server
Installation steps
Click here to download the latest version of the Vembu BDR Backup Server.
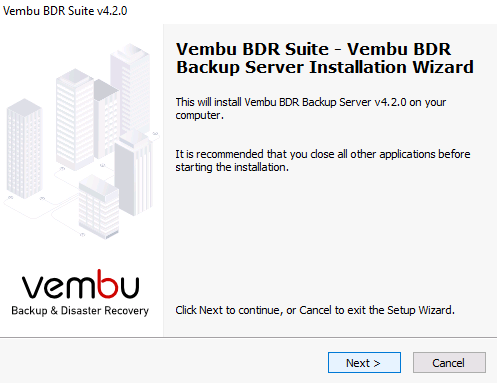
Step 1: Getting started with the installation
Open the folder where you have downloaded the Vembu BDR Backup Server setup and run the installer with administrator privileges. It will open the welcome page of the setup wizard, you can begin the installation process by clicking Next.
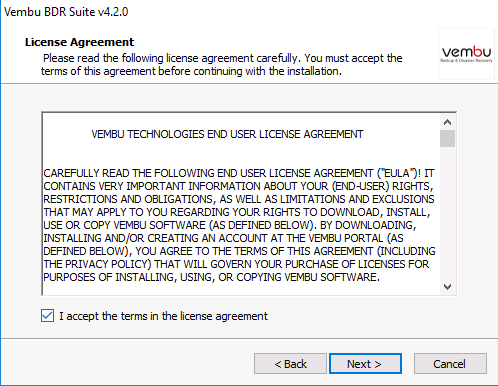
Step 2: License Agreement
'End User License Agreement' is the next step in the installation process. Please read the license agreement carefully as it contains important information about your Rights, Restrictions, Obligations, Limitations, and Exclusions. You must accept the terms in the agreement before continuing with the installation. Select “I accept the terms in the license agreement” and click Next.
Step 3: Installation Directory Customization
The next step in the installation is to specify the folder to install the Vembu BDR Backup Server. The installation folder consists of the necessary files to run the application. Make sure you have at least 1.2 GB of free disk space in the installation location.
|
The default installation folder is C:\Program Files\Vembu\VembuBDR |

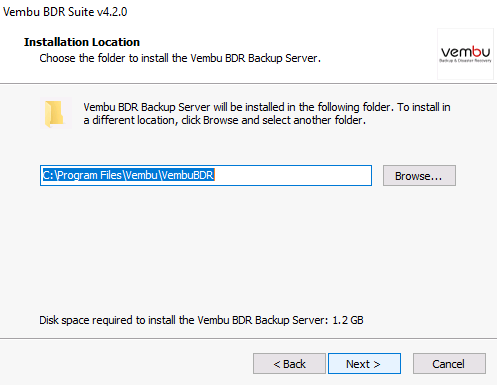
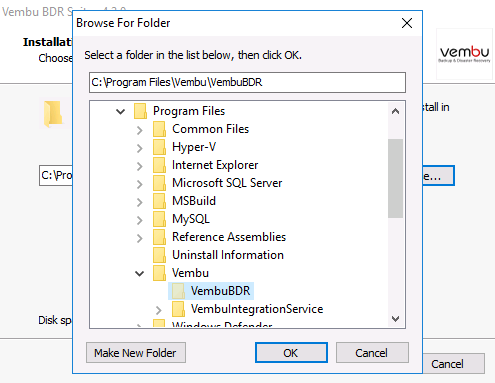
You can leave it to default or click Browse to choose a different folder. You can also create a new folder by clicking on the Make New Folder option and provide a name for the folder. Click Ok to complete the folder creation and click Next to continue with the installation.
|
Make sure you have 1.2 GB of free space for installing BDR Backup Server. |
Step 4: Database Storage Location
Vembu BDR Backup Server is using PostgreSQL as the backup database. You need to select the drive to store the database files. By default, it chooses a drive that contains maximum space. However, you can select any one of the available drives as per your requirement.
The database will grow as the backup data grows, so make sure to choose a drive that has a free space of at least 3% of the total size of the backup data. It is not recommended to choose OS drive as the database storage location
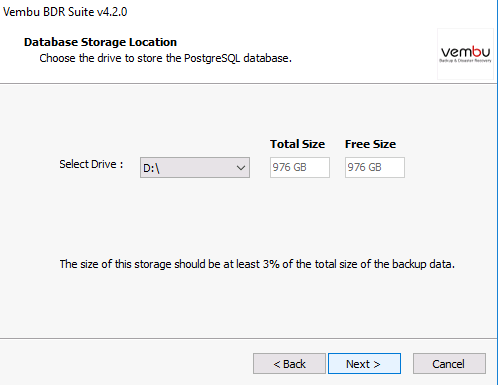
After selecting the database storage location, click Next to proceed with the installation process.
Step 5: Backup Server Settings
You can continue the installation with the default settings or you can customize the settings based on your requirement.
The default settings will be displayed on your installation wizard. If there is no change in the displayed settings, Click Install to begin the installation with default settings.
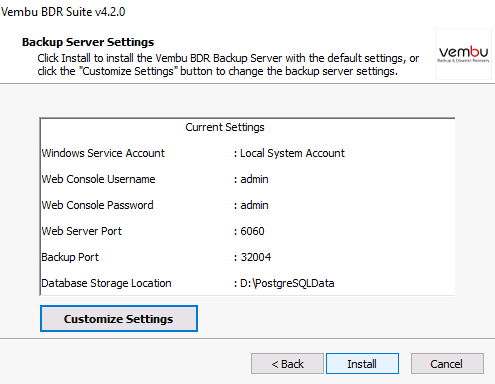
If you want to change any of the default backup server settings, click on the Customize Settings button to modify the default settings.
You can modify the followings backup server settings
- Windows Service Account - Local system or specific user account
- Backup Server web console Login Configuration - Username and password to login to the web console of Vembu BDR Backup Server
- Backup Server Port Configuration - Backup port, Web Server port, Secure Web Server port, Internal Service Port
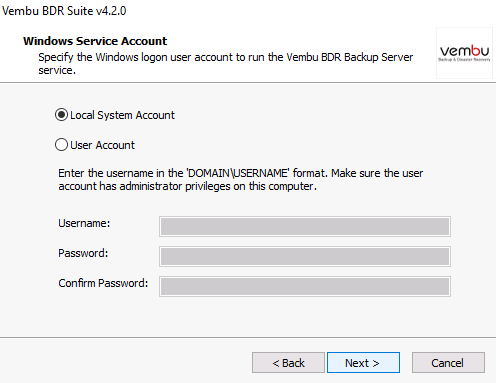
Step 6: Customize Settings - Windows Service Account
In the custom settings, the first step is to specify the Windows logon user account under which the Vembu BDR Backup Server service will run. You can select the local system account or a specific user account that has administrator privileges on the computer where Vembu BDR Backup Server is being installed.
You need to provide the username and password if you want to install it on any specific account.
|
The user name should be in the DOMAIN\USERNAME format. Make sure the specified user account has enough privileges |
Click Next to continue to the next step.
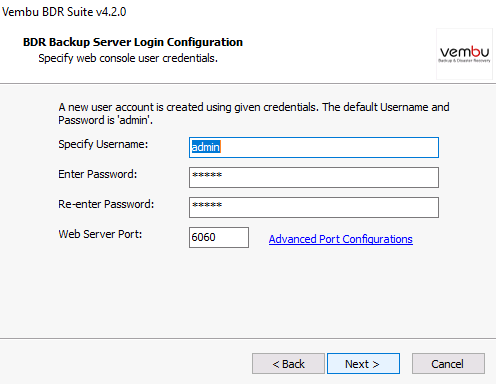
Step 7: Customize Settings - BDR Backup Server Login Configuration
You can customize the web console login and network ports in this step. Specify the user credentials such as username and password to login to the web console of Vembu BDR Backup Server. A new user account is created using the given credentials.
The default Username and Password is ‘admin’. You can click on the text box and edit as you require.
You can also specify the Web Server port on this page. It is a port used by the Web Server of Vembu BDR Backup Server for the web console. The default port is 6060 and it can be modified. Click on Advanced Port Configurations if you want to changes the other network ports
Step 8: Customize Settings - Backup Server Port Configuration
Clicking on Advanced Port Configurations will open a new window that allows you to configure the other network ports such as Backup port, Internal Service Port and, Secure Web Server port. You can edit and configure these network ports as per your requirements.
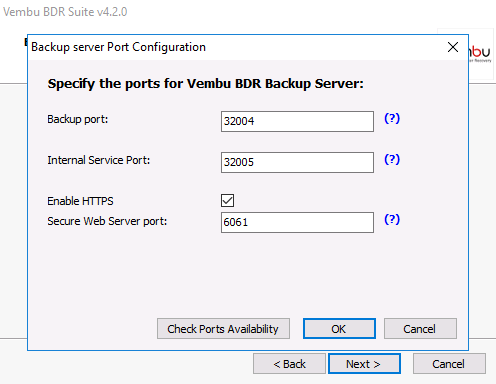
Secure WebServer port: The Port used by the Web Server of Vembu BDR Backup Server for secure connections. The default port is 6061.
Backup port: The port used by Vembu BDR Backup Server to transfer the backup data. The default port is 32004.
Internal Service Port: The port used for internal module communications. The default port is 32005.
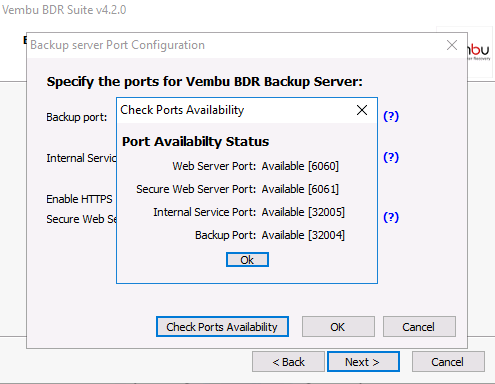
After making changes to the port, you can check the availability of the entered ports by clicking on the Check Ports Availability button. If entered ports are not available, you can edit the ports and check for the availability again.
Click Ok to confirm the port selection and Click Next on the Backup Server Port Configuration window to proceed further.
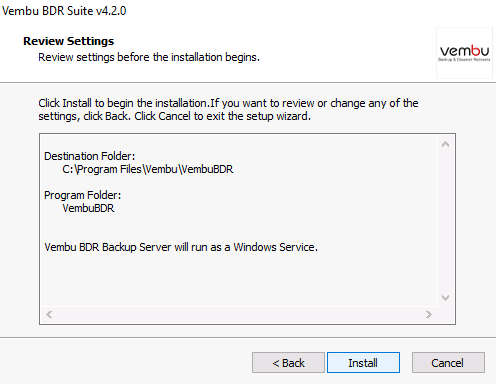
Step 9: Review Settings
Review all the settings you have selected for the installation. If you want to changes any of the backup server settings, you can click Back and change it. If there no changes, click Install to begin the installation of the Vembu BDR Backup server.
Step 10: Installing the necessary components
The setup wizard will start to install the Vembu BDR Backup Server v4.2.0 on your computer. The following components are installed in your machine during this installation process;
- PostgreSQL
- ODBC drivers (32-bit and 64-bit)
- Web Server
- Vembu BDR Backup Server
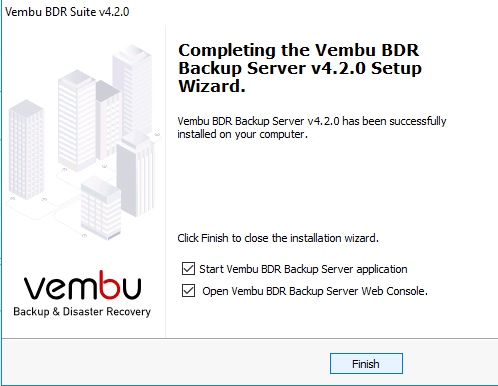
Step 11: Completing Installation
The Vembu BDR Backup Server and its components are successfully installed on your computer. If you would like to start the application immediately or open the web console, you can do it by selecting on the checkboxes given in the setup wizard
After selecting the appropriate option and click Finish to complete the installation process
Step 12: Changing the service account(optional)
By default, BDR Server will be installed as a service and runs under the local system account. So we recommend to provide administrative privileges via Services.msc:
- Navigate to services.msc and right-click over the service "VembuBDR" and click Properties
- Click Log On tab and provide administrator account details
- This will allow BDR Server to run with administrative privileges