Restore from BDRSuite Client GUI
The BDRSuite Client for Applications restores the SharePoint sites that are backed up from the SharePoint Server. The SharePoint Site Collections are restored to a local location and the dump process is performed by SharePoint’s internal Native Dump Utility - STSADM.EXE
Need for SharePoint backup and restore
- When a site collection is deleted in a SharePoint environment (intentionally/accidentally) and if needed for later use.
- When a site-collection is modified and its original/previous state is needed.
- When a redundant copy of business-critical site-collection is required.
- When losing a portal site and in need of re-creating a new one with original site-collections
Restoring SharePoint site collections in Windows involves two major steps
- Restoring SharePoint data from the backup server to a local drive
- Restoring *.dat file to the actual site-collection in a production environment
How it works?
NetworkBackup Client recovers the backed-up data from the backup server to a local drive. By using a few commands in the command prompt, the files can be restored to the same site collection which may be active or deleted. The files can also be restored to a new site collection or to a site collection that is non-existent using the STSADM.EXE tool.
Beginning the Restore
- To begin the restore process, click the Restore tab. From the list of displayed backup(s) select the MS SharePoint backup that is to be restored.
Restoring SharePoint data from the backup server to a local drive
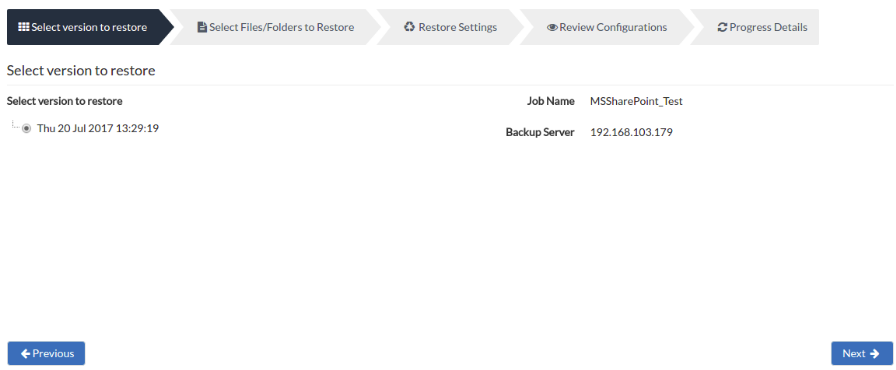
Step 1: Select version to restore
- A tree listing various backup time-stamps with the full backup as its parent node will be displayed. This list generated is based on incremental and retention configured. If an additional full backup is configured, then there will be more than one parent node listed based on the configuration.
- The Job name and Backup Server IP address will be displayed. Verify them before proceeding with your restore. Select the time-stamp from which you want to restore data and proceed to select SharePoint sites. Click Next to proceed to configure the Files/Folders for the restore process.
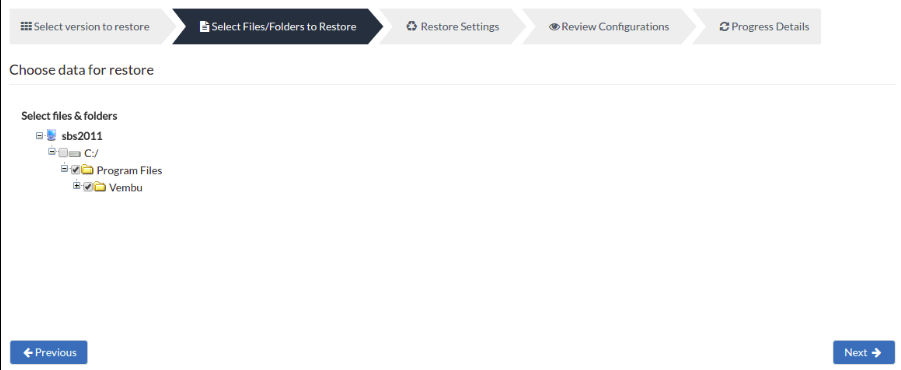
Step 2: Select Files/Folders to Restore
- The next step in the restore process will be to configure the SharePoint files/folders that need to be restored from the displayed tree.
- To configure individual files for restore, select the (+) to expand the folders further and choose the required SharePoint file or SharePoint folder for restore. You can either select the entire backup or select specific SharePoint Sites for restore and proceed by clicking Next.
Step 3: Restore settings
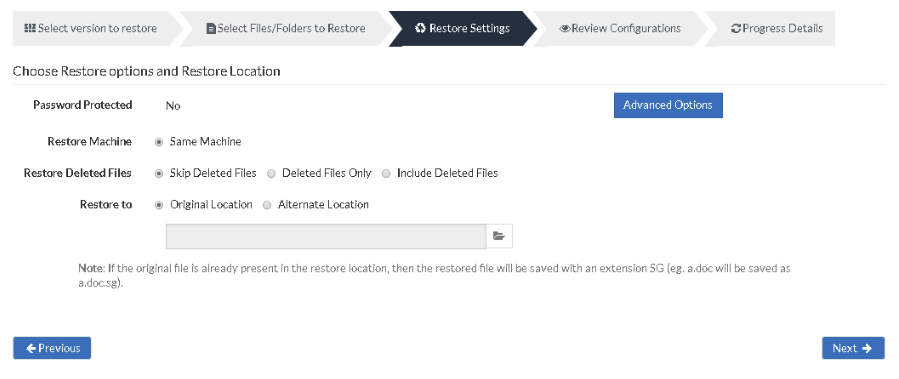
This step has the following options
Password Protected- This option reveals if the backup job that is being restored is encrypted or not. If yes, provide the correct password.
Restore machine- The machine to which the restore is going to happen. By default, this will be chosen as the same machine.
Restore Deleted files- Decide what must be done with the deleted files in a backup schedule:
- Skip deleted files (Restore backup data skipping deleted files) - Choosing this option will not restore the deleted files and skip them instead.
- Deleted files only (Restore deleted files alone) - This option will restore the files that are deleted alone and omit the other backed-up data from the restore process.
- Include deleted files (Restore backup data along with deleted files) - This option will restore the backup data along with the deleted files.
Restore to- Configure the location of the restore: You have two choices to choose from:
- Original location- This will restore data to the backup source location and if the source files(Original files) are present, the restored files will be saved with a *.SG extension.
- Alternate Restore location- This will allow the user to specify an altered location where backup data can be restored.
Advanced Options
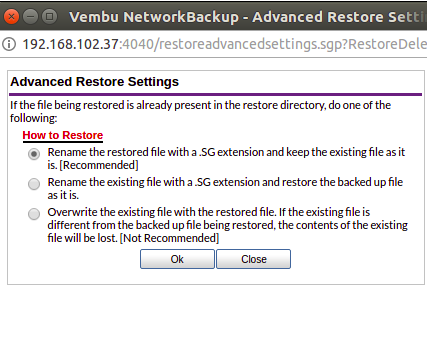
When the backup data is restored, it is possible that source files are already present in restore location. In this case, NetworkBackup Client will retain source files by default and restore files by renaming with a *.SG extension.
Advanced Settings allow alternate options to change this, they are:
- Rename the restored file with *.SG extension and keep existing files (This is the default option selected).
- Rename the existing file with *.SG extension and restore the backup file as it is.
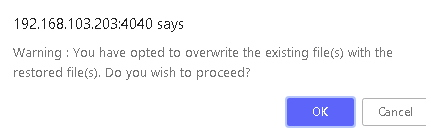
- Overwrite the existing file with the restored file (If the existing file is different from the backed-up file restored, the contents of source files will be lost. Choose this option, if you are sure that the current file can be overwritten). Choosing this option will display the alert shown below.
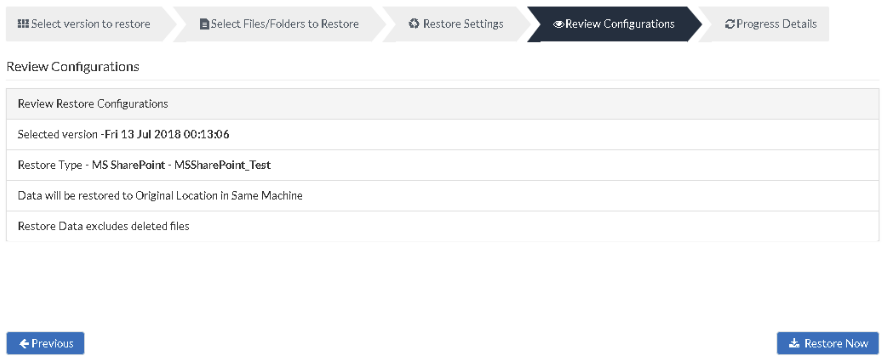
Step 4: Review Configurations
- You can view the status of your MS SharePoint restore from the 'Status' option. Once you click the inverted arrow mark, the page displayed below will be available.
- You can abort your restore if not required from the Abort (-) option available in that window. You will get a pop-up as shown below. Click OK to Abort your restore.
|

- You can suspend your restore if not required from the Suspend option available in that window. You will get a pop-up as shown below. Click Ok to Suspend your restore.
Restored Files
Once restore completes successfully, the restored files will be stored in the following naming pattern:
<Restore_Path>\<Temporary_Dump_Location>\<Backup_Name>\<Portal_Site_Name>\<Site_Collection_Name>\<Site_Collection_Name>.dat
|
- The character colon (:) in the portal site URL will be replaced with "@".
- The Characters \<>/*?"| and space characters in the portal site/site collection will be replaced with an underscore(_). Other characters will remain the same.
- "http://" or "https://" will be removed.
Example
Take portal URL: "http://winserver3:9090"
One of the site collections under it: "http://winserver3:9090/sites/first-No.1site"
Restore path: "C:/Restore"
Backup name: "MyShareBackup"
The restored file will be of the following name:
C:\Restore\MyShareBackup\winserver3@9090\winserver3@9090_sites_first-No.1site\winserver3@9090_sites_first-No.1site.dat
|
Restoring *.dat file to the actual site-collection in a production environment
Step 1- Open Command prompt and Set the path
- Open command prompt and change directory path to the folder where the 'STSADM.exe' tool exists.
Default locations of STSADM tool
For WSS2.0/MOSS2003- "C:\Program Files\Common Files\Microsoft Shared\web server extensions\60\BIN\" folder.
For WSS3.0/MOSS2007- "C:\Program Files\Common Files\Microsoft Shared\web server extensions\12\BIN\" folder.
For MS SharePoint 2010- "C:\Program Files\Common Files\Microsoft Shared\Web Server Extensions\14\BIN\" folder.
Step 2- Restore *.dat to site-collection
The restored ‘*.dat’ file can be restored to a site-collection in two strategies:
|
Restore strategy 1: Restore to the same site-collection which is active or deleted
- Enter the following command in a command prompt:
stsadm.exe -o restore -url <Site_Collection_URL> -filename <Backup_File_Name> -overwrite
Where <Site_collection_URL> is the name of site-collection in which data will be restored.
<Backup_File_Name> is the ‘*.dat’ filename to be restored, provided with its path.

|
- If the site is deleted already, executing the above command will restore the site to the state at which it is backed up.
Restore strategy 2: Restore to a non-existing/new site-collection
- Step 1: Create Site
- Enter following command in command prompt:
stsadm.exe -o createsiteinnewdb -url <New_Site_Collection_URL> -databasename <New_Database_Name> -ownerlogin <Site_Collection_Owner> -owneremail <Email_Of_Site_Collection_Owner>
Where <New_Site_Collection_URL> is the name of site you wish to process restore.
<New_Database_Name> is the new database to be created.
<Site_collection_owner> is the owner for the site collection to be created.
<Email_of_site_collection_owner> is the owner email of site collection.

The above command will create a new site collection in the new database specified.
Step 2: Restore site
Now run following command in command prompt to initiate restore:
stsadm.exe -o restore -url <New_Site_Collection_URL> -filename <Backup_File_Name> -overwrite

|
Example
Assume a portal named ‘P1’ with 3 site collections namely S1, S2 and S3 are backed up. Now the user is trying to restore S1 as S4 to the same portal P1.
This will create duplication of the site collection in the same database and is not permitted. Thus the duplicate entry will be deleted, making the restored site inaccessible.
However, restoring a site collection to the same portal can be done in two ways
- Restore to same site collection ‘S1’(Overwriting).
- Restore to a site collection ‘S4’, but by creating a new database and restoring it to the newly created database.
Limitations
- Restoring default site-collections in WSS2.0/SPS2003 is not permitted and any such attempt is strictly not recommended.
- Restoring SharePoint 'Central Administration' may not bring original the Central Administration's UI and its functionalities.
- Though configured at the server level or as an entire portal site, the backup will only be done at a site collection level. Hence, to restore a portal site, on the whole, each site-collection has to be restored one by one using the STSADM tool.