Restore from BDRSuite Client GUI
To begin the restore process, click the Restore tab. From the list of displayed backup(s) select the MS SQL Server backup that is to be restored.
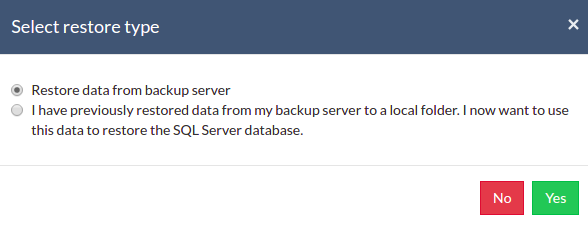
Selecting the Restore Type
- Upon selecting the Restore option, you must decide between two options.
- Restore data from a backup server - This option will proceed to restore data directly from the backup server itself.
- I have previously restored data from my backup server to a local folder. I now want to use this data to restore the MS SQL Server
Restore data from a backup server
- Selecting this option will restore the data from the backup server to the local folder and from there it will be restored to the Exchange Server directly.
I have previously restored data from my backup server to a local folder. I now want to use this data to restore the MS SQL Server
- If you select this option, you have to copy the backup data from the backup server through any USB medium and transfer it to the local folder where your client machine resides. From here, you can use this data to restore to SQL Server data. Provide the location where your restored files exist and click Yes to proceed further in your restore process.
Step 1: Select Database & Version
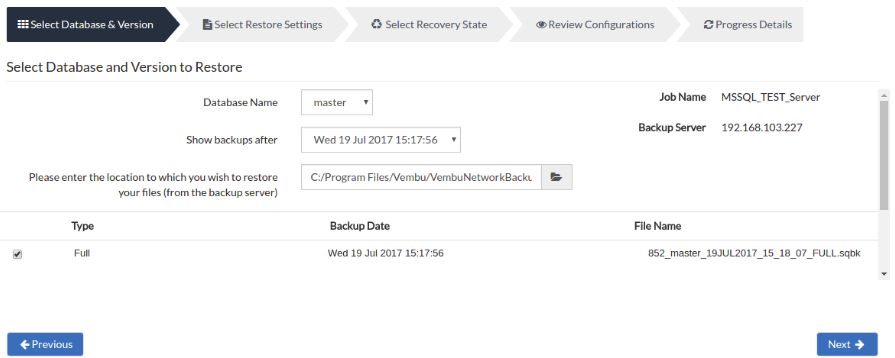
- From the Database Name drop-down list, select the Database Name and the time-stamp version to restore from.
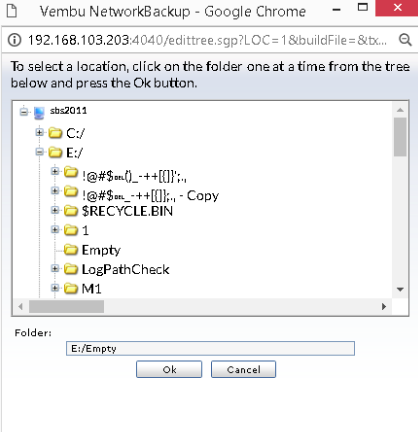
- Configure a location to which you wish you restore your backup data from the backup server. The location which you have configured for the backup dumps will be mentioned in the Folder tab. Click OK to finalize your location.
- Job Name and Backup Server IP address will be displayed. Verify it for correctness. The Backup type whether it is a full/incremental backup will be displayed. Select the checkbox and verify the Backup Date(Day/Date/Month/Year/Time) format and the File Name
- Click Next to proceed to configure your restore settings.
|

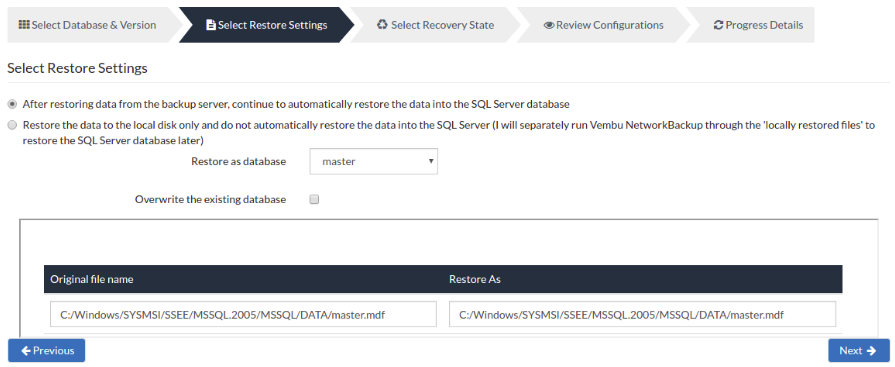
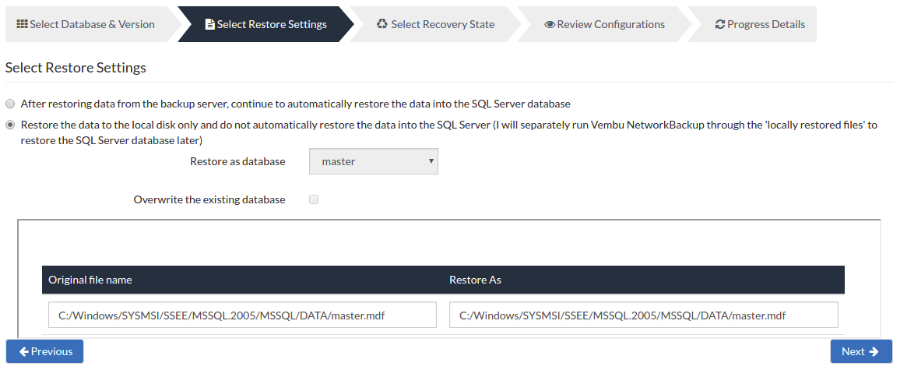
Step 2: Select Restore settings
This option allows two types of restores possible:
- After restoring data from the backup server, continue to auto-restore data into SQL Server Database
- Restore data from the backup server only (I will separately run BDRSuite NetworkBackup through the 'locally restored files' to restore the SQL Server database later).
- After restoring data from the backup server, continue to auto-restore data into the SQL Server Database
- Choosing this option will automatically restore the changed data into the SQL Server Database from the backup server. You have to either overwrite an existing database or restore it as a separate database. If you select to overwrite the existing database, the existing database will be overwritten with the contents that are being restored
- The original database name will be available from the Restore as a database drop-down list. Verify whether you are restoring the correct file and you can either restore it in the same name or provide another name in the box next to it
- Restore as a database - This drop-down list allows you to select an existing database, or if you want to restore to a new database, type in a new database name. For a new database, the database will be created and then the contents of the backup will be restored. For an existing database, the contents of the backup will be restored over the existing database
- Overwrite the existing database - If you are restoring backups and you want to overwrite an existing database with a different name, you must use choose this option. If you are restoring backups to the same database, this option is not required.
- Click Next to continue restoring MS SQL Server data
- Restore data from the backup server only (I will separately run BDRSuite NetworkBackup through the 'locally restored files' to restore the SQL Server database later).
- Choosing this option will restore data in a separate user-defined location (Local) instead of restoring data directly into the SQL Server. You will have to manually restore the backup data into the SQL Server.
- The original file name will be provided, verify whether you are restoring the correct file and you can either restore it in the same name or provide another name in the Restore As tab. Once done choosing restore option, click Next to continue the restore process.
|
Step 3- Select Recovery State
- Databases may be in different modes during the restore process. The Recovery State determines the state of the database after the restore operation. For this purpose, NetworkBackup Client provides you three options wherein you know how you are restoring the database
- RESTORE WITH RECOVERY - The database will be in a ready-to-use state and all the uncommitted transactions will be rolled back.
|
- RESTORE WITH NORECOVERY- The database will be in the non-operational mode and the uncommitted transactions will not be rolled back. In this type, additional transaction logs can be restored.
- RESTORE WITH STANDBY - The database will be in a read-only mode. The committed transactions will be undone but they will be saved in a file so that in the future the recovery effects can be reversed.
- Click Next to proceed to Review Configurations.
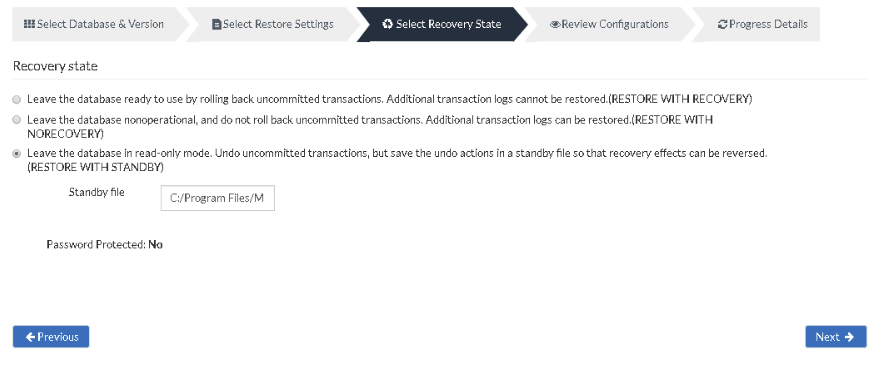
Standby file – A file required by SQL Server to track incomplete transactions if the backup is restored in a standby state. The Standby file is used to undo uncommitted transactions when the database is brought fully online. If the Standby file does not exist, it will be automatically created.
Password protected- This option displays if the backup is password protected or not. In case if it is password-protected, enter the correct password and proceed with the restore.
Step 4: Review Configurations
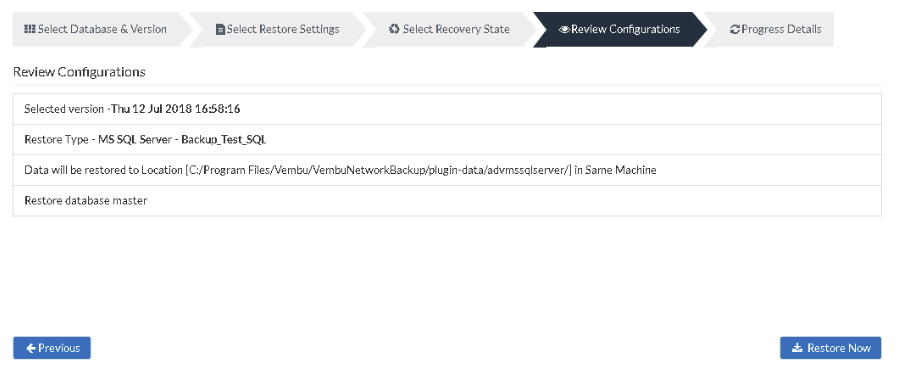
- You have reached the final step of the restore process wherein you have to review the configuration you have provided and click Restore Now option. This will trigger the restore process. Review restore progress and make sure it gets completed successfully.
- You can view the status of the Restore from the Status option. Once you click the inverted arrow mark, the page displayed below will be available.
- You can abort your restore if not required from the Abort (-) option available in that window. You will get a pop up as shown below. Click OK to Abort your restore.
|
- You can suspend your restore if not required from the Suspend option available in that window. You will get a pop up as shown below. Click OK to Suspend your restore.