Restore from BDR Client GUI
You can restore MS Exchange Mailbox data into your Exchange Server directly with NetworkBackup Client. You can restore an individual user or multiple user's data into your Exchange Server. Your data will be restored to a local location after which it will be restored to the Exchange Server without affecting the activities of your Exchange Server at any point.
Prerequisites for Exchange MailBox restore
- Ensure MS Exchange Server is running.
- Ensure that Default Information Store(MailBox Store in first storage group) and user's information store are mounted.
- Instead of choosing an entire MailBox store/public folder, select specific mailboxes to be restored.
|

Beginning the Restore
- To begin the restore process, click the Restore tab. From the list of displayed backup(s) select the MS Exchange Mailbox backup that is to be restored.
Selecting the Restore Type
- Upon selecting the Restore option, you must decide between two options.
- Restore data from the backup server - This option will proceed to restore data directly from the backup server itself.
- I have previously restored data from my backup server to a local folder. I now want to use this data to restore the Exchange Server.
- If the second option is selected for restore, then ensure that:
- Exchange Server backup data was restored from the backup server locally through the menu
- "Select Recovery tab, click on List of backups Actions and choose to Proceed to restore backup" option and transferred to the client machine.
- Exchange Server backup data was restored from the backup server locally through the menu
or
- You had chosen the previous option 'Restore data from the backup server only (I will separately run Vembu NetworkBackup through the 'locally restored files' to restore the Exchange Server later)' in "Step 4: Confirm Exchange Server Restore Settings" of the Restore Exchange Server Data page(during the previous restore).
- Enter the local location for the restore and click Submit Location to restore the data from the local folder.

Step 1: Select version to Restore
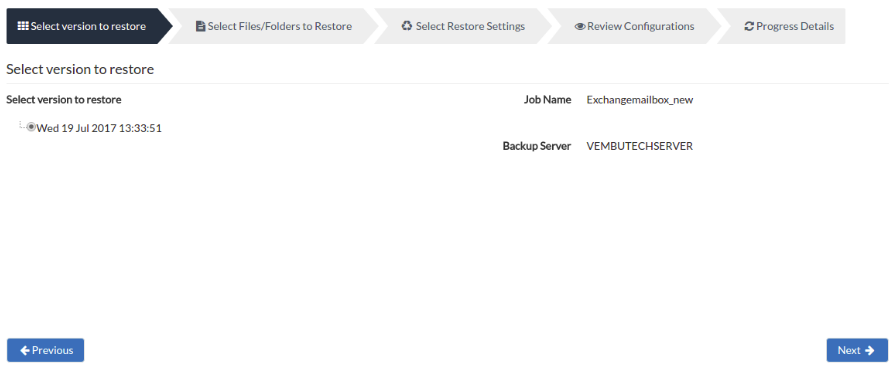
- A tree listing various backup time-stamps with the full backup as its parent node will be displayed. This list generated is based on incremental and retention configured. The Restore version will be in the following format: Day/Date/Month/Year/Hours/Minutes/Seconds. It further has the following options:
- Job name- The name of the backup which you are restoring. It is a non-editable field.
- Backup server-The name of the backup server, it is also a non-editable field. If replication is enabled and the replication server is added/discovered in the client machine, the user can choose the server from drop-box. Click Next to select the files/folders for the restore.
Step 2: Select Files/Folders to Restore
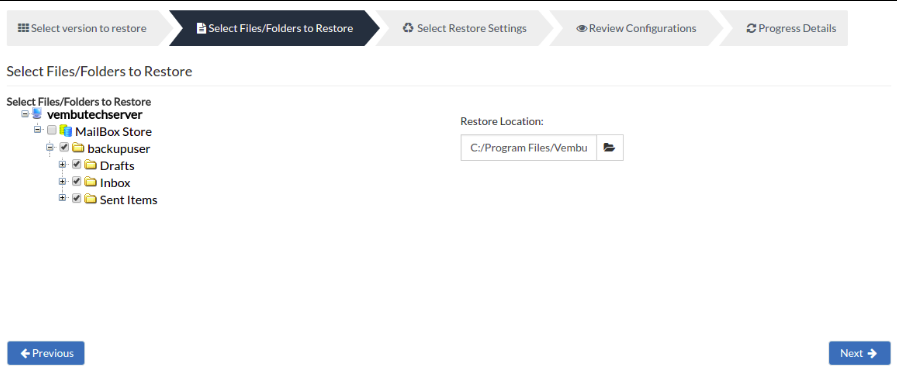
On this page, the Exchange Server will be displayed under which your mailbox files/folders will be available. To configure individual files for restore, select the (+) to expand the folders further and choose the required mailbox file or mailbox folder for restore.
Restore location- Also specify the location to where the restore has to happen. The restored backup will have the original folder structure. Click Next to proceed further with the restore process.
Exchange Server Name- Name of Exchange Server from which backup is configured (and to which data has to be restored).
Step 3: Select Restore settings
This option allows two types of restores possible. They are:
- After restoring data from the backup server, continue to the auto restore data into Exchange Server (This is the default option chosen).
- This option will automatically restore the changes into the Exchange Server without affecting the Exchange Server functionality.
- Restore data from the backup server only and do not auto restore(I will separately restore 'locally restored files' into Exchange Server later).
- When you select this option, you will have to manually restore the changes to Exchange Server, NetworkBackup Client will only restore the data locally from thereon you must carry on. Click Next to proceed with your restore process.

Password Protected- If you had password protected the backup schedule, you will need to provide the password here.
Step 4: Review Configurations
- You have reached the final step of the restore process wherein you have to review the configuration you have provided and click Restore Now option. This will trigger the restore process. Review restore progress and make sure it gets completed successfully.
- You can view the status of the Restore from the 'Status' option. Once you click the inverted arrow mark, the page displayed below will be available.
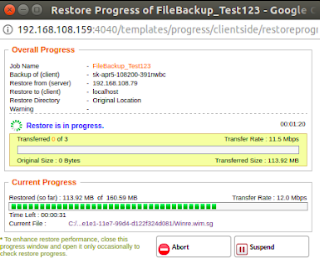
The following details will be available in the Restore Progress Page:
Job Name: Name of the backup job
Backup Of: Client Name
Restore from: From where the restore is happening, either from Client or Server
Restore to: To where the restore is happening.
Restore Directory: The location where the restore is taking place.
Warnings (If any)
Transfer Rate: Speed at which the restore is occurring
Transferred Size: The amount of backup data that is transferred
Original Size: The actual size of the backup data
Time Left: Time remaining for the restore to complete.
Current Progress: The progress of the restore, it will depend on how much data is restored.
- You can abort your restore if not required from the Abort (-) option available in that window. You will get a pop up as shown below. Click OK to Abort your restore.
|
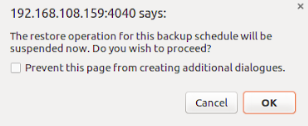
 You can suspend your restore if not required from the Suspend option available in that window. You will get a pop up as shown below. Click OK to Suspend your restore.